⏳️ Loading...
class: title, self-paced Opérer Kubernetes<br/> .nav[*Self-paced version*] .debug[ ``` ``` These slides have been built from commit: b0b1c34 [shared/title.md](https://github.com/jpetazzo/container.training/tree/2026-05-enix/slides/shared/title.md)] --- class: title, in-person Opérer Kubernetes<br/><br/></br> .footnote[ **Slides[:](https://www.youtube.com/watch?v=h16zyxiwDLY) https://2026-05-enix.container.training/** ] <!-- WiFi: **Something**<br/> Password: **Something** **Be kind to the WiFi!**<br/> *Use the 5G network.* *Don't use your hotspot.*<br/> *Don't stream videos or download big files during the workshop*<br/> *Thank you!* --> .debug[[shared/title.md](https://github.com/jpetazzo/container.training/tree/2026-05-enix/slides/shared/title.md)] --- ## Introductions (en 🇫🇷) - Bonjour ! - Sur scène : Jérôme ([@jpetazzo@hachyderm.io]) <!-- - Sur scène lundi+mardi : Jérôme ([@jpetazzo@hachyderm.io]) - Sur scène mercredi+jeudi : Ludovic --> - En backstage : Alexandre, Amy, Antoine, Aurélien (x2), Baptiste, Benjamin, David, Hadrien, Kostas, Louis, Magalie, Nicolas, Paul, Sébastien, Thibault... - Horaires : tous les jours de 9h à 13h - On fera une pause vers (environ) 11h - N'hésitez pas à poser un maximum de questions! - Utilisez [Mattermost](https://training.enix.io/mattermost) pour les questions, demander de l'aide, etc. [@alexbuisine]: https://twitter.com/alexbuisine [EphemeraSearch]: https://ephemerasearch.com/ [@jpetazzo]: https://twitter.com/jpetazzo [@jpetazzo@hachyderm.io]: https://hachyderm.io/@jpetazzo [@s0ulshake]: https://twitter.com/s0ulshake [Quantgene]: https://www.quantgene.com/ .debug[[logistics.md](https://github.com/jpetazzo/container.training/tree/2026-05-enix/slides/logistics.md)] --- ## Les 15 minutes du matin - Chaque jour, on commencera à 9h par une mini-présentation de 15 minutes (sur un sujet choisi ensemble, pas forcément en relation avec la formation!) - L'occasion de s'échauffer les neurones avec 🥐/☕️/🍊 (avant d'attaquer les choses sérieuses) - Puis à 9h15 on rentre dans le vif du sujet .debug[[logistics.md](https://github.com/jpetazzo/container.training/tree/2026-05-enix/slides/logistics.md)] --- ## Travaux pratiques - À la fin de chaque matinée, il y a un exercice pratique concret (pour mettre en œuvre ce qu'on a vu) - Les exercices font partie de la formation ! - Ils sont prévus pour prendre entre 15 minutes et 2 heures (selon les connaissances et l'aisance de chacun·e) - Chaque matinée commencera avec un passage en revue de l'exercice de la veille - On est là pour vous aider si vous bloquez sur un exercice ! .debug[[logistics.md](https://github.com/jpetazzo/container.training/tree/2026-05-enix/slides/logistics.md)] --- ## La hotline - Chaque après-midi : une heure de questions/réponses ouvertes ! (sauf le dernier jour) - Mardi: 15h00-16h00 - Mercredi: 16h00-17h00 - Sur Jitsi (lien "visioconf" sur le portail de formation) .debug[[logistics.md](https://github.com/jpetazzo/container.training/tree/2026-05-enix/slides/logistics.md)] --- ## Chat room - We've set up a chat room that we will monitor during the workshop - Don't hesitate to use it to ask questions, or get help, or share feedback - The chat room will also be available after the workshop - Join the chat room: [Mattermost](https://training.enix.io/mattermost) - Say hi in the chat room! .debug[[shared/chat-room-im.md](https://github.com/jpetazzo/container.training/tree/2026-05-enix/slides/shared/chat-room-im.md)] --- ## Pre-requirements - Familiarity with the UNIX command-line (navigating directories, editing files, using `kubectl`) - Hands-on experience working with containers (building images, running them; doesn't matter how exactly) - Kubernetes concepts (pods, deployments, services, labels, selectors) - Ideally, you already have access to a Kubernetes cluster (even if it's just a local one with KinD, minikube, etc.) .debug[[k8s/prereqs-advanced.md](https://github.com/jpetazzo/container.training/tree/2026-05-enix/slides/k8s/prereqs-advanced.md)] --- ## Accessing these slides now - We recommend that you open these slides in your browser: https://2026-05-enix.container.training/ - This is a public URL, you're welcome to share it with others! - Use arrows to move to next/previous slide (up, down, left, right, page up, page down) - Type a slide number + ENTER to go to that slide - The slide number is also visible in the URL bar (e.g. .../#123 for slide 123) .debug[[shared/about-slides.md](https://github.com/jpetazzo/container.training/tree/2026-05-enix/slides/shared/about-slides.md)] --- ## These slides are open source - The sources of these slides are available in a public GitHub repository: https://github.com/jpetazzo/container.training - These slides are written in Markdown - You are welcome to share, re-use, re-mix these slides - Typos? Mistakes? Questions? Feel free to hover over the bottom of the slide ... .footnote[👇 Try it! The source file will be shown and you can view it on GitHub and fork and edit it.] <!-- .lab[ ```open https://github.com/jpetazzo/container.training/tree/master/slides/common/about-slides.md``` ] --> .debug[[shared/about-slides.md](https://github.com/jpetazzo/container.training/tree/2026-05-enix/slides/shared/about-slides.md)] --- ## Accessing these slides later - Slides will remain online so you can review them later if needed (let's say we'll keep them online at least 1 year, how about that?) - You can download the slides using this URL: https://2026-05-enix.container.training/slides.zip (then open the file `5.yml.html`) - You can also generate a PDF of the slides (by printing them to a file; but be patient with your browser!) .debug[[shared/about-slides.md](https://github.com/jpetazzo/container.training/tree/2026-05-enix/slides/shared/about-slides.md)] --- ## These slides are constantly updated - They are maintained by [Jérôme Petazzoni](https://hachyderm.io/@jpetazzo/) and [multiple contributors](https://github.com/jpetazzo/container.training/graphs/contributors) - Feel free to check the GitHub repository for updates: https://github.com/jpetazzo/container.training - Look for branches named YYYY-MM-... - You can also find specific decks and other resources on: https://container.training/ .debug[[shared/about-slides.md](https://github.com/jpetazzo/container.training/tree/2026-05-enix/slides/shared/about-slides.md)] --- class: extra-details ## Extra details - This slide has a little magnifying glass in the top left corner - This magnifying glass indicates slides that provide extra details - Feel free to skip them if: - you are in a hurry - you are new to this and want to avoid cognitive overload - you want only the most essential information - You can review these slides another time if you want, they'll be waiting for you ☺ .debug[[shared/about-slides.md](https://github.com/jpetazzo/container.training/tree/2026-05-enix/slides/shared/about-slides.md)] --- ## Slides ≠ documentation - We tried to include a lot of information in these slides - But they don't replace or compete with the documentation! - Treat these slides as yet another pillar to support your learning experience - Don't hesitate to frequently read the documentations ([Docker documentation][docker-docs], [Kubernetes documentation][k8s-docs]) - And online communities (e.g.: [Docker forums][docker-forums], [Docker on StackOverflow][docker-so], [Kubernetes on StackOverflow][k8s-so]) [docker-docs]: https://docs.docker.com/ [k8s-docs]: https://kubernetes.io/docs/ [docker-forums]: https://forums.docker.com/ [docker-so]: http://stackoverflow.com/questions/tagged/docker [k8s-so]: http://stackoverflow.com/questions/tagged/kubernetes .debug[[shared/about-slides.md](https://github.com/jpetazzo/container.training/tree/2026-05-enix/slides/shared/about-slides.md)] --- class: title *Tell me and I forget.* <br/> *Teach me and I remember.* <br/> *Involve me and I learn.* Misattributed to Benjamin Franklin [(Probably inspired by Chinese Confucian philosopher Xunzi)](https://www.barrypopik.com/index.php/new_york_city/entry/tell_me_and_i_forget_teach_me_and_i_may_remember_involve_me_and_i_will_lear/) .debug[[shared/handson.md](https://github.com/jpetazzo/container.training/tree/2026-05-enix/slides/shared/handson.md)] --- ## Hands-on, you shall practice - Nobody ever became a Jedi by spending their lives reading Wookiepedia - Someone can: - read all the docs - watch all the videos - attend all the workshops and live classes - ...This won't be enough to become an expert! - We think one needs to *put the concepts in practice* to truly memorize them - But, how? .debug[[shared/handson.md](https://github.com/jpetazzo/container.training/tree/2026-05-enix/slides/shared/handson.md)] --- ## Hands-on labs - These slides include *tons* of demos, examples, and exercises - Don't follow along passively; try to reproduce the demos and examples! - Each time you see a gray rectangle like this, it indicates a demo or example .lab[ - This is a command that we're gonna run: ```bash echo hello world ``` ] - Don't hesitate to try them in your environment - Don't hesitate to improvise, deviate from the script... And see what happens! .debug[[shared/handson.md](https://github.com/jpetazzo/container.training/tree/2026-05-enix/slides/shared/handson.md)] --- ## Where are we going to run our containers? .debug[[k8s/labs-live.md](https://github.com/jpetazzo/container.training/tree/2026-05-enix/slides/k8s/labs-live.md)] --- class: pic  .debug[[k8s/labs-live.md](https://github.com/jpetazzo/container.training/tree/2026-05-enix/slides/k8s/labs-live.md)] --- ## If you're attending a live class - Each person gets a private lab environment (depending on the scenario, this will be one VM, one cluster, multiple clusters...) - The instructor will tell you how to connect to your environment - Your lab environments will be available for the duration of the workshop (check with your instructor to know exactly when they'll be shutdown) .debug[[k8s/labs-live.md](https://github.com/jpetazzo/container.training/tree/2026-05-enix/slides/k8s/labs-live.md)] --- ## Why don't we run containers locally? - Setting up a local Kubernetes cluster can take time (and the procedure can differ from one system to another) - On some systems, it might be impossible (due to restrictive IT policies, lack of hardware support...) - Some labs require a "real" cluster (e.g. multiple nodes to demonstrate failover, placement policies...) - For on-site classes, it can stress the local network *"The whole team downloaded all these container images from the WiFi! <br/>... and it went great!"* (Literally no-one ever) .debug[[k8s/labs-live.md](https://github.com/jpetazzo/container.training/tree/2026-05-enix/slides/k8s/labs-live.md)] --- ## Connecting to our lab environment - We need an SSH client - On Linux, OS X, FreeBSD... you are probably all set; just use `ssh` - On Windows, get one of these: - [putty](https://putty.software/) - Microsoft [Win32 OpenSSH](https://github.com/PowerShell/Win32-OpenSSH/wiki/Install-Win32-OpenSSH) - [Git BASH](https://git-for-windows.github.io/) - [MobaXterm](http://mobaxterm.mobatek.net/) - On Android, [JuiceSSH](https://juicessh.com/) ([Play Store](https://play.google.com/store/apps/details?id=com.sonelli.juicessh)) works pretty well .debug[[shared/connecting.md](https://github.com/jpetazzo/container.training/tree/2026-05-enix/slides/shared/connecting.md)] --- ## Testing the connection - Your instructor will tell you where to find the IP address, login, and password .lab[ - Connect to your lab environment with your SSH client: ```bash ssh `user`@`A.B.C.D` ssh -p `32323` `user`@`A.B.C.D` ``` (Make sure to replace the highlighted values with the ones provided to you!) <!-- ```bash for N in $(awk '/\Wnode/{print $2}' /etc/hosts); do ssh -o StrictHostKeyChecking=no $N true done ``` ```bash ### FIXME find a way to reset the cluster, maybe? ``` --> ] You should see a prompt looking like this: ``` [A.B.C.D] (...) user@machine ~ $ ``` .debug[[shared/connecting.md](https://github.com/jpetazzo/container.training/tree/2026-05-enix/slides/shared/connecting.md)] --- ## Checking the lab environment In Docker classes, run `docker version`. The output should look like this: .small[ ```bash Client: Version: 29.1.1 API version: 1.52 Go version: go1.25.4 X:nodwarf5 Git commit: 0aedba58c2 Built: Fri Nov 28 14:28:26 2025 OS/Arch: linux/amd64 Context: default Server: Engine: Version: 29.1.1 API version: 1.52 (minimum version 1.44) Go version: go1.25.4 X:nodwarf5 Git commit: 9a84135d52 Built: Fri Nov 28 14:28:26 2025 OS/Arch: linux/amd64 Experimental: false ... ``` ] .debug[[shared/connecting.md](https://github.com/jpetazzo/container.training/tree/2026-05-enix/slides/shared/connecting.md)] --- ## Checking the lab environment In Kubernetes classes, run `kubectl get nodes`. The output should look like this: ```bash $ k get nodes NAME STATUS ROLES AGE VERSION node1 Ready control-plane 7d6h v1.34.0 node2 Ready <none> 7d6h v1.34.0 node3 Ready <none> 7d6h v1.34.0 node4 Ready <none> 7d6h v1.34.0 ``` .debug[[shared/connecting.md](https://github.com/jpetazzo/container.training/tree/2026-05-enix/slides/shared/connecting.md)] --- ## If it doesn't work... Ask an instructor or assistant to help you! .debug[[shared/connecting.md](https://github.com/jpetazzo/container.training/tree/2026-05-enix/slides/shared/connecting.md)] --- ## `tailhist` - The shell history of the instructor is available online in real time - The instructor will share a special URL with you (typically, the instructor's lab address on port 1088 or 30088) - Open that URL in your browser and you should see the history - The history is updated in real time (using a WebSocket connection) - It should be green when the WebSocket is connected (if it turns red, reloading the page should fix it) .debug[[shared/connecting.md](https://github.com/jpetazzo/container.training/tree/2026-05-enix/slides/shared/connecting.md)] --- ## Terminals Once in a while, the instructions will say: <br/>"Open a new terminal." There are multiple ways to do this: - create a new window or tab on your machine, and SSH into the VM; - use screen or tmux on the VM and open a new window from there. You are welcome to use the method that you feel the most comfortable with. .debug[[shared/connecting.md](https://github.com/jpetazzo/container.training/tree/2026-05-enix/slides/shared/connecting.md)] --- ## Tmux cheat sheet (basic) [Tmux](https://en.wikipedia.org/wiki/Tmux) is a terminal multiplexer like `screen`. *You don't have to use it or even know about it to follow along. <br/> But some of us like to use it to switch between terminals. <br/> It has been preinstalled on your workshop nodes.* - You can start a new session with `tmux` <br/> (or resume or share an existing session with `tmux attach`) - Then use these keyboard shortcuts: - Ctrl-b c → creates a new window - Ctrl-b n → go to next window - Ctrl-b p → go to previous window - Ctrl-b " → split window top/bottom - Ctrl-b % → split window left/right - Ctrl-b arrows → navigate within split windows .debug[[shared/connecting.md](https://github.com/jpetazzo/container.training/tree/2026-05-enix/slides/shared/connecting.md)] --- ## Tmux cheat sheet (advanced) - Ctrl-b d → detach session <br/> (resume it later with `tmux attach`) - Ctrl-b Alt-1 → rearrange windows in columns - Ctrl-b Alt-2 → rearrange windows in rows - Ctrl-b , → rename window - Ctrl-b Ctrl-o → cycle pane position (e.g. switch top/bottom) - Ctrl-b PageUp → enter scrollback mode <br/> (use PageUp/PageDown to scroll; Ctrl-c or Enter to exit scrollback) .debug[[shared/connecting.md](https://github.com/jpetazzo/container.training/tree/2026-05-enix/slides/shared/connecting.md)] --- ## Running your own lab environments - To practice outside of live classes, you will need your own cluster - We'll give you 4 possibilities, depending on your goals: - level 0 (no installation required) - level 1 (local development cluster) - level 2 (cluster with multiple nodes) - level 3 ("real" cluster with all the bells and whistles) .debug[[k8s/labs-async.md](https://github.com/jpetazzo/container.training/tree/2026-05-enix/slides/k8s/labs-async.md)] --- ## Level 0 - Use a free, cloud-based, environment - Pros: free, and nothing to install locally - Cons: lots of limitations - requires online access - resources (CPU, RAM, disk) are limited - provides a single-node cluster - by default, only available through the online IDE <br/>(extra steps required to use local tools and IDE) - networking stack is different from a normal cluster - cluster might be automatically destroyed once in a while .debug[[k8s/labs-async.md](https://github.com/jpetazzo/container.training/tree/2026-05-enix/slides/k8s/labs-async.md)] --- ## When is it a good match? - Great for your first steps with Kubernetes - Convenient for "bite-sized" learning (a few minutes at a time without spending time on installs and setup) - Not-so-great beyond your first steps - We recommend to "level up" to a local cluster ASAP! .debug[[k8s/labs-async.md](https://github.com/jpetazzo/container.training/tree/2026-05-enix/slides/k8s/labs-async.md)] --- ## How to obtain it - We prepared a "Dev container configuration" (that you can use with GitHub Codespaces) - This requires a GitHub account (no credit card or personal information is needed, though) - Option 1: [follow that link][codespaces] - Option 2: go to [this repo][repo], click on `<> Code v` and `Create codespace on main` .debug[[k8s/labs-async.md](https://github.com/jpetazzo/container.training/tree/2026-05-enix/slides/k8s/labs-async.md)] --- ## Level 1 - Install a local Kubernetes dev cluster - Pros: free, can work with local tools - Cons: - usually, you get a one-node cluster <br/>(but some tools let you create multiple nodes) - resources can be limited <br/>(depends on how much CPU/RAM you have on your machine) - cluster is on a private network <br/>(not great for labs involving load balancers, ingress controllers...) - support for persistent volumes might be limited <br/>(or non-existent) .debug[[k8s/labs-async.md](https://github.com/jpetazzo/container.training/tree/2026-05-enix/slides/k8s/labs-async.md)] --- ## When is it a good match? - Ideal for most classes and labs (from basic to advanced) - Notable exceptions: - when you need multiple "real" nodes <br/>(e.g. resource scheduling, cluster autoscaling...) - when you want to expose things to the outside world <br/>(e.g. ingress, gateway API, cert-manager...) - Very easy to reset the environment to a clean slate - Great way to prepare a lab or demo before executing it on a "real" cluster .debug[[k8s/labs-async.md](https://github.com/jpetazzo/container.training/tree/2026-05-enix/slides/k8s/labs-async.md)] --- ## How to obtain it - There are many options available to run local Kubernetes clusters! - If you already have Docker up and running: *check [KinD] or [k3d]* - Otherwise: *check [Docker Desktop][docker-desktop] or [Rancher Desktop][rancher-desktop]* - There are also other options; this is just a shortlist! [KinD]: https://kind.sigs.k8s.io/ [k3d]:https://k3d.io/ [docker-desktop]: https://docs.docker.com/desktop/use-desktop/kubernetes/ [rancher-desktop]: https://docs.rancherdesktop.io/ui/preferences/kubernetes/ .debug[[k8s/labs-async.md](https://github.com/jpetazzo/container.training/tree/2026-05-enix/slides/k8s/labs-async.md)] --- ## Level 2 - Install a Kubernetes cluster on a few machines (physical machines, virtual machines, cloud, on-premises...) - Pros: - very flexible; works almost anywhere (cloud VMs, home lab...) - can even run "real" applications (serving real traffic) - Cons: - typically costs some money (hardware investment or cloud costs) - still missing a few things compared to a "real" cluster <br/>(cloud controller manager, storage class, control plane high availability...) .debug[[k8s/labs-async.md](https://github.com/jpetazzo/container.training/tree/2026-05-enix/slides/k8s/labs-async.md)] --- ## When is it a good match? - If you already have a "home lab" or a lab at work (because the machines already exist) - If you want more visibility and/or control: - enable alpha/experimental options and features - start, stop, view logs... of individual components - If you want multiple nodes to experiment with scheduling, autoscaling... - To host applications that remain available when your laptop is offline :) .debug[[k8s/labs-async.md](https://github.com/jpetazzo/container.training/tree/2026-05-enix/slides/k8s/labs-async.md)] --- ## How to obtain it - Option 1: *provision a few machines; [install `kubeadm`][kubeadm]; use `kubeadm` to install cluster* - Option 2: *use [`labctl`][labctl] to automate the previous steps* *(labctl supports [10+ public and private cloud platforms][labctl-vms])* - Option 3: *use the Kubernetes distro of your choice!* .debug[[k8s/labs-async.md](https://github.com/jpetazzo/container.training/tree/2026-05-enix/slides/k8s/labs-async.md)] --- ## Level 3 - Use a managed Kubernetes cluster - Pros: - it's the real deal! - Cons: - recurring cloud costs .debug[[k8s/labs-async.md](https://github.com/jpetazzo/container.training/tree/2026-05-enix/slides/k8s/labs-async.md)] --- ## When is it a good match? - If you want a highly-available cluster and control plane - To have all the cloud features (`LoadBalancer` services, `StorageClass` for stateful apps, cluster autoscaling...) - To host your first production stacks .debug[[k8s/labs-async.md](https://github.com/jpetazzo/container.training/tree/2026-05-enix/slides/k8s/labs-async.md)] --- ## How to obtain it - Option 1: *use the CLI / Web UI / Terraform... for your cloud provider* - Option 2: *use [`labctl`][labctl] to provision a cluster with Terraform/OpenTofu* .debug[[k8s/labs-async.md](https://github.com/jpetazzo/container.training/tree/2026-05-enix/slides/k8s/labs-async.md)] --- ## What's `labctl`? - `labctl` is the tool that we use to provision virtual machines and clusters for live classes - It can create and configure hundreds of VMs and clusters in a few minutes - It supports 10+ cloud providers - It's very useful if you need to provision many clusters (e.g. to run your own workshop with your team!) - It can also be used to provision a single cluster quickly (for testing or educational purposes) - Its Terraform configurations can also be useful on their own (e.g. as a base when building your own infra-as-code) .debug[[k8s/labs-async.md](https://github.com/jpetazzo/container.training/tree/2026-05-enix/slides/k8s/labs-async.md)] --- ## Our Kubernetes toolbox - We're going to use a lot of different tools (kubectl, stern, helm, k9s, krew, and many more) - We suggest that you install them progressively (when we introduce them, if you think they'll be useful to you!) - We have also prepared a container image: [jpetazzo/shpod] - `shpod` contains 30+ Docker and Kubernetes tools (along with shell customizations like prompt, completion...) - You can use it to work with your Kubernetes clusters - It can also be used as an SSH server if needed [codespaces]: https://github.com/codespaces/new?hide_repo_select=true&ref=main&repo=37004081&skip_quickstart=true [repo]: https://github.com/jpetazzo/container.training [kubeadm]: https://kubernetes.io/docs/reference/setup-tools/kubeadm/ [labctl]: https://github.com/jpetazzo/container.training/tree/main/prepare-labs [labctl-vms]: https://github.com/jpetazzo/container.training/tree/main/prepare-labs/terraform/virtual-machines [jpetazzo/shpod]: https://github.com/jpetazzo/shpod .debug[[k8s/labs-async.md](https://github.com/jpetazzo/container.training/tree/2026-05-enix/slides/k8s/labs-async.md)] --- name: toc-part-1 ## Part 1 - [Kubernetes architecture](#toc-kubernetes-architecture) - [The Kubernetes API](#toc-the-kubernetes-api) - [Other control plane components](#toc-other-control-plane-components) - [Building our own cluster (easy)](#toc-building-our-own-cluster-easy) - [Building our own cluster (medium)](#toc-building-our-own-cluster-medium) - [Generating user certificates](#toc-generating-user-certificates) - [Securing the control plane](#toc-securing-the-control-plane) - [Static pods](#toc-static-pods) - [Exercise — enable auth](#toc-exercise--enable-auth) - [Exercise — networking](#toc-exercise--networking) - [Exercise — static pods](#toc-exercise--static-pods) .debug[(auto-generated TOC)] --- name: toc-part-2 ## Part 2 - [Building our own cluster (hard)](#toc-building-our-own-cluster-hard) - [API server availability](#toc-api-server-availability) - [CNI internals](#toc-cni-internals) - [The CSR API](#toc-the-csr-api) - [OpenID Connect](#toc-openid-connect) - [Restricting Pod Permissions](#toc-restricting-pod-permissions) - [Pod Security Policies](#toc-pod-security-policies) - [Pod Security Admission](#toc-pod-security-admission) - [Upgrading clusters](#toc-upgrading-clusters) - [Backing up clusters](#toc-backing-up-clusters) .debug[(auto-generated TOC)] .debug[[shared/toc.md](https://github.com/jpetazzo/container.training/tree/2026-05-enix/slides/shared/toc.md)] --- ## Pre-requirements - Familiarity with the UNIX command-line (navigating directories, editing files, using `kubectl`) - Hands-on experience working with containers (building images, running them; doesn't matter how exactly) - Kubernetes concepts (pods, deployments, services, labels, selectors) - Ideally, you already have access to a Kubernetes cluster (even if it's just a local one with KinD, minikube, etc.) .debug[[k8s/prereqs-advanced.md](https://github.com/jpetazzo/container.training/tree/2026-05-enix/slides/k8s/prereqs-advanced.md)] --- class: title *Tell me and I forget.* <br/> *Teach me and I remember.* <br/> *Involve me and I learn.* Misattributed to Benjamin Franklin [(Probably inspired by Chinese Confucian philosopher Xunzi)](https://www.barrypopik.com/index.php/new_york_city/entry/tell_me_and_i_forget_teach_me_and_i_may_remember_involve_me_and_i_will_lear/) .debug[[shared/handson.md](https://github.com/jpetazzo/container.training/tree/2026-05-enix/slides/shared/handson.md)] --- ## Hands-on, you shall practice - Nobody ever became a Jedi by spending their lives reading Wookiepedia - Someone can: - read all the docs - watch all the videos - attend all the workshops and live classes - ...This won't be enough to become an expert! - We think one needs to *put the concepts in practice* to truly memorize them - But, how? .debug[[shared/handson.md](https://github.com/jpetazzo/container.training/tree/2026-05-enix/slides/shared/handson.md)] --- ## Hands-on labs - These slides include *tons* of demos, examples, and exercises - Don't follow along passively; try to reproduce the demos and examples! - Each time you see a gray rectangle like this, it indicates a demo or example .lab[ - This is a command that we're gonna run: ```bash echo hello world ``` ] - Don't hesitate to try them in your environment - Don't hesitate to improvise, deviate from the script... And see what happens! .debug[[shared/handson.md](https://github.com/jpetazzo/container.training/tree/2026-05-enix/slides/shared/handson.md)] --- class: pic .interstitial[] --- name: toc-kubernetes-architecture class: title Kubernetes architecture .nav[ [Previous part](#toc-) | [Back to table of contents](#toc-part-1) | [Next part](#toc-the-kubernetes-api) ] .debug[(automatically generated title slide)] --- # Kubernetes architecture We can arbitrarily split Kubernetes in two parts: - the *nodes*, a set of machines that run our containerized workloads; - the *control plane*, a set of processes implementing the Kubernetes APIs. Kubernetes also relies on underlying infrastructure: - servers, network connectivity (obviously!), - optional components like storage systems, load balancers ... .debug[[k8s/architecture.md](https://github.com/jpetazzo/container.training/tree/2026-05-enix/slides/k8s/architecture.md)] --- class: pic 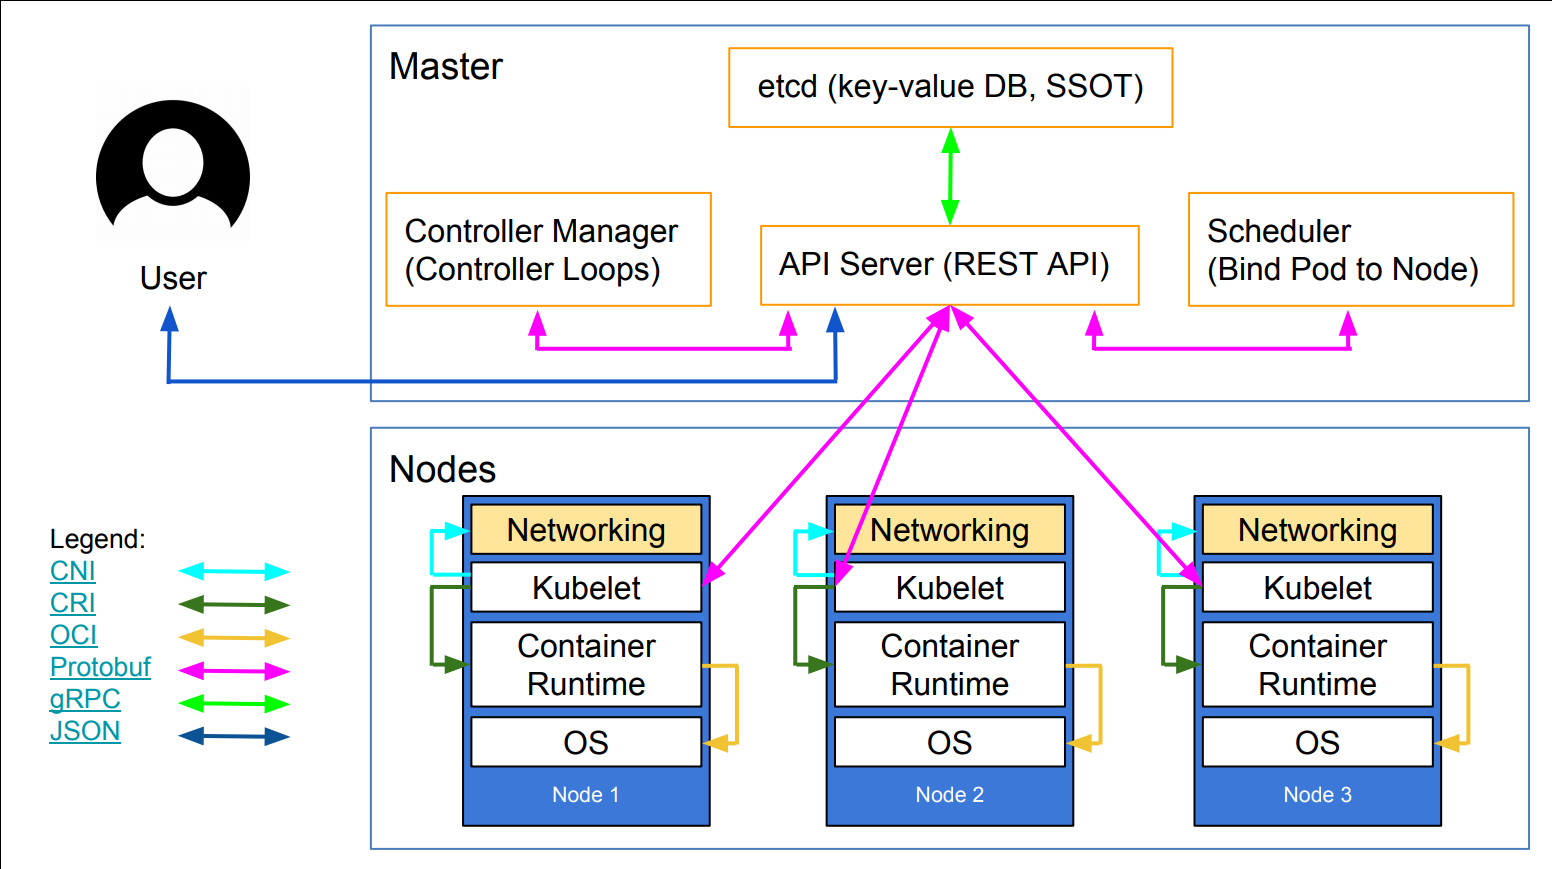 .debug[[k8s/architecture.md](https://github.com/jpetazzo/container.training/tree/2026-05-enix/slides/k8s/architecture.md)] --- ## What runs on a node - Our containerized workloads - A container engine like Docker, CRI-O, containerd... (in theory, the choice doesn't matter, as the engine is abstracted by Kubernetes) - kubelet: an agent connecting the node to the cluster (it connects to the API server, registers the node, receives instructions) - kube-proxy: a component used for internal cluster communication (note that this is *not* an overlay network or a CNI plugin!) .debug[[k8s/architecture.md](https://github.com/jpetazzo/container.training/tree/2026-05-enix/slides/k8s/architecture.md)] --- ## What's in the control plane - Everything is stored in etcd (it's the only stateful component) - Everyone communicates exclusively through the API server: - we (users) interact with the cluster through the API server - the nodes register and get their instructions through the API server - the other control plane components also register with the API server - API server is the only component that reads/writes from/to etcd .debug[[k8s/architecture.md](https://github.com/jpetazzo/container.training/tree/2026-05-enix/slides/k8s/architecture.md)] --- ## Communication protocols: API server - The API server exposes a REST API (except for some calls, e.g. to attach interactively to a container) - Almost all requests and responses are JSON following a strict format - For performance, the requests and responses can also be done over protobuf (see this [design proposal](https://github.com/kubernetes/community/blob/master/contributors/design-proposals/api-machinery/protobuf.md) for details) - In practice, protobuf is used for all internal communication (between control plane components, and with kubelet) .debug[[k8s/architecture.md](https://github.com/jpetazzo/container.training/tree/2026-05-enix/slides/k8s/architecture.md)] --- ## Communication protocols: on the nodes The kubelet agent uses a number of special-purpose protocols and interfaces, including: - CRI (Container Runtime Interface) - used for communication with the container engine - abstracts the differences between container engines - based on gRPC+protobuf - [CNI (Container Network Interface)](https://github.com/containernetworking/cni/blob/master/SPEC.md) - used for communication with network plugins - network plugins are implemented as executable programs invoked by kubelet - network plugins provide IPAM - network plugins set up network interfaces in pods .debug[[k8s/architecture.md](https://github.com/jpetazzo/container.training/tree/2026-05-enix/slides/k8s/architecture.md)] --- ## Control plane location The control plane can run: - in containers, on the same nodes that run other application workloads (default behavior for local clusters like [Minikube](https://github.com/kubernetes/minikube), [kind](https://kind.sigs.k8s.io/)...) - on a dedicated node (default behavior when deploying with kubeadm) - on a dedicated set of nodes ([Kubernetes The Hard Way](https://github.com/kelseyhightower/kubernetes-the-hard-way); [kops](https://github.com/kubernetes/kops); also kubeadm) - outside of the cluster (most managed clusters like AKS, DOK, EKS, GKE, Kapsule, LKE, OKE...) .debug[[k8s/architecture.md](https://github.com/jpetazzo/container.training/tree/2026-05-enix/slides/k8s/architecture.md)] --- class: pic  .debug[[k8s/architecture.md](https://github.com/jpetazzo/container.training/tree/2026-05-enix/slides/k8s/architecture.md)] --- class: pic  .debug[[k8s/architecture.md](https://github.com/jpetazzo/container.training/tree/2026-05-enix/slides/k8s/architecture.md)] --- class: pic  .debug[[k8s/architecture.md](https://github.com/jpetazzo/container.training/tree/2026-05-enix/slides/k8s/architecture.md)] --- class: pic  .debug[[k8s/architecture.md](https://github.com/jpetazzo/container.training/tree/2026-05-enix/slides/k8s/architecture.md)] --- class: pic  .debug[[k8s/architecture.md](https://github.com/jpetazzo/container.training/tree/2026-05-enix/slides/k8s/architecture.md)] --- class: pic  .debug[[k8s/architecture.md](https://github.com/jpetazzo/container.training/tree/2026-05-enix/slides/k8s/architecture.md)] --- class: pic  .debug[[k8s/architecture.md](https://github.com/jpetazzo/container.training/tree/2026-05-enix/slides/k8s/architecture.md)] --- class: pic .interstitial[] --- name: toc-the-kubernetes-api class: title The Kubernetes API .nav[ [Previous part](#toc-kubernetes-architecture) | [Back to table of contents](#toc-part-1) | [Next part](#toc-other-control-plane-components) ] .debug[(automatically generated title slide)] --- # The Kubernetes API [ *The Kubernetes API server is a "dumb server" which offers storage, versioning, validation, update, and watch semantics on API resources.* ]( https://github.com/kubernetes/community/blob/master/contributors/design-proposals/api-machinery/protobuf.md#proposal-and-motivation ) ([Clayton Coleman](https://twitter.com/smarterclayton), Kubernetes Architect and Maintainer) What does that mean? .debug[[k8s/architecture.md](https://github.com/jpetazzo/container.training/tree/2026-05-enix/slides/k8s/architecture.md)] --- ## The Kubernetes API is declarative - We cannot tell the API, "run a pod" - We can tell the API, "here is the definition for pod X" - The API server will store that definition (in etcd) - *Controllers* will then wake up and create a pod matching the definition .debug[[k8s/architecture.md](https://github.com/jpetazzo/container.training/tree/2026-05-enix/slides/k8s/architecture.md)] --- ## The core features of the Kubernetes API - We can create, read, update, and delete objects - We can also *watch* objects (be notified when an object changes, or when an object of a given type is created) - Objects are strongly typed - Types are *validated* and *versioned* - Storage and watch operations are provided by etcd (note: the [k3s](https://k3s.io/) project allows us to use sqlite instead of etcd) .debug[[k8s/architecture.md](https://github.com/jpetazzo/container.training/tree/2026-05-enix/slides/k8s/architecture.md)] --- ## Let's experiment a bit! - For this section, connect to the first node of the `test` cluster .lab[ - SSH to the first node of the test cluster - Check that the cluster is operational: ```bash kubectl get nodes ``` - All nodes should be `Ready` ] .debug[[k8s/architecture.md](https://github.com/jpetazzo/container.training/tree/2026-05-enix/slides/k8s/architecture.md)] --- ## Create - Let's create a simple object .lab[ - Create a namespace with the following command: ```bash kubectl create -f- <<EOF apiVersion: v1 kind: Namespace metadata: name: hello EOF ``` ] This is equivalent to `kubectl create namespace hello`. .debug[[k8s/architecture.md](https://github.com/jpetazzo/container.training/tree/2026-05-enix/slides/k8s/architecture.md)] --- ## Read - Let's retrieve the object we just created .lab[ - Read back our object: ```bash kubectl get namespace hello -o yaml ``` ] We see a lot of data that wasn't here when we created the object. Some data was automatically added to the object (like `spec.finalizers`). Some data is dynamic (typically, the content of `status`.) .debug[[k8s/architecture.md](https://github.com/jpetazzo/container.training/tree/2026-05-enix/slides/k8s/architecture.md)] --- ## API requests and responses - Almost every Kubernetes API payload (requests and responses) has the same format: ```yaml apiVersion: xxx kind: yyy metadata: name: zzz (more metadata fields here) (more fields here) ``` - The fields shown above are mandatory, except for some special cases (e.g.: in lists of resources, the list itself doesn't have a `metadata.name`) - We show YAML for convenience, but the API uses JSON (with optional protobuf encoding) .debug[[k8s/architecture.md](https://github.com/jpetazzo/container.training/tree/2026-05-enix/slides/k8s/architecture.md)] --- class: extra-details ## API versions - The `apiVersion` field corresponds to an *API group* - It can be either `v1` (aka "core" group or "legacy group"), or `group/versions`; e.g.: - `apps/v1` - `rbac.authorization.k8s.io/v1` - `extensions/v1beta1` - It does not indicate which version of Kubernetes we're talking about - It *indirectly* indicates the version of the `kind` (which fields exist, their format, which ones are mandatory...) - A single resource type (`kind`) is rarely versioned alone (e.g.: the `batch` API group contains `jobs` and `cronjobs`) .debug[[k8s/architecture.md](https://github.com/jpetazzo/container.training/tree/2026-05-enix/slides/k8s/architecture.md)] --- class: extra-details ## Group-Version-Kind, or GVK - A particular type will be identified by the combination of: - the API group it belongs to (core, `apps`, `metrics.k8s.io`, ...) - the version of this API group (`v1`, `v1beta1`, ...) - the "Kind" itself (Pod, Role, Job, ...) - "GVK" appears a lot in the API machinery code - Conversions are possible between different versions and even between API groups (e.g. when Deployments moved from `extensions` to `apps`) .debug[[k8s/architecture.md](https://github.com/jpetazzo/container.training/tree/2026-05-enix/slides/k8s/architecture.md)] --- ## Update - Let's update our namespace object - There are many ways to do that, including: - `kubectl apply` (and provide an updated YAML file) - `kubectl edit` - `kubectl patch` - many helpers, like `kubectl label`, or `kubectl set` - In each case, `kubectl` will: - get the current definition of the object - compute changes - submit the changes (with `PATCH` requests) .debug[[k8s/architecture.md](https://github.com/jpetazzo/container.training/tree/2026-05-enix/slides/k8s/architecture.md)] --- ## Adding a label - For demonstration purposes, let's add a label to the namespace - The easiest way is to use `kubectl label` .lab[ - In one terminal, watch namespaces: ```bash kubectl get namespaces --show-labels -w ``` - In the other, update our namespace: ```bash kubectl label namespaces hello color=purple ``` ] We demonstrated *update* and *watch* semantics. .debug[[k8s/architecture.md](https://github.com/jpetazzo/container.training/tree/2026-05-enix/slides/k8s/architecture.md)] --- ## What's special about *watch*? - The API server itself doesn't do anything: it's just a fancy object store - All the actual logic in Kubernetes is implemented with *controllers* - A *controller* watches a set of resources, and takes action when they change - Examples: - when a Pod object is created, it gets scheduled and started - when a Pod belonging to a ReplicaSet terminates, it gets replaced - when a Deployment object is updated, it can trigger a rolling update .debug[[k8s/architecture.md](https://github.com/jpetazzo/container.training/tree/2026-05-enix/slides/k8s/architecture.md)] --- class: extra-details ## Watch events - `kubectl get --watch` shows changes - If we add `--output-watch-events`, we can also see: - the difference between ADDED and MODIFIED resources - DELETED resources .lab[ - In one terminal, watch pods, displaying full events: ```bash kubectl get pods --watch --output-watch-events ``` - In another, run a short-lived pod: ```bash kubectl run pause --image=alpine --rm -ti --restart=Never -- sleep 5 ``` ] .debug[[k8s/architecture.md](https://github.com/jpetazzo/container.training/tree/2026-05-enix/slides/k8s/architecture.md)] --- class: pic .interstitial[] --- name: toc-other-control-plane-components class: title Other control plane components .nav[ [Previous part](#toc-the-kubernetes-api) | [Back to table of contents](#toc-part-1) | [Next part](#toc-building-our-own-cluster-easy) ] .debug[(automatically generated title slide)] --- # Other control plane components - API server ✔️ - etcd ✔️ - Controller manager - Scheduler .debug[[k8s/architecture.md](https://github.com/jpetazzo/container.training/tree/2026-05-enix/slides/k8s/architecture.md)] --- ## Controller manager - This is a collection of loops watching all kinds of objects - That's where the actual logic of Kubernetes lives - When we create a Deployment (e.g. with `kubectl create deployment web --image=nginx`), - we create a Deployment object - the Deployment controller notices it, and creates a ReplicaSet - the ReplicaSet controller notices the ReplicaSet, and creates a Pod .debug[[k8s/architecture.md](https://github.com/jpetazzo/container.training/tree/2026-05-enix/slides/k8s/architecture.md)] --- ## Scheduler - When a pod is created, it is in `Pending` state - The scheduler (or rather: *a scheduler*) must bind it to a node - Kubernetes comes with an efficient scheduler with many features - if we have special requirements, we can add another scheduler <br/> (example: this [demo scheduler](https://github.com/kelseyhightower/scheduler) uses the cost of nodes, stored in node annotations) - A pod might stay in `Pending` state for a long time: - if the cluster is full - if the pod has special constraints that can't be met - if the scheduler is not running (!) ??? :EN:- Kubernetes architecture review :FR:- Passage en revue de l'architecture de Kubernetes .debug[[k8s/architecture.md](https://github.com/jpetazzo/container.training/tree/2026-05-enix/slides/k8s/architecture.md)] --- ## 19,000 words They say, "a picture is worth one thousand words." The following 19 slides show what really happens when we run: ```bash kubectl create deployment web --image=nginx ``` .debug[[k8s/deploymentslideshow.md](https://github.com/jpetazzo/container.training/tree/2026-05-enix/slides/k8s/deploymentslideshow.md)] --- class: pic  .debug[[k8s/deploymentslideshow.md](https://github.com/jpetazzo/container.training/tree/2026-05-enix/slides/k8s/deploymentslideshow.md)] --- class: pic  .debug[[k8s/deploymentslideshow.md](https://github.com/jpetazzo/container.training/tree/2026-05-enix/slides/k8s/deploymentslideshow.md)] --- class: pic  .debug[[k8s/deploymentslideshow.md](https://github.com/jpetazzo/container.training/tree/2026-05-enix/slides/k8s/deploymentslideshow.md)] --- class: pic  .debug[[k8s/deploymentslideshow.md](https://github.com/jpetazzo/container.training/tree/2026-05-enix/slides/k8s/deploymentslideshow.md)] --- class: pic  .debug[[k8s/deploymentslideshow.md](https://github.com/jpetazzo/container.training/tree/2026-05-enix/slides/k8s/deploymentslideshow.md)] --- class: pic  .debug[[k8s/deploymentslideshow.md](https://github.com/jpetazzo/container.training/tree/2026-05-enix/slides/k8s/deploymentslideshow.md)] --- class: pic  .debug[[k8s/deploymentslideshow.md](https://github.com/jpetazzo/container.training/tree/2026-05-enix/slides/k8s/deploymentslideshow.md)] --- class: pic  .debug[[k8s/deploymentslideshow.md](https://github.com/jpetazzo/container.training/tree/2026-05-enix/slides/k8s/deploymentslideshow.md)] --- class: pic  .debug[[k8s/deploymentslideshow.md](https://github.com/jpetazzo/container.training/tree/2026-05-enix/slides/k8s/deploymentslideshow.md)] --- class: pic  .debug[[k8s/deploymentslideshow.md](https://github.com/jpetazzo/container.training/tree/2026-05-enix/slides/k8s/deploymentslideshow.md)] --- class: pic  .debug[[k8s/deploymentslideshow.md](https://github.com/jpetazzo/container.training/tree/2026-05-enix/slides/k8s/deploymentslideshow.md)] --- class: pic  .debug[[k8s/deploymentslideshow.md](https://github.com/jpetazzo/container.training/tree/2026-05-enix/slides/k8s/deploymentslideshow.md)] --- class: pic  .debug[[k8s/deploymentslideshow.md](https://github.com/jpetazzo/container.training/tree/2026-05-enix/slides/k8s/deploymentslideshow.md)] --- class: pic  .debug[[k8s/deploymentslideshow.md](https://github.com/jpetazzo/container.training/tree/2026-05-enix/slides/k8s/deploymentslideshow.md)] --- class: pic  .debug[[k8s/deploymentslideshow.md](https://github.com/jpetazzo/container.training/tree/2026-05-enix/slides/k8s/deploymentslideshow.md)] --- class: pic  .debug[[k8s/deploymentslideshow.md](https://github.com/jpetazzo/container.training/tree/2026-05-enix/slides/k8s/deploymentslideshow.md)] --- class: pic  .debug[[k8s/deploymentslideshow.md](https://github.com/jpetazzo/container.training/tree/2026-05-enix/slides/k8s/deploymentslideshow.md)] --- class: pic  .debug[[k8s/deploymentslideshow.md](https://github.com/jpetazzo/container.training/tree/2026-05-enix/slides/k8s/deploymentslideshow.md)] --- class: pic  .debug[[k8s/deploymentslideshow.md](https://github.com/jpetazzo/container.training/tree/2026-05-enix/slides/k8s/deploymentslideshow.md)] --- class: pic .interstitial[] --- name: toc-building-our-own-cluster-easy class: title Building our own cluster (easy) .nav[ [Previous part](#toc-other-control-plane-components) | [Back to table of contents](#toc-part-1) | [Next part](#toc-building-our-own-cluster-medium) ] .debug[(automatically generated title slide)] --- # Building our own cluster (easy) - Let's build our own cluster! *Perfection is attained not when there is nothing left to add, but when there is nothing left to take away. (Antoine de Saint-Exupery)* - Our goal is to build a minimal cluster allowing us to: - create a Deployment (with `kubectl create deployment`) - expose it with a Service - connect to that service - "Minimal" here means: - smaller number of components - smaller number of command-line flags - smaller number of configuration files .debug[[k8s/dmuc-easy.md](https://github.com/jpetazzo/container.training/tree/2026-05-enix/slides/k8s/dmuc-easy.md)] --- ## Non-goals - For now, we don't care about security - For now, we don't care about scalability - For now, we don't care about high availability - All we care about is *simplicity* .debug[[k8s/dmuc-easy.md](https://github.com/jpetazzo/container.training/tree/2026-05-enix/slides/k8s/dmuc-easy.md)] --- ## Our environment - We will use the machine indicated as `monokube1` - This machine: - runs Ubuntu LTS - has Kubernetes, Docker, and etcd binaries installed - but nothing is running .debug[[k8s/dmuc-easy.md](https://github.com/jpetazzo/container.training/tree/2026-05-enix/slides/k8s/dmuc-easy.md)] --- ## The fine print - We're going to use a *very old* version of Kubernetes (specifically, 1.19) - Why? - It's much easier to set up than recent versions - it's compatible with Docker (no need to set up CNI) - it doesn't require a ServiceAccount keypair - it can be exposed over plain HTTP (insecure but easier) - We'll do that, and later, move to recent versions of Kubernetes! .debug[[k8s/dmuc-easy.md](https://github.com/jpetazzo/container.training/tree/2026-05-enix/slides/k8s/dmuc-easy.md)] --- ## Checking our environment - Let's make sure we have everything we need first .lab[ - Log into the `monokube1` machine - Get root: ```bash sudo -i ``` - Check available versions: ```bash etcd -version kube-apiserver --version dockerd --version ``` ] .debug[[k8s/dmuc-easy.md](https://github.com/jpetazzo/container.training/tree/2026-05-enix/slides/k8s/dmuc-easy.md)] --- ## The plan 1. Start API server 2. Interact with it (create Deployment and Service) 3. See what's broken 4. Fix it and go back to step 2 until it works! .debug[[k8s/dmuc-easy.md](https://github.com/jpetazzo/container.training/tree/2026-05-enix/slides/k8s/dmuc-easy.md)] --- ## Dealing with multiple processes - We are going to start many processes - Depending on what you're comfortable with, you can: - open multiple windows and multiple SSH connections - use a terminal multiplexer like screen or tmux - put processes in the background with `&` <br/>(warning: log output might get confusing to read!) .debug[[k8s/dmuc-easy.md](https://github.com/jpetazzo/container.training/tree/2026-05-enix/slides/k8s/dmuc-easy.md)] --- ## Starting API server .lab[ - Try to start the API server: ```bash kube-apiserver # It will fail with "--etcd-servers must be specified" ``` ] Since the API server stores everything in etcd, it cannot start without it. .debug[[k8s/dmuc-easy.md](https://github.com/jpetazzo/container.training/tree/2026-05-enix/slides/k8s/dmuc-easy.md)] --- ## Starting etcd .lab[ - Try to start etcd: ```bash etcd ``` ] Success! Note the last line of output: ``` serving insecure client requests on 127.0.0.1:2379, this is strongly discouraged! ``` *Sure, that's discouraged. But thanks for telling us the address!* .debug[[k8s/dmuc-easy.md](https://github.com/jpetazzo/container.training/tree/2026-05-enix/slides/k8s/dmuc-easy.md)] --- ## Starting API server (for real) - Try again, passing the `--etcd-servers` argument - That argument should be a comma-separated list of URLs .lab[ - Start API server: ```bash kube-apiserver --etcd-servers http://127.0.0.1:2379 ``` ] Success! .debug[[k8s/dmuc-easy.md](https://github.com/jpetazzo/container.training/tree/2026-05-enix/slides/k8s/dmuc-easy.md)] --- ## Interacting with API server - Let's try a few "classic" commands .lab[ - List nodes: ```bash kubectl get nodes ``` - List services: ```bash kubectl get services ``` ] We should get `No resources found.` and the `kubernetes` service, respectively. Note: the API server automatically created the `kubernetes` service entry. .debug[[k8s/dmuc-easy.md](https://github.com/jpetazzo/container.training/tree/2026-05-enix/slides/k8s/dmuc-easy.md)] --- class: extra-details ## What about `kubeconfig`? - We didn't need to create a `kubeconfig` file - By default, the API server is listening on `localhost:8080` (without requiring authentication) - By default, `kubectl` connects to `localhost:8080` (without providing authentication) .debug[[k8s/dmuc-easy.md](https://github.com/jpetazzo/container.training/tree/2026-05-enix/slides/k8s/dmuc-easy.md)] --- ## Creating a Deployment - Let's run a web server! .lab[ - Create a Deployment with NGINX: ```bash kubectl create deployment web --image=nginx ``` ] Success? .debug[[k8s/dmuc-easy.md](https://github.com/jpetazzo/container.training/tree/2026-05-enix/slides/k8s/dmuc-easy.md)] --- ## Checking our Deployment status .lab[ - Look at pods, deployments, etc.: ```bash kubectl get all ``` ] Our Deployment is in bad shape: ``` NAME READY UP-TO-DATE AVAILABLE AGE deployment.apps/web 0/1 0 0 2m26s ``` And, there is no ReplicaSet, and no Pod. .debug[[k8s/dmuc-easy.md](https://github.com/jpetazzo/container.training/tree/2026-05-enix/slides/k8s/dmuc-easy.md)] --- ## What's going on? - We stored the definition of our Deployment in etcd (through the API server) - But there is no *controller* to do the rest of the work - We need to start the *controller manager* .debug[[k8s/dmuc-easy.md](https://github.com/jpetazzo/container.training/tree/2026-05-enix/slides/k8s/dmuc-easy.md)] --- ## Starting the controller manager .lab[ - Try to start the controller manager: ```bash kube-controller-manager ``` ] The final error message is: ``` invalid configuration: no configuration has been provided ``` But the logs include another useful piece of information: ``` Neither --kubeconfig nor --master was specified. Using the inClusterConfig. This might not work. ``` .debug[[k8s/dmuc-easy.md](https://github.com/jpetazzo/container.training/tree/2026-05-enix/slides/k8s/dmuc-easy.md)] --- ## Reminder: everyone talks to API server - The controller manager needs to connect to the API server - It *does not* have a convenient `localhost:8080` default - We can pass the connection information in two ways: - `--master` and a host:port combination (easy) - `--kubeconfig` and a `kubeconfig` file - For simplicity, we'll use the first option .debug[[k8s/dmuc-easy.md](https://github.com/jpetazzo/container.training/tree/2026-05-enix/slides/k8s/dmuc-easy.md)] --- ## Starting the controller manager (for real) .lab[ - Start the controller manager: ```bash kube-controller-manager --master http://localhost:8080 ``` ] Success! .debug[[k8s/dmuc-easy.md](https://github.com/jpetazzo/container.training/tree/2026-05-enix/slides/k8s/dmuc-easy.md)] --- ## Checking our Deployment status .lab[ - Check all our resources again: ```bash kubectl get all ``` ] We now have a ReplicaSet. But we still don't have a Pod. .debug[[k8s/dmuc-easy.md](https://github.com/jpetazzo/container.training/tree/2026-05-enix/slides/k8s/dmuc-easy.md)] --- ## What's going on? In the controller manager logs, we should see something like this: ``` E0404 15:46:25.753376 22847 replica_set.go:450] Sync "default/web-5bc9bd5b8d" failed with `No API token found for service account "default"`, retry after the token is automatically created and added to the service account ``` - The service account `default` was automatically added to our Deployment (and to its pods) - The service account `default` exists - But it doesn't have an associated token (the token is a secret; creating it requires signature; therefore a CA) .debug[[k8s/dmuc-easy.md](https://github.com/jpetazzo/container.training/tree/2026-05-enix/slides/k8s/dmuc-easy.md)] --- ## Solving the missing token issue There are many ways to solve that issue. We are going to list a few (to get an idea of what's happening behind the scenes). Of course, we don't need to perform *all* the solutions mentioned here. .debug[[k8s/dmuc-easy.md](https://github.com/jpetazzo/container.training/tree/2026-05-enix/slides/k8s/dmuc-easy.md)] --- ## Option 1: disable service accounts - Restart the API server with `--disable-admission-plugins=ServiceAccount` - The API server will no longer add a service account automatically - Our pods will be created without a service account .debug[[k8s/dmuc-easy.md](https://github.com/jpetazzo/container.training/tree/2026-05-enix/slides/k8s/dmuc-easy.md)] --- ## Option 2: do not mount the (missing) token - Add `automountServiceAccountToken: false` to the Deployment spec *or* - Add `automountServiceAccountToken: false` to the default ServiceAccount - The ReplicaSet controller will no longer create pods referencing the (missing) token .lab[ - Programmatically change the `default` ServiceAccount: ```bash kubectl patch sa default -p "automountServiceAccountToken: false" ``` ] .debug[[k8s/dmuc-easy.md](https://github.com/jpetazzo/container.training/tree/2026-05-enix/slides/k8s/dmuc-easy.md)] --- ## Option 3: set up service accounts properly - This is the most complex option! - Generate a key pair - Pass the private key to the controller manager (to generate and sign tokens) - Pass the public key to the API server (to verify these tokens) .debug[[k8s/dmuc-easy.md](https://github.com/jpetazzo/container.training/tree/2026-05-enix/slides/k8s/dmuc-easy.md)] --- ## Continuing without service account token - Once we patch the default service account, the ReplicaSet can create a Pod .lab[ - Check that we now have a pod: ```bash kubectl get all ``` ] Note: we might have to wait a bit for the ReplicaSet controller to retry. If we're impatient, we can restart the controller manager. .debug[[k8s/dmuc-easy.md](https://github.com/jpetazzo/container.training/tree/2026-05-enix/slides/k8s/dmuc-easy.md)] --- ## What's next? - Our pod exists, but it is in `Pending` state - Remember, we don't have a node so far (`kubectl get nodes` shows an empty list) - We need to: - start a container engine - start kubelet .debug[[k8s/dmuc-easy.md](https://github.com/jpetazzo/container.training/tree/2026-05-enix/slides/k8s/dmuc-easy.md)] --- ## Starting a container engine - We're going to use Docker (because it's the default option) .lab[ - Start the Docker Engine: ```bash dockerd ``` ] Success! Feel free to check that it actually works with e.g.: ```bash docker run alpine echo hello world ``` .debug[[k8s/dmuc-easy.md](https://github.com/jpetazzo/container.training/tree/2026-05-enix/slides/k8s/dmuc-easy.md)] --- ## Starting kubelet - If we start kubelet without arguments, it *will* start - But it will not join the cluster! - It will start in *standalone* mode - Just like with the controller manager, we need to tell kubelet where the API server is - Alas, kubelet doesn't have a simple `--master` option - We have to use `--kubeconfig` - We need to write a `kubeconfig` file for kubelet .debug[[k8s/dmuc-easy.md](https://github.com/jpetazzo/container.training/tree/2026-05-enix/slides/k8s/dmuc-easy.md)] --- ## Writing a kubeconfig file - We can copy/paste a bunch of YAML - Or we can generate the file with `kubectl` .lab[ - Create the file `~/.kube/config` with `kubectl`: ```bash kubectl config \ set-cluster localhost --server http://localhost:8080 kubectl config \ set-context localhost --cluster localhost kubectl config \ use-context localhost ``` ] .debug[[k8s/dmuc-easy.md](https://github.com/jpetazzo/container.training/tree/2026-05-enix/slides/k8s/dmuc-easy.md)] --- ## Our `~/.kube/config` file The file that we generated looks like the one below. That one has been slightly simplified (removing extraneous fields), but it is still valid. ```yaml apiVersion: v1 kind: Config current-context: localhost contexts: - name: localhost context: cluster: localhost clusters: - name: localhost cluster: server: http://localhost:8080 ``` .debug[[k8s/dmuc-easy.md](https://github.com/jpetazzo/container.training/tree/2026-05-enix/slides/k8s/dmuc-easy.md)] --- ## Starting kubelet .lab[ - Start kubelet with that kubeconfig file: ```bash kubelet --kubeconfig ~/.kube/config ``` ] If it works: great! If it complains about a "cgroup driver", check the next slide. .debug[[k8s/dmuc-easy.md](https://github.com/jpetazzo/container.training/tree/2026-05-enix/slides/k8s/dmuc-easy.md)] --- ## Cgroup drivers - Cgroups ("control groups") are a Linux kernel feature - They're used to account and limit resources (e.g.: memory, CPU, block I/O...) - There are multiple ways to manipulate cgroups, including: - through a pseudo-filesystem (typically mounted in /sys/fs/cgroup) - through systemd - Kubelet and the container engine need to agree on which method to use .debug[[k8s/dmuc-easy.md](https://github.com/jpetazzo/container.training/tree/2026-05-enix/slides/k8s/dmuc-easy.md)] --- ## Setting the cgroup driver - If kubelet refused to start, mentioning a cgroup driver issue, try: ```bash kubelet --kubeconfig ~/.kube/config --cgroup-driver=systemd ``` - That *should* do the trick! .debug[[k8s/dmuc-easy.md](https://github.com/jpetazzo/container.training/tree/2026-05-enix/slides/k8s/dmuc-easy.md)] --- ## Looking at our 1-node cluster - Let's check that our node registered correctly .lab[ - List the nodes in our cluster: ```bash kubectl get nodes ``` ] Our node should show up. Its name will be its hostname (it should be `monokube1`). .debug[[k8s/dmuc-easy.md](https://github.com/jpetazzo/container.training/tree/2026-05-enix/slides/k8s/dmuc-easy.md)] --- ## Are we there yet? - Let's check if our pod is running .lab[ - List all resources: ```bash kubectl get all ``` ] -- Our pod is still `Pending`. 🤔 -- Which is normal: it needs to be *scheduled*. (i.e., something needs to decide which node it should go on.) .debug[[k8s/dmuc-easy.md](https://github.com/jpetazzo/container.training/tree/2026-05-enix/slides/k8s/dmuc-easy.md)] --- ## Scheduling our pod - Why do we need a scheduling decision, since we have only one node? - The node might be full, unavailable; the pod might have constraints ... - The easiest way to schedule our pod is to start the scheduler (we could also schedule it manually) .debug[[k8s/dmuc-easy.md](https://github.com/jpetazzo/container.training/tree/2026-05-enix/slides/k8s/dmuc-easy.md)] --- ## Starting the scheduler - The scheduler also needs to know how to connect to the API server - Just like for controller manager, we can use `--kubeconfig` or `--master` .lab[ - Start the scheduler: ```bash kube-scheduler --master http://localhost:8080 ``` ] - Our pod should now start correctly .debug[[k8s/dmuc-easy.md](https://github.com/jpetazzo/container.training/tree/2026-05-enix/slides/k8s/dmuc-easy.md)] --- ## Checking the status of our pod - Our pod will go through a short `ContainerCreating` phase - Then it will be `Running` .lab[ - Check pod status: ```bash kubectl get pods ``` ] Success! .debug[[k8s/dmuc-easy.md](https://github.com/jpetazzo/container.training/tree/2026-05-enix/slides/k8s/dmuc-easy.md)] --- class: extra-details ## Scheduling a pod manually - We can schedule a pod in `Pending` state by creating a Binding, e.g.: ```bash kubectl create -f- <<EOF apiVersion: v1 kind: Binding metadata: name: name-of-the-pod target: apiVersion: v1 kind: Node name: name-of-the-node EOF ``` - This is actually how the scheduler works! - It watches pods, makes scheduling decisions, and creates Binding objects .debug[[k8s/dmuc-easy.md](https://github.com/jpetazzo/container.training/tree/2026-05-enix/slides/k8s/dmuc-easy.md)] --- ## Connecting to our pod - Let's check that our pod correctly runs NGINX .lab[ - Check our pod's IP address: ```bash kubectl get pods -o wide ``` - Send some HTTP request to the pod: ```bash curl `X.X.X.X` ``` ] We should see the `Welcome to nginx!` page. .debug[[k8s/dmuc-easy.md](https://github.com/jpetazzo/container.training/tree/2026-05-enix/slides/k8s/dmuc-easy.md)] --- ## Exposing our Deployment - We can now create a Service associated with this Deployment .lab[ - Expose the Deployment's port 80: ```bash kubectl expose deployment web --port=80 ``` - Check the Service's ClusterIP, and try connecting: ```bash kubectl get service web curl http://`X.X.X.X` ``` ] -- This won't work. We need kube-proxy to enable internal communication. .debug[[k8s/dmuc-easy.md](https://github.com/jpetazzo/container.training/tree/2026-05-enix/slides/k8s/dmuc-easy.md)] --- ## Starting kube-proxy - kube-proxy also needs to connect to the API server - It can work with the `--master` flag (although that will be deprecated in the future) .lab[ - Start kube-proxy: ```bash kube-proxy --master http://localhost:8080 ``` ] .debug[[k8s/dmuc-easy.md](https://github.com/jpetazzo/container.training/tree/2026-05-enix/slides/k8s/dmuc-easy.md)] --- ## Connecting to our Service - Now that kube-proxy is running, we should be able to connect .lab[ - Check the Service's ClusterIP again, and retry connecting: ```bash kubectl get service web curl http://`X.X.X.X` ``` ] Success! .debug[[k8s/dmuc-easy.md](https://github.com/jpetazzo/container.training/tree/2026-05-enix/slides/k8s/dmuc-easy.md)] --- class: extra-details ## How kube-proxy works - kube-proxy watches Service resources - When a Service is created or updated, kube-proxy creates iptables rules .lab[ - Check out the `OUTPUT` chain in the `nat` table: ```bash iptables -t nat -L OUTPUT ``` - Traffic is sent to `KUBE-SERVICES`; check that too: ```bash iptables -t nat -L KUBE-SERVICES ``` ] For each Service, there is an entry in that chain. .debug[[k8s/dmuc-easy.md](https://github.com/jpetazzo/container.training/tree/2026-05-enix/slides/k8s/dmuc-easy.md)] --- class: extra-details ## Diving into iptables - The last command showed a chain named `KUBE-SVC-...` corresponding to our service .lab[ - Check that `KUBE-SVC-...` chain: ```bash iptables -t nat -L `KUBE-SVC-...` ``` - It should show a jump to a `KUBE-SEP-...` chains; check it out too: ```bash iptables -t nat -L `KUBE-SEP-...` ``` ] This is a `DNAT` rule to rewrite the destination address of the connection to our pod. This is how kube-proxy works! .debug[[k8s/dmuc-easy.md](https://github.com/jpetazzo/container.training/tree/2026-05-enix/slides/k8s/dmuc-easy.md)] --- class: extra-details ## kube-router, IPVS - With recent versions of Kubernetes, it is possible to tell kube-proxy to use IPVS - IPVS is a more powerful load balancing framework (remember: iptables was primarily designed for firewalling, not load balancing!) - It is also possible to replace kube-proxy with kube-router - kube-router uses IPVS by default - kube-router can also perform other functions (e.g., we can use it as a CNI plugin to provide pod connectivity) .debug[[k8s/dmuc-easy.md](https://github.com/jpetazzo/container.training/tree/2026-05-enix/slides/k8s/dmuc-easy.md)] --- class: extra-details ## What about the `kubernetes` service? - If we try to connect, it won't work (by default, it should be `10.0.0.1`) - If we look at the Endpoints for this service, we will see one endpoint: `host-address:6443` - By default, the API server expects to be running directly on the nodes (it could be as a bare process, or in a container/pod using the host network) - ... And it expects to be listening on port 6443 with TLS ??? :EN:- Building our own cluster from scratch :FR:- Construire son cluster à la main .debug[[k8s/dmuc-easy.md](https://github.com/jpetazzo/container.training/tree/2026-05-enix/slides/k8s/dmuc-easy.md)] --- class: pic .interstitial[] --- name: toc-building-our-own-cluster-medium class: title Building our own cluster (medium) .nav[ [Previous part](#toc-building-our-own-cluster-easy) | [Back to table of contents](#toc-part-1) | [Next part](#toc-generating-user-certificates) ] .debug[(automatically generated title slide)] --- # Building our own cluster (medium) - This section assumes that you already went through *“Building our own cluster (easy)”* - In that section, we saw how to run each control plane component manually... ...but with an older version of Kubernetes (1.19) - In this section, we're going to do something similar... ...but with recent versions of Kubernetes! - Note: we won't need the lab environment of that previous section (we're going to build a new cluster from scratch) .debug[[k8s/dmuc-medium.md](https://github.com/jpetazzo/container.training/tree/2026-05-enix/slides/k8s/dmuc-medium.md)] --- ## What remains the same - We'll use machines with Kubernetes binaries pre-downloaded - We'll run individual components by hand (etcd, API server, controller manager, scheduler, kubelet) - We'll run on a single node (but we'll be laying the groundwork to add more nodes) - We'll get the cluster to the point where we can run and expose pods .debug[[k8s/dmuc-medium.md](https://github.com/jpetazzo/container.training/tree/2026-05-enix/slides/k8s/dmuc-medium.md)] --- ## What's different - We'll need to generate TLS keys and certificates (because it's mandatory with recent versions of Kubernetes) - Things will be *a little bit more* secure (but still not 100% secure, far from it!) - We'll use containerd instead of Docker (you could probably try with CRI-O or another CRI engine, too) - We'll need to set up CNI for networking - *And we won't do everything as root this time (but we might use `sudo` a lot)* .debug[[k8s/dmuc-medium.md](https://github.com/jpetazzo/container.training/tree/2026-05-enix/slides/k8s/dmuc-medium.md)] --- ## Our environment - We will use the machine indicated as `polykube1` - This machine: - runs Ubuntu LTS - has Kubernetes, etcd, and CNI binaries installed - but nothing is running .debug[[k8s/dmuc-medium.md](https://github.com/jpetazzo/container.training/tree/2026-05-enix/slides/k8s/dmuc-medium.md)] --- ## Checking our environment - Let's make sure we have everything we need first .lab[ - Log into the `polykube1` machine - Check available versions: ```bash etcd -version kube-apiserver --version ``` ] .debug[[k8s/dmuc-medium.md](https://github.com/jpetazzo/container.training/tree/2026-05-enix/slides/k8s/dmuc-medium.md)] --- ## The plan We'll follow the same methodology as for the "easy" section 1. Start API server 2. Interact with it (create Deployment and Service) 3. See what's broken 4. Fix it and go back to step 2 until it works! .debug[[k8s/dmuc-medium.md](https://github.com/jpetazzo/container.training/tree/2026-05-enix/slides/k8s/dmuc-medium.md)] --- ## Dealing with multiple processes - Again, we are going to start many processes - Depending on what you're comfortable with, you can: - open multiple windows and multiple SSH connections - use a terminal multiplexer like screen or tmux - put processes in the background with `&` <br/>(warning: log output might get confusing to read!) .debug[[k8s/dmuc-medium.md](https://github.com/jpetazzo/container.training/tree/2026-05-enix/slides/k8s/dmuc-medium.md)] --- ## Starting API server .lab[ - Try to start the API server: ```bash kube-apiserver # It will complain about permission to /var/run/kubernetes sudo kube-apiserver # Now it will complain about a bunch of missing flags, including: # --etcd-servers # --service-account-issuer # --service-account-signing-key-file ``` ] Just like before, we'll need to start etcd. But we'll also need some TLS keys! .debug[[k8s/dmuc-medium.md](https://github.com/jpetazzo/container.training/tree/2026-05-enix/slides/k8s/dmuc-medium.md)] --- ## Generating TLS keys - There are many ways to generate TLS keys (and certificates) - A very popular and modern tool to do that is [cfssl] - We're going to use the old-fashioned [openssl] CLI - Feel free to use cfssl or any other tool if you prefer! [cfssl]: https://github.com/cloudflare/cfssl#using-the-command-line-tool [openssl]: https://www.openssl.org/docs/man3.0/man1/ .debug[[k8s/dmuc-medium.md](https://github.com/jpetazzo/container.training/tree/2026-05-enix/slides/k8s/dmuc-medium.md)] --- ## How many keys do we need? At the very least, we need the following two keys: - ServiceAccount key pair - API client key pair, aka "CA key" (technically, we will need a *certificate* for that key pair) But if we wanted to tighten the cluster security, we'd need many more... .debug[[k8s/dmuc-medium.md](https://github.com/jpetazzo/container.training/tree/2026-05-enix/slides/k8s/dmuc-medium.md)] --- ## The other keys These keys are not strictly necessary at this point: - etcd key pair *without that key, communication with etcd will be insecure* - API server endpoint key pair *the API server will generate this one automatically if we don't* - kubelet key pair (used by API server to connect to kubelets) *without that key, commands like kubectl logs/exec will be insecure* .debug[[k8s/dmuc-medium.md](https://github.com/jpetazzo/container.training/tree/2026-05-enix/slides/k8s/dmuc-medium.md)] --- ## Would you like some auth with that? If we want to enable authentication and authorization, we also need various API client key pairs signed by the "CA key" mentioned earlier. That would include (non-exhaustive list): - controller manager key pair - scheduler key pair - in most cases: kube-proxy (or equivalent) key pair - in most cases: key pairs for the nodes joining the cluster (these might be generated through TLS bootstrap tokens) - key pairs for users that will interact with the clusters (unless another authentication mechanism like OIDC is used) .debug[[k8s/dmuc-medium.md](https://github.com/jpetazzo/container.training/tree/2026-05-enix/slides/k8s/dmuc-medium.md)] --- ## Generating our keys and certificates .lab[ - Generate the ServiceAccount key pair: ```bash openssl genrsa -out sa.key 2048 ``` - Generate the CA key pair: ```bash openssl genrsa -out ca.key 2048 ``` - Generate a self-signed certificate for the CA key: ```bash openssl x509 -new -key ca.key -out ca.cert -subj /CN=kubernetes/ ``` ] .debug[[k8s/dmuc-medium.md](https://github.com/jpetazzo/container.training/tree/2026-05-enix/slides/k8s/dmuc-medium.md)] --- ## Starting etcd - This one is easy! .lab[ - Start etcd: ```bash etcd ``` ] Note: if you want a bit of extra challenge, you can try to generate the etcd key pair and use it. (You will need to pass it to etcd and to the API server.) .debug[[k8s/dmuc-medium.md](https://github.com/jpetazzo/container.training/tree/2026-05-enix/slides/k8s/dmuc-medium.md)] --- ## Starting API server - We need to use the keys and certificate that we just generated .lab[ - Start the API server: ```bash sudo kube-apiserver \ --etcd-servers=http://localhost:2379 \ --service-account-signing-key-file=sa.key \ --service-account-issuer=https://kubernetes \ --service-account-key-file=sa.key \ --client-ca-file=ca.cert ``` ] The API server should now start. But can we really use it? 🤔 .debug[[k8s/dmuc-medium.md](https://github.com/jpetazzo/container.training/tree/2026-05-enix/slides/k8s/dmuc-medium.md)] --- ## Trying `kubectl` - Let's try some simple `kubectl` command .lab[ - Try to list Namespaces: ```bash kubectl get namespaces ``` ] We're getting an error message like this one: ``` The connection to the server localhost:8080 was refused - did you specify the right host or port? ``` .debug[[k8s/dmuc-medium.md](https://github.com/jpetazzo/container.training/tree/2026-05-enix/slides/k8s/dmuc-medium.md)] --- ## What's going on? - Recent versions of Kubernetes don't support unauthenticated API access - The API server doesn't support listening on plain HTTP anymore - `kubectl` still tries to connect to `localhost:8080` by default - But there is nothing listening there - Our API server listens on port 6443, using TLS .debug[[k8s/dmuc-medium.md](https://github.com/jpetazzo/container.training/tree/2026-05-enix/slides/k8s/dmuc-medium.md)] --- ## Trying to access the API server - Let's use `curl` first to confirm that everything works correctly (and then we will move to `kubectl`) .lab[ - Try to connect with `curl`: ```bash curl https://localhost:6443 # This will fail because the API server certificate is unknown. ``` - Try again, skipping certificate verification: ```bash curl --insecure https://localhost:6443 ``` ] We should now see an `Unauthorized` Kubernetes API error message. </br> We need to authenticate with our key and certificate. .debug[[k8s/dmuc-medium.md](https://github.com/jpetazzo/container.training/tree/2026-05-enix/slides/k8s/dmuc-medium.md)] --- ## Authenticating with the API server - For the time being, we can use the CA key and cert directly - In a real world scenario, we would *never* do that! (because we don't want the CA key to be out there in the wild) .lab[ - Try again, skipping cert verification, and using the CA key and cert: ```bash curl --insecure --key ca.key --cert ca.cert https://localhost:6443 ``` ] We should see a list of API routes. .debug[[k8s/dmuc-medium.md](https://github.com/jpetazzo/container.training/tree/2026-05-enix/slides/k8s/dmuc-medium.md)] --- class: extra-details ## Doing it right In the future, instead of using the CA key and certificate, we should generate a new key, and a certificate for that key, signed by the CA key. Then we can use that new key and certificate to authenticate. Example: ``` ### Generate a key pair openssl genrsa -out user.key ### Extract the public key openssl pkey -in user.key -out user.pub -pubout ### Generate a certificate signed by the CA key openssl x509 -new -key ca.key -force_pubkey user.pub -out user.cert \ -subj /CN=kubernetes-user/ ``` .debug[[k8s/dmuc-medium.md](https://github.com/jpetazzo/container.training/tree/2026-05-enix/slides/k8s/dmuc-medium.md)] --- ## Writing a kubeconfig file - We now want to use `kubectl` instead of `curl` - We'll need to write a kubeconfig file for `kubectl` - There are many way to do that; here, we're going to use `kubectl config` - We'll need to: - set the "cluster" (API server endpoint) - set the "credentials" (the key and certficate) - set the "context" (referencing the cluster and credentials) - use that context (make it the default that `kubectl` will use) .debug[[k8s/dmuc-medium.md](https://github.com/jpetazzo/container.training/tree/2026-05-enix/slides/k8s/dmuc-medium.md)] --- ## Set the cluster The "cluster" section holds the API server endpoint. .lab[ - Set the API server endpoint: ```bash kubectl config set-cluster polykube --server=https://localhost:6443 ``` - Don't verify the API server certificate: ```bash kubectl config set-cluster polykube --insecure-skip-tls-verify ``` ] .debug[[k8s/dmuc-medium.md](https://github.com/jpetazzo/container.training/tree/2026-05-enix/slides/k8s/dmuc-medium.md)] --- ## Set the credentials The "credentials" section can hold a TLS key and certificate, or a token, or configuration information for a plugin (for instance, when using AWS EKS or GCP GKE, they use a plugin). .lab[ - Set the client key and certificate: ```bash kubectl config set-credentials polykube \ --client-key ca.key \ --client-certificate ca.cert ``` ] .debug[[k8s/dmuc-medium.md](https://github.com/jpetazzo/container.training/tree/2026-05-enix/slides/k8s/dmuc-medium.md)] --- ## Set and use the context The "context" section references the "cluster" and "credentials" that we defined earlier. (It can also optionally reference a Namespace.) .lab[ - Set the "context": ```bash kubectl config set-context polykube --cluster polykube --user polykube ``` - Set that context to be the default context: ```bash kubectl config use-context polykube ``` ] .debug[[k8s/dmuc-medium.md](https://github.com/jpetazzo/container.training/tree/2026-05-enix/slides/k8s/dmuc-medium.md)] --- ## Review the kubeconfig file The kubeconfig file should look like this: .small[ ```yaml apiVersion: v1 clusters: - cluster: insecure-skip-tls-verify: true server: https://localhost:6443 name: polykube contexts: - context: cluster: polykube user: polykube name: polykube current-context: polykube kind: Config preferences: {} users: - name: polykube user: client-certificate: /root/ca.cert client-key: /root/ca.key ``` ] .debug[[k8s/dmuc-medium.md](https://github.com/jpetazzo/container.training/tree/2026-05-enix/slides/k8s/dmuc-medium.md)] --- ## Trying the kubeconfig file - We should now be able to access our cluster's API! .lab[ - Try to list Namespaces: ```bash kubectl get namespaces ``` ] This should show the classic `default`, `kube-system`, etc. .debug[[k8s/dmuc-medium.md](https://github.com/jpetazzo/container.training/tree/2026-05-enix/slides/k8s/dmuc-medium.md)] --- class: extra-details ## Do we need `--client-ca-file` ? Technically, we didn't need to specify the `--client-ca-file` flag! But without that flag, no client can be authenticated. Which means that we wouldn't be able to issue any API request! .debug[[k8s/dmuc-medium.md](https://github.com/jpetazzo/container.training/tree/2026-05-enix/slides/k8s/dmuc-medium.md)] --- ## Running pods - We can now try to create a Deployment .lab[ - Create a Deployment: ```bash kubectl create deployment blue --image=jpetazzo/color ``` - Check the results: ```bash kubectl get deployments,replicasets,pods ``` ] Our Deployment exists, but not the Replica Set or Pod. We need to run the controller manager. .debug[[k8s/dmuc-medium.md](https://github.com/jpetazzo/container.training/tree/2026-05-enix/slides/k8s/dmuc-medium.md)] --- ## Running the controller manager - Previously, we used the `--master` flag to pass the API server address - Now, we need to authenticate properly - The simplest way at this point is probably to use the same kubeconfig file! .lab[ - Start the controller manager: ```bash kube-controller-manager --kubeconfig .kube/config ``` - Check the results: ```bash kubectl get deployments,replicasets,pods ``` ] .debug[[k8s/dmuc-medium.md](https://github.com/jpetazzo/container.training/tree/2026-05-enix/slides/k8s/dmuc-medium.md)] --- ## What's next? - Normally, the last commands showed us a Pod in `Pending` state - We need two things to continue: - the scheduler (to assign the Pod to a Node) - a Node! - We're going to run `kubelet` to register the Node with the cluster .debug[[k8s/dmuc-medium.md](https://github.com/jpetazzo/container.training/tree/2026-05-enix/slides/k8s/dmuc-medium.md)] --- ## Running `kubelet` - Let's try to run `kubelet` and see what happens! .lab[ - Start `kubelet`: ```bash sudo kubelet ``` ] We should see an error about connecting to `containerd.sock`. We need to run a container engine! (For instance, `containerd`.) .debug[[k8s/dmuc-medium.md](https://github.com/jpetazzo/container.training/tree/2026-05-enix/slides/k8s/dmuc-medium.md)] --- ## Running `containerd` - We need to install and start `containerd` - You could try another engine if you wanted (but there might be complications!) .lab[ - Install `containerd`: ```bash sudo apt-get install containerd ``` - Start `containerd`: ```bash sudo containerd ``` ] .debug[[k8s/dmuc-medium.md](https://github.com/jpetazzo/container.training/tree/2026-05-enix/slides/k8s/dmuc-medium.md)] --- class: extra-details ## Configuring `containerd` Depending on how we install `containerd`, it might need a bit of extra configuration. Watch for the following symptoms: - `containerd` refuses to start (rare, unless there is an *invalid* configuration) - `containerd` starts but `kubelet` can't connect (could be the case if the configuration disables the CRI socket) - `containerd` starts and things work but Pods keep being killed (may happen if there is a mismatch in the cgroups driver) .debug[[k8s/dmuc-medium.md](https://github.com/jpetazzo/container.training/tree/2026-05-enix/slides/k8s/dmuc-medium.md)] --- ## Starting `kubelet` for good - Now that `containerd` is running, `kubelet` should start! .lab[ - Try to start `kubelet`: ```bash sudo kubelet ``` - In another terminal, check if our Node is now visible: ```bash sudo kubectl get nodes ``` ] `kubelet` should now start, but our Node doesn't show up in `kubectl get nodes`! This is because without a kubeconfig file, `kubelet` runs in standalone mode: <br/> it will not connect to a Kubernetes API server, and will only start *static pods*. .debug[[k8s/dmuc-medium.md](https://github.com/jpetazzo/container.training/tree/2026-05-enix/slides/k8s/dmuc-medium.md)] --- ## Passing the kubeconfig file - Let's start `kubelet` again, with our kubeconfig file .lab[ - Stop `kubelet` (e.g. with `Ctrl-C`) - Restart it with the kubeconfig file: ```bash sudo kubelet --kubeconfig .kube/config ``` - Check our list of Nodes: ```bash kubectl get nodes ``` ] This time, our Node should show up! .debug[[k8s/dmuc-medium.md](https://github.com/jpetazzo/container.training/tree/2026-05-enix/slides/k8s/dmuc-medium.md)] --- ## Node readiness - However, our Node shows up as `NotReady` - If we wait a few minutes, the `kubelet` logs will tell us why: *we're missing a CNI configuration!* - As a result, the containers can't be connected to the network - `kubelet` detects that and doesn't become `Ready` until this is fixed .debug[[k8s/dmuc-medium.md](https://github.com/jpetazzo/container.training/tree/2026-05-enix/slides/k8s/dmuc-medium.md)] --- ## CNI configuration - We need to provide a CNI configuration - This is a file in `/etc/cni/net.d` (the name of the file doesn't matter; the first file in lexicographic order will be used) - Usually, when installing a "CNI plugin¹", this file gets installed automatically - Here, we are going to write that file manually .footnote[¹Technically, a *pod network*; typically running as a DaemonSet, which will install the file with a `hostPath` volume.] .debug[[k8s/dmuc-medium.md](https://github.com/jpetazzo/container.training/tree/2026-05-enix/slides/k8s/dmuc-medium.md)] --- ## Our CNI configuration Create the following file in e.g. `/etc/cni/net.d/kube.conf`: ```json { "cniVersion": "0.3.1", "name": "kube", "type": "bridge", "bridge": "cni0", "isDefaultGateway": true, "ipMasq": true, "hairpinMode": true, "ipam": { "type": "host-local", "subnet": "10.1.1.0/24" } } ``` That's all we need - `kubelet` will detect and validate the file automatically! .debug[[k8s/dmuc-medium.md](https://github.com/jpetazzo/container.training/tree/2026-05-enix/slides/k8s/dmuc-medium.md)] --- ## Checking our Node again - After a short time (typically about 10 seconds) the Node should be `Ready` .lab[ - Wait until the Node is `Ready`: ```bash kubectl get nodes ``` ] If the Node doesn't show up as `Ready`, check the `kubelet` logs. .debug[[k8s/dmuc-medium.md](https://github.com/jpetazzo/container.training/tree/2026-05-enix/slides/k8s/dmuc-medium.md)] --- ## What's next? - At this point, we have a `Pending` Pod and a `Ready` Node - All we need is the scheduler to bind the former to the latter .lab[ - Run the scheduler: ```bash kube-scheduler --kubeconfig .kube/config ``` - Check that the Pod gets assigned to the Node and becomes `Running`: ```bash kubectl get pods ``` ] .debug[[k8s/dmuc-medium.md](https://github.com/jpetazzo/container.training/tree/2026-05-enix/slides/k8s/dmuc-medium.md)] --- ## Check network access - Let's check that we can connect to our Pod, and that the Pod can connect outside .lab[ - Get the Pod's IP address: ```bash kubectl get pods -o wide ``` - Connect to the Pod (make sure to update the IP address): ```bash curl `10.1.1.2` ``` - Check that the Pod has external connectivity too: ```bash kubectl exec `blue-xxxxxxxxxx-yyyyy` -- ping -c3 1.1 ``` ] .debug[[k8s/dmuc-medium.md](https://github.com/jpetazzo/container.training/tree/2026-05-enix/slides/k8s/dmuc-medium.md)] --- ## Expose our Deployment - We can now try to expose the Deployment and connect to the ClusterIP .lab[ - Expose the Deployment: ```bash kubectl expose deployment blue --port=80 ``` - Retrieve the ClusterIP: ```bash kubectl get services ``` - Try to connect to the ClusterIP: ```bash curl `10.0.0.42` ``` ] At this point, it won't work - we need to run `kube-proxy`! .debug[[k8s/dmuc-medium.md](https://github.com/jpetazzo/container.training/tree/2026-05-enix/slides/k8s/dmuc-medium.md)] --- ## Running `kube-proxy` - We need to run `kube-proxy` (also passing it our kubeconfig file) .lab[ - Run `kube-proxy`: ```bash sudo kube-proxy --kubeconfig .kube/config ``` - Try again to connect to the ClusterIP: ```bash curl `10.0.0.42` ``` ] This time, it should work. .debug[[k8s/dmuc-medium.md](https://github.com/jpetazzo/container.training/tree/2026-05-enix/slides/k8s/dmuc-medium.md)] --- ## What's next? - Scale up the Deployment, and check that load balancing works properly - Enable RBAC, and generate individual certificates for each controller (check the [certificate paths][certpath] section in the Kubernetes documentation for a detailed list of all the certificates and keys that are used by the control plane, and which flags are used by which components to configure them!) - Add more nodes to the cluster *Feel free to try these if you want to get additional hands-on experience!* [certpath]: https://kubernetes.io/docs/setup/best-practices/certificates/#certificate-paths ??? :EN:- Setting up control plane certificates :EN:- Implementing a basic CNI configuration :FR:- Mettre en place les certificats du plan de contrôle :FR:- Réaliser un configuration CNI basique .debug[[k8s/dmuc-medium.md](https://github.com/jpetazzo/container.training/tree/2026-05-enix/slides/k8s/dmuc-medium.md)] --- class: pic .interstitial[] --- name: toc-generating-user-certificates class: title Generating user certificates .nav[ [Previous part](#toc-building-our-own-cluster-medium) | [Back to table of contents](#toc-part-1) | [Next part](#toc-securing-the-control-plane) ] .debug[(automatically generated title slide)] --- # Generating user certificates - The most popular ways to authenticate users with Kubernetes are: - TLS certificates - JSON Web Tokens (OIDC or ServiceAccount tokens) - We're going to see how to use TLS certificates - We will generate a certificate for an user and give them some permissions - Then we will use that certificate to access the cluster .debug[[k8s/user-cert.md](https://github.com/jpetazzo/container.training/tree/2026-05-enix/slides/k8s/user-cert.md)] --- ## Heads up! - The demos in this section require that we have access to our cluster's CA - *On a managed cluster:* the CA is very rarely exposed by the provider - *On a self-hosted cluster:* the CA should be available somewhere (it may or may not be easy to find, though!) - We may or may not be able to use the CSR API instead .debug[[k8s/user-cert.md](https://github.com/jpetazzo/container.training/tree/2026-05-enix/slides/k8s/user-cert.md)] --- ## Locate the CA key and cert - On a cluster deployed with `kubeadm`: *the files will be in `/etc/kubernetes/pki` (on any control plane node)* - On a cluster deployed with something like k3s or k0s: *Check the docs to know where the CA files are* *(and for extra credit, submit a PR to update this slide!)* - On a cluster deployed manually (like "dessine-moi un cluster"): *the files will be wherever you did put them* .debug[[k8s/user-cert.md](https://github.com/jpetazzo/container.training/tree/2026-05-enix/slides/k8s/user-cert.md)] --- ## Let's set environment variables - To normalize the commands in the next slides: ```bash CA_KEY=/.../ca.key CA_CRT=/.../ca.crt ``` .debug[[k8s/user-cert.md](https://github.com/jpetazzo/container.training/tree/2026-05-enix/slides/k8s/user-cert.md)] --- ## How it works - The API server is configured to accept all certificates signed by a given CA - The certificate contains: - the user name (in the `CN` field) - the groups the user belongs to (as multiple `O` fields) .lab[ - On clusters deployed with `kubeadm`, this will show the location of the CA cert: ```bash sudo grep client-ca /etc/kubernetes/manifests/kube-apiserver.yaml ``` ] This should output a flag like the following one: ``` --client-ca-file=/etc/kubernetes/pki/ca.crt ``` .debug[[k8s/user-cert.md](https://github.com/jpetazzo/container.training/tree/2026-05-enix/slides/k8s/user-cert.md)] --- ## Generating a key and CSR for our user - These operations could be done on a separate machine - We only need to transfer the CSR (Certificate Signing Request) to the CA (we never need to expose the private key) .lab[ - Generate a private key: ```bash openssl genrsa 4096 > user.key ``` - Generate a CSR: ```bash openssl req -new -key user.key -subj /CN=jerome/O=devs/O=ops > user.csr ``` ] .debug[[k8s/user-cert.md](https://github.com/jpetazzo/container.training/tree/2026-05-enix/slides/k8s/user-cert.md)] --- ## Generating a signed certificate - This has to be done on the machine holding the CA private key (copy the `user.csr` file if needed) .lab[ - Verify the CSR paramters: ```bash openssl req -in user.csr -text | head ``` - Generate the certificate: ```bash sudo openssl x509 -req \ -CA $CA_CRT -CAkey $CA_KEY \ -in user.csr -days 1 -set_serial 1234 > user.crt ``` ] If you are using two separate machines, transfer `user.crt` to the other machine. .debug[[k8s/user-cert.md](https://github.com/jpetazzo/container.training/tree/2026-05-enix/slides/k8s/user-cert.md)] --- ## Adding the key and certificate to kubeconfig - We have to edit our `.kube/config` file - This can be done relatively easily with `kubectl config` .lab[ - Create a new `user` entry in our `.kube/config` file: ```bash kubectl config set-credentials jerome \ --client-key=user.key --client-certificate=user.crt ``` ] The configuration file now points to our local files. We could also embed the key and certs with the `--embed-certs` option. (So that the kubeconfig file can be used without `user.key` and `user.crt`.) .debug[[k8s/user-cert.md](https://github.com/jpetazzo/container.training/tree/2026-05-enix/slides/k8s/user-cert.md)] --- ## Using the new identity - At the moment, we probably use the admin certificate generated by `kubeadm` (with `CN=kubernetes-admin` and `O=system:masters`) - Let's edit our *context* to use our new certificate instead! .lab[ - Edit the context: ```bash kubectl config set-context --current --user=jerome ``` - Try any command: ```bash kubectl get pods ``` ] Does it work, or do we get a permission error? .debug[[k8s/user-cert.md](https://github.com/jpetazzo/container.training/tree/2026-05-enix/slides/k8s/user-cert.md)] --- ## On a normal cluster - We should get a message like the following one: ``` Error from server (Forbidden): pods is forbidden: User "jerome" cannot list resource "pods" in API group "" in the namespace "default" ``` - This means: *your user key and cert are valid (`User "jerome"`)...* *...but you don't have permission to get pods yet* - We now need to grant permissions (e.g. with Roles and Rolebindings) .debug[[k8s/user-cert.md](https://github.com/jpetazzo/container.training/tree/2026-05-enix/slides/k8s/user-cert.md)] --- ## On a cluster deployed manually - If we haven't enabled RBAC, then it will work (because without RBAC, any valid certificate gives full access to the API) - We could (should?) enable RBAC! - But then we'll need to generate keys and certs for all API clients (including, but not limited to, control plane components and kubelets) .debug[[k8s/user-cert.md](https://github.com/jpetazzo/container.training/tree/2026-05-enix/slides/k8s/user-cert.md)] --- ## Granting permissions - If RBAC is enabled, we can give some permissions to our new user - The following example assumes a `kubeadm` cluster - Let's add some read-only permissions to the `devs` group (for instance) .lab[ - Switch back to our admin identity: ```bash kubectl config set-context --current --user=kubernetes-admin ``` - Grant permissions: ```bash kubectl create clusterrolebinding devs-can-view \ --clusterrole=view --group=devs ``` ] .debug[[k8s/user-cert.md](https://github.com/jpetazzo/container.training/tree/2026-05-enix/slides/k8s/user-cert.md)] --- ## Testing the new permissions - As soon as we create the ClusterRoleBinding, all users in the `devs` group get access - Let's verify that we can e.g. list pods! .lab[ - Switch to our user identity again: ```bash kubectl config set-context --current --user=jerome ``` - Test the permissions: ```bash kubectl get pods ``` ] .debug[[k8s/user-cert.md](https://github.com/jpetazzo/container.training/tree/2026-05-enix/slides/k8s/user-cert.md)] --- ## `kubeadm kubeconfig user` - On `kubeadm` clusters, there is a command to automate key and certificate generation - `kubeadm kubeconfig user` will issue a key, certificate, and output the kubeconfig file - It will access CA key and cert in `/etc/kubernetes/pki/` directly ??? :EN:- Authentication with user certificates :FR:- Identification par certificat TLS .debug[[k8s/user-cert.md](https://github.com/jpetazzo/container.training/tree/2026-05-enix/slides/k8s/user-cert.md)] --- class: pic .interstitial[] --- name: toc-securing-the-control-plane class: title Securing the control plane .nav[ [Previous part](#toc-generating-user-certificates) | [Back to table of contents](#toc-part-1) | [Next part](#toc-static-pods) ] .debug[(automatically generated title slide)] --- # Securing the control plane - Many components accept connections (and requests) from others: - API server - etcd - kubelet - We must secure these connections: - to deny unauthorized requests - to prevent eavesdropping secrets, tokens, and other sensitive information - Disabling authentication and/or authorization is **strongly discouraged** (but it's possible to do it, e.g. for learning / troubleshooting purposes) .debug[[k8s/control-plane-auth.md](https://github.com/jpetazzo/container.training/tree/2026-05-enix/slides/k8s/control-plane-auth.md)] --- ## Authentication and authorization - Authentication (checking "who you are") can be done in different ways: - with mutual TLS (both client and server need to hold a valid certificate) - with service account tokens (issued by the Kubernetes API server) - Authorization (checking "what you can do") can also be done in multiple ways: - the API server implements a sophisticated permission logic (with RBAC) - some services will defer authorization to the API server (through webhooks) - some services require a certificate signed by a particular CA / sub-CA - there is also a special "Node Authorizer" (for kubelet API access) .debug[[k8s/control-plane-auth.md](https://github.com/jpetazzo/container.training/tree/2026-05-enix/slides/k8s/control-plane-auth.md)] --- ## Mutual TLS vs tokens - Service account tokens: - automatically generated by API server - can be exposed to pods through e.g. volume mounts - require the control plane to be up and running - can't be used by kubelets or by static pods - Mutual TLS: - requires manual generation (and renewal!) - doesn't require the control plane to be up and running - particularly relevant for kubelets and static pods .debug[[k8s/control-plane-auth.md](https://github.com/jpetazzo/container.training/tree/2026-05-enix/slides/k8s/control-plane-auth.md)] --- ## In practice - We will review the various communication channels in the control plane - We will describe how they are secured - When TLS certificates are used, we will indicate: - which CA signs them - what their subject (CN) should be, when applicable - We will indicate how to configure security (client- and server-side) .debug[[k8s/control-plane-auth.md](https://github.com/jpetazzo/container.training/tree/2026-05-enix/slides/k8s/control-plane-auth.md)] --- ## etcd peers - Replication and coordination of etcd happens on a dedicated port (typically port 2380; the default port for normal client connections is 2379) - Authentication uses TLS certificates with a separate sub-CA (otherwise, anyone with a Kubernetes client certificate could access etcd!) - The etcd command line flags involved are: `--peer-client-cert-auth=true` to activate it `--peer-cert-file`, `--peer-key-file`, `--peer-trusted-ca-file` .debug[[k8s/control-plane-auth.md](https://github.com/jpetazzo/container.training/tree/2026-05-enix/slides/k8s/control-plane-auth.md)] --- ## etcd clients - The only¹ thing that connects to etcd is the API server - Authentication uses TLS certificates with a separate sub-CA (for the same reasons as for etcd inter-peer authentication) - The etcd command line flags involved are: `--client-cert-auth=true` to activate it `--trusted-ca-file`, `--cert-file`, `--key-file` - The API server command line flags involved are: `--etcd-cafile`, `--etcd-certfile`, `--etcd-keyfile` .footnote[¹Technically, there is also the etcd healthcheck. Let's ignore it for now.] .debug[[k8s/control-plane-auth.md](https://github.com/jpetazzo/container.training/tree/2026-05-enix/slides/k8s/control-plane-auth.md)] --- ## etcd authorization - etcd supports RBAC, but Kubernetes doesn't use it by default (note: etcd RBAC is completely different from Kubernetes RBAC!) - By default, etcd access is "all or nothing" (if you have a valid certificate, you get in) - Be very careful if you use the same root CA for etcd and other things (if etcd trusts the root CA, then anyone with a valid cert gets full etcd access) - For more details, check the following resources: - [etcd documentation on authentication](https://etcd.io/docs/current/op-guide/authentication/) - [PKI The Wrong Way](https://www.youtube.com/watch?v=gcOLDEzsVHI) at KubeCon NA 2020 .debug[[k8s/control-plane-auth.md](https://github.com/jpetazzo/container.training/tree/2026-05-enix/slides/k8s/control-plane-auth.md)] --- ## API server authentication with TLS certificates - Some control plane components will authenticate with TLS certificates (typically: scheduler, controller manager; also: kubelets!) - The relevant API server flags are: `--client-ca-file`, `--tls-cert-file`, `--tls-private-key-file` - These clients will typically accept a `--kubeconfig` flag (to specify a kubeconfig file containing the CA cert, client key, and client cert) - Yes, that kubeconfig file follows the same format as our `~/.kube/config` file! .debug[[k8s/control-plane-auth.md](https://github.com/jpetazzo/container.training/tree/2026-05-enix/slides/k8s/control-plane-auth.md)] --- ## API server authentication with tokens - Some control plane components may authenticate with Service Account tokens (typically: controllers like CNI, CSI, Ingress...) - The relevant API server flags are: `--service-account-signing-key-file`, `--service-account-issuer`, `--service-account-key-file` - These clients will automatically detect that they should use "in cluster config" - That detection relies on the following things to exist: - environment variables `KUBERNETES_SERVICE_HOST` and `KUBERNETES_SERVICE_PORT` - token in file `/var/run/secrets/kubernetes.io/serviceaccount/token` .debug[[k8s/control-plane-auth.md](https://github.com/jpetazzo/container.training/tree/2026-05-enix/slides/k8s/control-plane-auth.md)] --- ## API server clients authorization - Most clients will rely on the `RBAC` authorizer - enabled with API server flag `--authorization-mode=RBAC` - that flag will automatically create a bunch of roles and bindings - clients should use standard names (e.g. `system:kube-scheduler`) - Kubelets will rely on the `Node` authorizer - enabled with API server flag `--authorization-mode=Node` - this authorizer makes sure that kubelets work on a "need-to-know" basis - kubelets should use standard names (`system:node:<name-of-the-node>`) - Note: to enable both authorizers, use `--authorization-mode=RBAC,Node` .debug[[k8s/control-plane-auth.md](https://github.com/jpetazzo/container.training/tree/2026-05-enix/slides/k8s/control-plane-auth.md)] --- class: extra-details ## How are these permissions set up? - A bunch of roles and bindings are defined as constants in the API server code: [auth/authorizer/rbac/bootstrappolicy/policy.go](https://github.com/kubernetes/kubernetes/blob/release-1.19/plugin/pkg/auth/authorizer/rbac/bootstrappolicy/policy.go#L188) - They are created automatically when the API server starts: [registry/rbac/rest/storage_rbac.go](https://github.com/kubernetes/kubernetes/blob/release-1.19/pkg/registry/rbac/rest/storage_rbac.go#L140) - We must use the correct Common Names (`CN`) for the control plane certificates (since the bindings defined above refer to these common names) .debug[[k8s/control-plane-auth.md](https://github.com/jpetazzo/container.training/tree/2026-05-enix/slides/k8s/control-plane-auth.md)] --- class: extra-details ## The Node Authorizer - Question: when should node `X` be able to access secret `Y`? -- - Answer: if, and only if, node `X` runs a pod that uses secret `Y` - The Node Authorizer implements that kind of logic - It also allows kubelets to set labels and taints for themselves (but not for other nodes) .debug[[k8s/control-plane-auth.md](https://github.com/jpetazzo/container.training/tree/2026-05-enix/slides/k8s/control-plane-auth.md)] --- ## Kubelet and API server - Communication between kubelet and API server can be established both ways - Kubelet → API server: - kubelet registers itself ("hi, I'm node42, do you have work for me?") - connection is kept open and re-established if it breaks - that's how the kubelet knows which pods to start/stop - API server → kubelet: - used to retrieve logs, exec, attach to containers .debug[[k8s/control-plane-auth.md](https://github.com/jpetazzo/container.training/tree/2026-05-enix/slides/k8s/control-plane-auth.md)] --- ## Kubelet → API server - Kubelet is started with `--kubeconfig` with API server information - The client certificate of the kubelet will typically have: `CN=system:node:<nodename>` and groups `O=system:nodes` - Nothing special on the API server side (it will authenticate like any other client) - Authorization will typically require the Node Authorizer mentioned earlier ⚠️ Kubelet certificates need to be renewed regularly! - This is typically done through the CSR API .debug[[k8s/control-plane-auth.md](https://github.com/jpetazzo/container.training/tree/2026-05-enix/slides/k8s/control-plane-auth.md)] --- ## API server → kubelet - Kubelet is started with the flag `--client-ca-file` (typically using the same CA as the API server) - API server will use a dedicated key pair when contacting kubelet (specified with `--kubelet-client-certificate` and `--kubelet-client-key`) - Authorization uses webhooks (enabled with `--authorization-mode=Webhook` on kubelet) - The webhook server is the API server itself (the kubelet sends back a request to the API server to ask, "can this person do that?") .debug[[k8s/control-plane-auth.md](https://github.com/jpetazzo/container.training/tree/2026-05-enix/slides/k8s/control-plane-auth.md)] --- ## Scheduler - The scheduler connects to the API server like an ordinary client - The certificate of the scheduler will have `CN=system:kube-scheduler` .debug[[k8s/control-plane-auth.md](https://github.com/jpetazzo/container.training/tree/2026-05-enix/slides/k8s/control-plane-auth.md)] --- ## Controller manager - The controller manager is also a normal client to the API server - Its certificate will have `CN=system:kube-controller-manager` - To improve security posture, each controller can use an individual Service Account - This is enabled with flag `--use-service-account-credentials=true` .debug[[k8s/control-plane-auth.md](https://github.com/jpetazzo/container.training/tree/2026-05-enix/slides/k8s/control-plane-auth.md)] --- ## Controller manager keys - The controller can create Secrets holding Service Account tokens - this is enabled with flag `--service-account-private-key-file` - this was used in older versions of Kubernetes (before *bound tokens*) - in modern clusters, kubelet uses the `TokenRequest` API instead - If we use the CSR API, the controller manager needs the CA cert and key - the CSR API is used in many clusters to renew kubelet certificates - it's enabled with `--cluster-signing-cert-file` and `--cluster-signing-key-file` .debug[[k8s/control-plane-auth.md](https://github.com/jpetazzo/container.training/tree/2026-05-enix/slides/k8s/control-plane-auth.md)] --- ## Service account tokens recap - These tokens are JWT tokens, signed with a particular key - These tokens are used for authentication with the API server (and therefore, the API server needs to be able to verify their integrity) - That key is passed to the API server using a couple of flags: - `--service-account-private-key-file` (used to issue tokens) - `--service-account-key-file` (used to verify tokens) - The private key is also passed to the controller manager <br/>(using flag `--service-account-private-key-file`) .debug[[k8s/control-plane-auth.md](https://github.com/jpetazzo/container.training/tree/2026-05-enix/slides/k8s/control-plane-auth.md)] --- ## kube-proxy - kube-proxy is "yet another API server client" - In many clusters, it runs as a Daemon Set - In that case, it will have its own Service Account and associated permissions - It will authenticate using the token of that Service Account - It's also possible (but rare) to run it with e.g. static pods (it will then require TLS keys; possibly the same as kubelet's!) .debug[[k8s/control-plane-auth.md](https://github.com/jpetazzo/container.training/tree/2026-05-enix/slides/k8s/control-plane-auth.md)] --- class: extra-details ## Webhooks - We mentioned webhooks earlier; how does that really work? - The Kubernetes API has special resource types to check permissions - One of them is SubjectAccessReview - To check if a particular user can do a particular action on a particular resource: - we prepare a SubjectAccessReview object - we send that object to the API server - the API server responds with allow/deny (and optional explanations) - Using webhooks for authorization = sending SAR to authorize each request .debug[[k8s/control-plane-auth.md](https://github.com/jpetazzo/container.training/tree/2026-05-enix/slides/k8s/control-plane-auth.md)] --- class: extra-details ## Subject Access Review Here is an example showing how to check if `jean.doe` can `get` some `pods` in `kube-system`: ```bash kubectl -v9 create -f- <<EOF apiVersion: authorization.k8s.io/v1 kind: SubjectAccessReview spec: user: jean.doe groups: - foo - bar resourceAttributes: #group: blah.k8s.io namespace: kube-system resource: pods verb: get #name: web-xyz1234567-pqr89 EOF ``` ??? :EN:- Control plane authentication :FR:- Sécurisation du plan de contrôle .debug[[k8s/control-plane-auth.md](https://github.com/jpetazzo/container.training/tree/2026-05-enix/slides/k8s/control-plane-auth.md)] --- class: pic .interstitial[] --- name: toc-static-pods class: title Static pods .nav[ [Previous part](#toc-securing-the-control-plane) | [Back to table of contents](#toc-part-1) | [Next part](#toc-exercise--enable-auth) ] .debug[(automatically generated title slide)] --- # Static pods Question: can we host the control plane of a cluster *on the cluster itself?* - To create a Pod, we need to communicate with the API server - The API server needs etcd to be up - Then the Pod needs to be bound to a node by the scheduler - So... all these things need to be running already! - Even if the Pod already exists, we still need API server and etcd (so that kubelet can connect to the API server and "know" about the Pod) .debug[[k8s/staticpods.md](https://github.com/jpetazzo/container.training/tree/2026-05-enix/slides/k8s/staticpods.md)] --- ## Static pods Solution: run (parts of) the control plane in *static pods!* - Normally, kubelet queries the API server to know what pods to run - Additionally, we can tell kubelet to run pods: - by storing manifests in a directory (`--pod-manifest-path`) - by retrieving manifests from an HTTP server (`--manifest-url`) - These manifests should be normal pod manifests (make sure to include the namespace in the metadata block!) - kubelet will append the node name after the pod name .debug[[k8s/staticpods.md](https://github.com/jpetazzo/container.training/tree/2026-05-enix/slides/k8s/staticpods.md)] --- ## How and when kubelet runs static pods - kubelet runs static pods "no matter what" (even if it can't connect to the API server, or if no API server is configured) - When there is no API server configuration, that's called "standalone mode" - Almost nothing can prevent kubelet from running these pods (e.g. admission controllers, pod security settings... won't apply) - kubelet monitors the manifest path (and/or the manifest URL) - If manifests are deleted: their pods are destroyed - If manifests are modified: their pods are destroyed and recreated .debug[[k8s/staticpods.md](https://github.com/jpetazzo/container.training/tree/2026-05-enix/slides/k8s/staticpods.md)] --- ## Mirror pods - Static pods remain running even after API server connection is up - Once the API server is up, kubelet will create *mirror pods* - Mirror pods represent the static pods that are running .warning[Deleting a mirror pod has no effect on the static pod!] - kubelet will immediately recreate the mirror pod if it is deleted .warning[Admission control can block the mirror pod, but not the static pod!] - Since kubelet runs the static pod even if there is no connection to the API server .debug[[k8s/staticpods.md](https://github.com/jpetazzo/container.training/tree/2026-05-enix/slides/k8s/staticpods.md)] --- ## Example - `kubeadm` leverages static pods to run the control plane (etcd, API server, controller manager, scheduler) - It "renders" a number of YAML manifests to `/etc/kubernetes/manifests` - This is the cluster boot sequence: - machine boots - kubelet is started (typically by systemd) - kubelet reads static pod manifests and run them - control plane is up, yay! .debug[[k8s/staticpods.md](https://github.com/jpetazzo/container.training/tree/2026-05-enix/slides/k8s/staticpods.md)] --- class: extra-details ## Pod checkpointer - This pattern isn't used anymore, but perhaps it can provide inspiration - The pod checkpointer automatically generates manifests of running pods (if they have specific labels/annotations) - The manifests are used to restart these pods if API contact is lost - This pattern is implemented in [openshift/pod-checkpointer-operator] and [bootkube checkpointer] - Unfortunately, as of 2021, both seem abandoned / unmaintained 😢 [openshift/pod-checkpointer-operator]: https://github.com/openshift/pod-checkpointer-operator [bootkube checkpointer]: https://github.com/kubernetes-retired/bootkube/blob/master/cmd/checkpoint/README.md ??? :EN:- Static pods :FR:- Les *static pods* .debug[[k8s/staticpods.md](https://github.com/jpetazzo/container.training/tree/2026-05-enix/slides/k8s/staticpods.md)] --- class: pic .interstitial[] --- name: toc-exercise--enable-auth class: title Exercise — enable auth .nav[ [Previous part](#toc-static-pods) | [Back to table of contents](#toc-part-1) | [Next part](#toc-exercise--networking) ] .debug[(automatically generated title slide)] --- # Exercise — enable auth - We want to enable authentication and authorization - Checklist: - non-privileged user can deploy in their namespace <br/>(and nowhere else) - each controller uses its own key, certificate, and identity - each node uses its own key, certificate, and identity - Service Accounts work properly - See next slide for help / hints! .debug[[exercises/dmuc-auth-details.md](https://github.com/jpetazzo/container.training/tree/2026-05-enix/slides/exercises/dmuc-auth-details.md)] --- ## Checklist - Generate keys, certs, and kubeconfig for everything that needs them (cluster admin, cluster user, controller manager, scheduler, kubelet) - Reconfigure and restart each component to use its new identity - Turn on `RBAC` and `Node` authorizers on the API server - Check that everything works properly (e.g. that you can create and scale a Deployment using the "cluster user" identity) .debug[[exercises/dmuc-auth-details.md](https://github.com/jpetazzo/container.training/tree/2026-05-enix/slides/exercises/dmuc-auth-details.md)] --- class: pic .interstitial[] --- name: toc-exercise--networking class: title Exercise — networking .nav[ [Previous part](#toc-exercise--enable-auth) | [Back to table of contents](#toc-part-1) | [Next part](#toc-exercise--static-pods) ] .debug[(automatically generated title slide)] --- # Exercise — networking - We want to install extra networking components: - a CNI configuration - kube-proxy - CoreDNS - After doing that, we should be able to deploy a "complex" app (with multiple containers communicating together + service discovery) .debug[[exercises/dmuc-networking-details.md](https://github.com/jpetazzo/container.training/tree/2026-05-enix/slides/exercises/dmuc-networking-details.md)] --- ## CNI - Easy option: Weave https://github.com/weaveworks/weave/releases - Better option: Cilium https://docs.cilium.io/en/stable/gettingstarted/k8s-install-default/#install-the-cilium-cli or https://docs.cilium.io/en/stable/installation/k8s-install-helm/#installation-using-helm .debug[[exercises/dmuc-networking-details.md](https://github.com/jpetazzo/container.training/tree/2026-05-enix/slides/exercises/dmuc-networking-details.md)] --- ## kube-proxy - Option 1: author a DaemonSet - Option 2: leverage the CNI (some CNIs like Cilium can replace kube-proxy) .debug[[exercises/dmuc-networking-details.md](https://github.com/jpetazzo/container.training/tree/2026-05-enix/slides/exercises/dmuc-networking-details.md)] --- ## CoreDNS - Suggested method: Helm chart (available on https://github.com/coredns/helm) .debug[[exercises/dmuc-networking-details.md](https://github.com/jpetazzo/container.training/tree/2026-05-enix/slides/exercises/dmuc-networking-details.md)] --- ## Testing - Try to deploy DockerCoins and confirm that it works (for instance with [this YAML file](https://raw.githubusercontent.com/jpetazzo/container.training/refs/heads/main/k8s/dockercoins.yaml)) .debug[[exercises/dmuc-networking-details.md](https://github.com/jpetazzo/container.training/tree/2026-05-enix/slides/exercises/dmuc-networking-details.md)] --- class: pic .interstitial[] --- name: toc-exercise--static-pods class: title Exercise — static pods .nav[ [Previous part](#toc-exercise--networking) | [Back to table of contents](#toc-part-1) | [Next part](#toc-building-our-own-cluster-hard) ] .debug[(automatically generated title slide)] --- # Exercise — static pods - We want to run the control plane in static pods (etcd, API server, controller manager, scheduler) - For Kubernetes components, we can use [these images](https://kubernetes.io/releases/download/#container-images) - For etcd, we can use [this image](https://quay.io/repository/coreos/etcd?tab=tags) - If we're using keys, certificates... We can use [hostPath volumes](https://kubernetes.io/docs/concepts/storage/volumes/#hostpath) .debug[[exercises/dmuc-staticpods-details.md](https://github.com/jpetazzo/container.training/tree/2026-05-enix/slides/exercises/dmuc-staticpods-details.md)] --- ## Testing After authoring our static pod manifests and placing them in the right directory, we should be able to start our cluster simply by starting kubelet. (Assuming that the container engine is already running.) For bonus points: write and enable a systemd unit for kubelet! .debug[[exercises/dmuc-staticpods-details.md](https://github.com/jpetazzo/container.training/tree/2026-05-enix/slides/exercises/dmuc-staticpods-details.md)] --- class: pic .interstitial[] --- name: toc-building-our-own-cluster-hard class: title Building our own cluster (hard) .nav[ [Previous part](#toc-exercise--static-pods) | [Back to table of contents](#toc-part-2) | [Next part](#toc-api-server-availability) ] .debug[(automatically generated title slide)] --- # Building our own cluster (hard) - This section assumes that you already went through *“Building our own cluster (medium)”* - In that previous section, we built a cluster with a single node - In this new section, we're going to add more nodes to the cluster - Note: we will need the lab environment of that previous section - If you haven't done it yet, you should go through that section first .debug[[k8s/dmuc-hard.md](https://github.com/jpetazzo/container.training/tree/2026-05-enix/slides/k8s/dmuc-hard.md)] --- ## Our environment - On `polykube1`, we should have our Kubernetes control plane - We're also assuming that we have the kubeconfig file created earlier (in `~/.kube/config`) - We're going to work on `polykube2` and add it to the cluster - This machine has exactly the same setup as `polykube1` (Ubuntu LTS with CNI, etcd, and Kubernetes binaries installed) - Note that we won't need the etcd binaries here (the control plane will run solely on `polykube1`) .debug[[k8s/dmuc-hard.md](https://github.com/jpetazzo/container.training/tree/2026-05-enix/slides/k8s/dmuc-hard.md)] --- ## Checklist We need to: - generate the kubeconfig file for `polykube2` - install a container engine - generate a CNI configuration file - start kubelet .debug[[k8s/dmuc-hard.md](https://github.com/jpetazzo/container.training/tree/2026-05-enix/slides/k8s/dmuc-hard.md)] --- ## Generating the kubeconfig file - Ideally, we should generate a key pair and certificate for `polykube2`... - ...and generate a kubeconfig file using these - At the moment, for simplicity, we'll use the same key pair and certificate as earlier - We have a couple of options: - copy the required files (kubeconfig, key pair, certificate) - "flatten" the kubeconfig file (embed the key and certificate within) .debug[[k8s/dmuc-hard.md](https://github.com/jpetazzo/container.training/tree/2026-05-enix/slides/k8s/dmuc-hard.md)] --- class: extra-details ## To flatten or not to flatten? - "Flattening" the kubeconfig file can seem easier (because it means we'll only have one file to move around) - But it's easier to rotate the key or renew the certificate when they're in separate files .debug[[k8s/dmuc-hard.md](https://github.com/jpetazzo/container.training/tree/2026-05-enix/slides/k8s/dmuc-hard.md)] --- ## Flatten and copy the kubeconfig file - We'll flatten the file and copy it over .lab[ - On `polykube1`, flatten the kubeconfig file: ```bash kubectl config view --flatten > kubeconfig ``` - Then copy it to `polykube2`: ```bash scp kubeconfig polykube2: ``` ] .debug[[k8s/dmuc-hard.md](https://github.com/jpetazzo/container.training/tree/2026-05-enix/slides/k8s/dmuc-hard.md)] --- ## Generate CNI configuration Back on `polykube2`, put the following in `/etc/cni/net.d/kube.conf`: ```json { "cniVersion": "0.3.1", "name": "kube", "type": "bridge", "bridge": "cni0", "isDefaultGateway": true, "ipMasq": true, "hairpinMode": true, "ipam": { "type": "host-local", "subnet": `"10.1.2.0/24"` } } ``` Note how we changed the subnet! .debug[[k8s/dmuc-hard.md](https://github.com/jpetazzo/container.training/tree/2026-05-enix/slides/k8s/dmuc-hard.md)] --- ## Install container engine and start `kubelet` .lab[ - Install `containerd`: ```bash sudo apt-get install containerd -y ``` - Start `containerd`: ```bash sudo systemctl start containerd ``` - Start `kubelet`: ```bash sudo kubelet --kubeconfig kubeconfig ``` ] We're getting errors looking like: ``` "Post \"https://localhost:6443/api/v1/nodes\": ... connect: connection refused" ``` .debug[[k8s/dmuc-hard.md](https://github.com/jpetazzo/container.training/tree/2026-05-enix/slides/k8s/dmuc-hard.md)] --- ## Updating the kubeconfig file - Our kubeconfig file still references `localhost:6443` - This was fine on `polykube1` (where `kubelet` was connecting to the control plane running locally) - On `polykube2`, we need to change that and put the address of the API server (i.e. the address of `polykube1`) .lab[ - Update the `kubeconfig` file: ```bash sed -i s/localhost:6443/polykube1:6443/ kubeconfig ``` ] .debug[[k8s/dmuc-hard.md](https://github.com/jpetazzo/container.training/tree/2026-05-enix/slides/k8s/dmuc-hard.md)] --- ## Starting `kubelet` - `kubelet` should now start correctly (hopefully!) .lab[ - On `polykube2`, start `kubelet`: ```bash sudo kubelet --kubeconfig kubeconfig ``` - On `polykube1`, check that `polykube2` shows up and is `Ready`: ```bash kubectl get nodes ``` ] .debug[[k8s/dmuc-hard.md](https://github.com/jpetazzo/container.training/tree/2026-05-enix/slides/k8s/dmuc-hard.md)] --- ## Testing connectivity - From `polykube1`, can we connect to Pods running on `polykube2`? 🤔 .lab[ - Scale the test Deployment: ```bash kubectl scale deployment blue --replicas=5 ``` - Get the IP addresses of the Pods: ```bash kubectl get pods -o wide ``` - Pick a Pod on `polykube2` and try to connect to it: ```bash curl `10.1.2.2` ``` ] -- At that point, it doesn't work. .debug[[k8s/dmuc-hard.md](https://github.com/jpetazzo/container.training/tree/2026-05-enix/slides/k8s/dmuc-hard.md)] --- ## Refresher on the *pod network* - The *pod network* (or *pod-to-pod network*) has a few responsibilities: - allocating and managing Pod IP addresses - connecting Pods and Nodes - connecting Pods together on a given node - *connecting Pods together across nodes* - That last part is the one that's not functioning in our cluster - It typically requires some combination of routing, tunneling, bridging... .debug[[k8s/dmuc-hard.md](https://github.com/jpetazzo/container.training/tree/2026-05-enix/slides/k8s/dmuc-hard.md)] --- ## Connecting networks together - We can add manual routes between our nodes - This requires adding `N x (N-1)` routes (on each node, add a route to every other node) - This will work on home labs where nodes are directly connected (e.g. on an Ethernet switch, or same WiFi network, or a bridge between local VMs) - ...Or on clouds where IP address filtering has been disabled (by default, most cloud providers will discard packets going to unknown IP addresses) - If IP address filtering is enabled, you'll have to use e.g. tunneling or overlay networks .debug[[k8s/dmuc-hard.md](https://github.com/jpetazzo/container.training/tree/2026-05-enix/slides/k8s/dmuc-hard.md)] --- ## Important warning - The technique that we are about to use doesn't work everywhere - It only works if: - all the nodes are directly connected to each other (at layer 2) - the underlying network allows the IP addresses of our pods - If we are on physical machines connected by a switch: OK - If we are on virtual machines in a public cloud: NOT OK - on AWS, we need to disable "source and destination checks" on our instances - on OpenStack, we need to disable "port security" on our network ports .debug[[k8s/dmuc-hard.md](https://github.com/jpetazzo/container.training/tree/2026-05-enix/slides/k8s/dmuc-hard.md)] --- ## Routing basics - We need to tell *each* node: "The subnet 10.1.N.0/24 is located on node N" (for all values of N) - This is how we add a route on Linux: ```bash ip route add 10.1.N.0/24 via W.X.Y.Z ``` (where `W.X.Y.Z` is the internal IP address of node N) - We can see the internal IP addresses of our nodes with: ```bash kubectl get nodes -o wide ``` .debug[[k8s/dmuc-hard.md](https://github.com/jpetazzo/container.training/tree/2026-05-enix/slides/k8s/dmuc-hard.md)] --- ## Adding our route - Let's add a route from `polykube1` to `polykube2` .lab[ - Check the internal address of `polykube2`: ```bash kubectl get node polykube2 -o wide ``` - Now, on `polykube1`, add the route to the Pods running on `polykube2`: ```bash sudo ip route add 10.1.2.0/24 via `A.B.C.D` ``` - Finally, check that we can now connect to a Pod running on `polykube2`: ```bash curl 10.1.2.2 ``` ] .debug[[k8s/dmuc-hard.md](https://github.com/jpetazzo/container.training/tree/2026-05-enix/slides/k8s/dmuc-hard.md)] --- ## What's next? - The network configuration feels very manual: - we had to generate the CNI configuration file (in `/etc/cni/net.d`) - we had to manually update the nodes' routing tables - Can we automate that? **YES!** - We could install something like [kube-router](https://www.kube-router.io/) (which specifically takes care of the CNI configuration file and populates routing tables) - Or we could also go with e.g. [Cilium](https://cilium.io/) .debug[[k8s/dmuc-hard.md](https://github.com/jpetazzo/container.training/tree/2026-05-enix/slides/k8s/dmuc-hard.md)] --- class: extra-details ## If you want to try Cilium... - Add the `--root-ca-file` flag to the controller manager: - use the certificate automatically generated by the API server <br/> (it should be in `/var/run/kubernetes/apiserver.crt`) - or generate a key pair and certificate for the API server and point to that certificate - without that, you'll get certificate validation errors <br/> (because in our Pods, the `ca.crt` file used to validate the API server will be empty) - Check the Cilium [without kube-proxy][ciliumwithoutkubeproxy] instructions (make sure to pass the API server IP address and port!) - Other pod-to-pod network implementations might also require additional steps [ciliumwithoutkubeproxy]: https://docs.cilium.io/en/stable/network/kubernetes/kubeproxy-free/#kubeproxy-free .debug[[k8s/dmuc-hard.md](https://github.com/jpetazzo/container.training/tree/2026-05-enix/slides/k8s/dmuc-hard.md)] --- class: extra-details ## About the API server certificate... - In the previous sections, we've skipped API server certificate verification - To generate a proper certificate, we need to include a `subjectAltName` extension - And make sure that the CA includes the extension in the certificate ```bash openssl genrsa -out apiserver.key 4096 openssl req -new -key apiserver.key -subj /CN=kubernetes/ \ -addext "subjectAltName = DNS:kubernetes.default.svc, \ DNS:kubernetes.default, DNS:kubernetes, \ DNS:localhost, DNS:polykube1" -out apiserver.csr openssl x509 -req -in apiserver.csr -CAkey ca.key -CA ca.cert \ -out apiserver.crt -copy_extensions copy ``` ??? :EN:- Connecting nodes and pods :FR:- Interconnecter les nœuds et les pods .debug[[k8s/dmuc-hard.md](https://github.com/jpetazzo/container.training/tree/2026-05-enix/slides/k8s/dmuc-hard.md)] --- class: pic .interstitial[] --- name: toc-api-server-availability class: title API server availability .nav[ [Previous part](#toc-building-our-own-cluster-hard) | [Back to table of contents](#toc-part-2) | [Next part](#toc-cni-internals) ] .debug[(automatically generated title slide)] --- # API server availability - When we set up a node, we need the address of the API server: - for kubelet - for kube-proxy - sometimes for the pod network system (like kube-router) - How do we ensure the availability of that endpoint? (what if the node running the API server goes down?) .debug[[k8s/apilb.md](https://github.com/jpetazzo/container.training/tree/2026-05-enix/slides/k8s/apilb.md)] --- ## Option 1: external load balancer - Set up an external load balancer - Point kubelet (and other components) to that load balancer - Put the node(s) running the API server behind that load balancer - Update the load balancer if/when an API server node needs to be replaced - On cloud infrastructures, some mechanisms provide automation for this (e.g. on AWS, an Elastic Load Balancer + Auto Scaling Group) - [Example in Kubernetes The Hard Way](https://github.com/kelseyhightower/kubernetes-the-hard-way/blob/master/docs/08-bootstrapping-kubernetes-controllers.md#the-kubernetes-frontend-load-balancer) .debug[[k8s/apilb.md](https://github.com/jpetazzo/container.training/tree/2026-05-enix/slides/k8s/apilb.md)] --- ## Option 2: local load balancer - Set up a load balancer (like NGINX, HAProxy...) on *each* node - Configure that load balancer to send traffic to the API server node(s) - Point kubelet (and other components) to `localhost` - Update the load balancer configuration when API server nodes are updated .debug[[k8s/apilb.md](https://github.com/jpetazzo/container.training/tree/2026-05-enix/slides/k8s/apilb.md)] --- ## Updating the local load balancer config - Distribute the updated configuration (push) - Or regularly check for updates (pull) - The latter requires an external, highly available store (it could be an object store, an HTTP server, or even DNS...) - Updates can be facilitated by a DaemonSet (but remember that it can't be used when installing a new node!) .debug[[k8s/apilb.md](https://github.com/jpetazzo/container.training/tree/2026-05-enix/slides/k8s/apilb.md)] --- ## Option 3: DNS records - Put all the API server nodes behind a round-robin DNS - Point kubelet (and other components) to that name - Update the records when needed - Note: this option is not officially supported (but since kubelet supports reconnection anyway, it *should* work) .debug[[k8s/apilb.md](https://github.com/jpetazzo/container.training/tree/2026-05-enix/slides/k8s/apilb.md)] --- ## Option 4: .................... - Many managed clusters expose a high-availability API endpoint (and you don't have to worry about it) - You can also use HA mechanisms that you're familiar with (e.g. virtual IPs) - Tunnels are also fine (e.g. [k3s](https://k3s.io/) uses a tunnel to allow each node to contact the API server) ??? :EN:- Ensuring API server availability :FR:- Assurer la disponibilité du serveur API .debug[[k8s/apilb.md](https://github.com/jpetazzo/container.training/tree/2026-05-enix/slides/k8s/apilb.md)] --- class: pic .interstitial[] --- name: toc-cni-internals class: title CNI internals .nav[ [Previous part](#toc-api-server-availability) | [Back to table of contents](#toc-part-2) | [Next part](#toc-the-csr-api) ] .debug[(automatically generated title slide)] --- # CNI internals - Kubelet looks for a CNI configuration file (by default, in `/etc/cni/net.d`) - Note: if we have multiple files, the first one will be used (in lexicographic order) - If no configuration can be found, kubelet holds off on creating containers (except if they are using `hostNetwork`) - Let's see how exactly plugins are invoked! .debug[[k8s/cni-internals.md](https://github.com/jpetazzo/container.training/tree/2026-05-enix/slides/k8s/cni-internals.md)] --- ## General principle - A plugin is an executable program - It is invoked with by kubelet to set up / tear down networking for a container - It doesn't take any command-line argument - However, it uses environment variables to know what to do, which container, etc. - It reads JSON on stdin, and writes back JSON on stdout - There will generally be multiple plugins invoked in a row (at least IPAM + network setup; possibly more) .debug[[k8s/cni-internals.md](https://github.com/jpetazzo/container.training/tree/2026-05-enix/slides/k8s/cni-internals.md)] --- ## Environment variables - `CNI_COMMAND`: `ADD`, `DEL`, `CHECK`, or `VERSION` - `CNI_CONTAINERID`: opaque identifier (container ID of the "sandbox", i.e. the container running the `pause` image) - `CNI_NETNS`: path to network namespace pseudo-file (e.g. `/var/run/netns/cni-0376f625-29b5-7a21-6c45-6a973b3224e5`) - `CNI_IFNAME`: interface name, usually `eth0` - `CNI_PATH`: path(s) with plugin executables (e.g. `/opt/cni/bin`) - `CNI_ARGS`: "extra arguments" (see next slide) .debug[[k8s/cni-internals.md](https://github.com/jpetazzo/container.training/tree/2026-05-enix/slides/k8s/cni-internals.md)] --- ## `CNI_ARGS` - Extra key/value pair arguments passed by "the user" - "The user", here, is "kubelet" (or in an abstract way, "Kubernetes") - This is used to pass the pod name and namespace to the CNI plugin - Example: ``` IgnoreUnknown=1 K8S_POD_NAMESPACE=default K8S_POD_NAME=web-96d5df5c8-jcn72 K8S_POD_INFRA_CONTAINER_ID=016493dbff152641d334d9828dab6136c1ff... ``` Note that technically, it's a `;`-separated list, so it really looks like this: ``` CNI_ARGS=IgnoreUnknown=1;K8S_POD_NAMESPACE=default;K8S_POD_NAME=web-96d... ``` .debug[[k8s/cni-internals.md](https://github.com/jpetazzo/container.training/tree/2026-05-enix/slides/k8s/cni-internals.md)] --- ## JSON in, JSON out - The plugin reads its configuration on stdin - It writes back results in JSON (e.g. allocated address, routes, DNS...) ⚠️ "Plugin configuration" is not always the same as "CNI configuration"! .debug[[k8s/cni-internals.md](https://github.com/jpetazzo/container.training/tree/2026-05-enix/slides/k8s/cni-internals.md)] --- ## Conf vs Conflist - The CNI configuration can be a single plugin configuration - it will then contain a `type` field in the top-most structure - it will be passed "as-is" - It can also be a "conflist", containing a chain of plugins (it will then contain a `plugins` field in the top-most structure) - Plugins are then invoked in order (reverse order for `DEL` action) - In that case, the input of the plugin is not the whole configuration (see details on next slide) .debug[[k8s/cni-internals.md](https://github.com/jpetazzo/container.training/tree/2026-05-enix/slides/k8s/cni-internals.md)] --- ## List of plugins - When invoking a plugin in a list, the JSON input will be: - the configuration of the plugin - augmented with `name` (matching the conf list `name`) - augmented with `prevResult` (which will be the output of the previous plugin) - Conceptually, a plugin (generally the first one) will do the "main setup" - Other plugins can do tuning / refinement (firewalling, traffic shaping...) .debug[[k8s/cni-internals.md](https://github.com/jpetazzo/container.training/tree/2026-05-enix/slides/k8s/cni-internals.md)] --- ## Analyzing plugins - Let's see what goes in and out of our CNI plugins! - We will create a fake plugin that: - saves its environment and input - executes the real plugin with the saved input - saves the plugin output - passes the saved output .debug[[k8s/cni-internals.md](https://github.com/jpetazzo/container.training/tree/2026-05-enix/slides/k8s/cni-internals.md)] --- ## Our fake plugin ```bash #!/bin/sh PLUGIN=$(basename $0) cat > /tmp/cni.$$.$PLUGIN.in env | sort > /tmp/cni.$$.$PLUGIN.env echo "PPID=$PPID, $(readlink /proc/$PPID/exe)" > /tmp/cni.$$.$PLUGIN.parent $0.real < /tmp/cni.$$.$PLUGIN.in > /tmp/cni.$$.$PLUGIN.out EXITSTATUS=$? cat /tmp/cni.$$.$PLUGIN.out exit $EXITSTATUS ``` Save this script as `/opt/cni/bin/debug` and make it executable. .debug[[k8s/cni-internals.md](https://github.com/jpetazzo/container.training/tree/2026-05-enix/slides/k8s/cni-internals.md)] --- ## Substituting the fake plugin - For each plugin that we want to instrument: - rename the plugin from e.g. `ptp` to `ptp.real` - symlink `ptp` to our `debug` plugin - There is no need to change the CNI configuration or restart kubelet .debug[[k8s/cni-internals.md](https://github.com/jpetazzo/container.training/tree/2026-05-enix/slides/k8s/cni-internals.md)] --- ## Create some pods and looks at the results - Create a pod - For each instrumented plugin, there will be files in `/tmp`: `cni.PID.pluginname.in` (JSON input) `cni.PID.pluginname.env` (environment variables) `cni.PID.pluginname.parent` (parent process information) `cni.PID.pluginname.out` (JSON output) ❓️ What is calling our plugins? ??? :EN:- Deep dive into CNI internals :FR:- La Container Network Interface (CNI) en détails .debug[[k8s/cni-internals.md](https://github.com/jpetazzo/container.training/tree/2026-05-enix/slides/k8s/cni-internals.md)] --- class: pic .interstitial[] --- name: toc-the-csr-api class: title The CSR API .nav[ [Previous part](#toc-cni-internals) | [Back to table of contents](#toc-part-2) | [Next part](#toc-openid-connect) ] .debug[(automatically generated title slide)] --- # The CSR API - The Kubernetes API exposes CSR resources - We can use these resources to issue TLS certificates - First, we will go through a quick reminder about TLS certificates - Then, we will see how to obtain a certificate for a user - We will use that certificate to authenticate with the cluster - Finally, we will grant some privileges to that user .debug[[k8s/csr-api.md](https://github.com/jpetazzo/container.training/tree/2026-05-enix/slides/k8s/csr-api.md)] --- ## Reminder about TLS - TLS (Transport Layer Security) is a protocol providing: - encryption (to prevent eavesdropping) - authentication (using public key cryptography) - When we access an https:// URL, the server authenticates itself (it proves its identity to us; as if it were "showing its ID") - But we can also have mutual TLS authentication (mTLS) (client proves its identity to server; server proves its identity to client) .debug[[k8s/csr-api.md](https://github.com/jpetazzo/container.training/tree/2026-05-enix/slides/k8s/csr-api.md)] --- ## Authentication with certificates - To authenticate, someone (client or server) needs: - a *private key* (that remains known only to them) - a *public key* (that they can distribute) - a *certificate* (associating the public key with an identity) - A message encrypted with the private key can only be decrypted with the public key (and vice versa) - If I use someone's public key to encrypt/decrypt their messages, <br/> I can be certain that I am talking to them / they are talking to me - The certificate proves that I have the correct public key for them .debug[[k8s/csr-api.md](https://github.com/jpetazzo/container.training/tree/2026-05-enix/slides/k8s/csr-api.md)] --- ## Certificate generation workflow This is what I do if I want to obtain a certificate. 1. Create public and private keys. 2. Create a Certificate Signing Request (CSR). (The CSR contains the identity that I claim and a public key.) 3. Send that CSR to the Certificate Authority (CA). 4. The CA verifies that I can claim the identity in the CSR. 5. The CA generates my certificate and gives it to me. The CA (or anyone else) never needs to know my private key. .debug[[k8s/csr-api.md](https://github.com/jpetazzo/container.training/tree/2026-05-enix/slides/k8s/csr-api.md)] --- ## The CSR API - The Kubernetes API has a CertificateSigningRequest resource type (we can list them with e.g. `kubectl get csr`) - We can create a CSR object (= upload a CSR to the Kubernetes API) - Then, using the Kubernetes API, we can approve/deny the request - If we approve the request, the Kubernetes API generates a certificate - The certificate gets attached to the CSR object and can be retrieved .debug[[k8s/csr-api.md](https://github.com/jpetazzo/container.training/tree/2026-05-enix/slides/k8s/csr-api.md)] --- ## Using the CSR API - We will show how to use the CSR API to obtain user certificates - This will be a rather complex demo - ... And yet, we will take a few shortcuts to simplify it (but it will illustrate the general idea) - The demo also won't be automated (we would have to write extra code to make it fully functional) .debug[[k8s/csr-api.md](https://github.com/jpetazzo/container.training/tree/2026-05-enix/slides/k8s/csr-api.md)] --- ## Warning - The CSR API isn't really suited to issue user certificates - It is primarily intended to issue control plane certificates (for instance, deal with kubelet certificates renewal) - The API was expanded a bit in Kubernetes 1.19 to encompass broader usage - There are still lots of gaps in the spec (e.g. how to specify expiration in a standard way) - ... And no other implementation to this date (but [cert-manager](https://cert-manager.io/docs/faq/#kubernetes-has-a-builtin-certificatesigningrequest-api-why-not-use-that) might eventually get there!) .debug[[k8s/csr-api.md](https://github.com/jpetazzo/container.training/tree/2026-05-enix/slides/k8s/csr-api.md)] --- ## General idea - We will create a Namespace named "users" - Each user will get a ServiceAccount in that Namespace - That ServiceAccount will give read/write access to *one* CSR object - Users will use that ServiceAccount's token to submit a CSR - We will approve the CSR (or not) - Users can then retrieve their certificate from their CSR object - ...And use that certificate for subsequent interactions .debug[[k8s/csr-api.md](https://github.com/jpetazzo/container.training/tree/2026-05-enix/slides/k8s/csr-api.md)] --- ## Resource naming For a user named `jean.doe`, we will have: - ServiceAccount `jean.doe` in Namespace `users` - CertificateSigningRequest `user=jean.doe` - ClusterRole `user=jean.doe` giving read/write access to that CSR - ClusterRoleBinding `user=jean.doe` binding ClusterRole and ServiceAccount .debug[[k8s/csr-api.md](https://github.com/jpetazzo/container.training/tree/2026-05-enix/slides/k8s/csr-api.md)] --- class: extra-details ## About resource name constraints - Most Kubernetes identifiers and names are fairly restricted - They generally are DNS-1123 *labels* or *subdomains* (from [RFC 1123](https://tools.ietf.org/html/rfc1123)) - A label is lowercase letters, numbers, dashes; can't start or finish with a dash - A subdomain is one or multiple labels separated by dots - Some resources have more relaxed constraints, and can be "path segment names" (uppercase are allowed, as well as some characters like `#:?!,_`) - This includes RBAC objects (like Roles, RoleBindings...) and CSRs - See the [Identifiers and Names](https://github.com/kubernetes/community/blob/master/contributors/design-proposals/architecture/identifiers.md) design document and the [Object Names and IDs](https://kubernetes.io/docs/concepts/overview/working-with-objects/names/#path-segment-names) documentation page for more details .debug[[k8s/csr-api.md](https://github.com/jpetazzo/container.training/tree/2026-05-enix/slides/k8s/csr-api.md)] --- ## Creating the user's resources .warning[If you want to use another name than `jean.doe`, update the YAML file!] .lab[ - Create the global namespace for all users: ```bash kubectl create namespace users ``` - Create the ServiceAccount, ClusterRole, ClusterRoleBinding for `jean.doe`: ```bash kubectl apply -f ~/container.training/k8s/user=jean.doe.yaml ``` ] .debug[[k8s/csr-api.md](https://github.com/jpetazzo/container.training/tree/2026-05-enix/slides/k8s/csr-api.md)] --- ## Extracting the user's token - Let's obtain the user's token and give it to them (the token will be their password) .lab[ - List the user's secrets: ```bash kubectl --namespace=users describe serviceaccount jean.doe ``` - Show the user's token: ```bash kubectl --namespace=users describe secret `jean.doe-token-xxxxx` ``` ] .debug[[k8s/csr-api.md](https://github.com/jpetazzo/container.training/tree/2026-05-enix/slides/k8s/csr-api.md)] --- ## Configure `kubectl` to use the token - Let's create a new context that will use that token to access the API .lab[ - Add a new identity to our kubeconfig file: ```bash kubectl config set-credentials token:jean.doe --token=... ``` - Add a new context using that identity: ```bash kubectl config set-context jean.doe --user=token:jean.doe --cluster=`kubernetes` ``` (Make sure to adapt the cluster name if yours is different!) - Use that context: ```bash kubectl config use-context jean.doe ``` ] .debug[[k8s/csr-api.md](https://github.com/jpetazzo/container.training/tree/2026-05-enix/slides/k8s/csr-api.md)] --- ## Access the API with the token - Let's check that our access rights are set properly .lab[ - Try to access any resource: ```bash kubectl get pods ``` (This should tell us "Forbidden") - Try to access "our" CertificateSigningRequest: ```bash kubectl get csr user=jean.doe ``` (This should tell us "NotFound") ] .debug[[k8s/csr-api.md](https://github.com/jpetazzo/container.training/tree/2026-05-enix/slides/k8s/csr-api.md)] --- ## Create a key and a CSR - There are many tools to generate TLS keys and CSRs - Let's use OpenSSL; it's not the best one, but it's installed everywhere (many people prefer cfssl, easyrsa, or other tools; that's fine too!) .lab[ - Generate the key and certificate signing request: ```bash openssl req -newkey rsa:2048 -nodes -keyout key.pem \ -new -subj /CN=jean.doe/O=devs/ -out csr.pem ``` ] The command above generates: - a 2048-bit RSA key, without encryption, stored in key.pem - a CSR for the name `jean.doe` in group `devs` .debug[[k8s/csr-api.md](https://github.com/jpetazzo/container.training/tree/2026-05-enix/slides/k8s/csr-api.md)] --- ## Inside the Kubernetes CSR object - The Kubernetes CSR object is a thin wrapper around the CSR PEM file - The PEM file needs to be encoded to base64 on a single line (we will use `base64 -w0` for that purpose) - The Kubernetes CSR object also needs to list the right "usages" (these are flags indicating how the certificate can be used) .debug[[k8s/csr-api.md](https://github.com/jpetazzo/container.training/tree/2026-05-enix/slides/k8s/csr-api.md)] --- ## Sending the CSR to Kubernetes .lab[ - Generate and create the CSR resource: ```bash kubectl apply -f - <<EOF apiVersion: certificates.k8s.io/v1 kind: CertificateSigningRequest metadata: name: user=jean.doe spec: request: $(base64 -w0 < csr.pem) signerName: kubernetes.io/kube-apiserver-client usages: - digital signature - key encipherment - client auth EOF ``` ] .debug[[k8s/csr-api.md](https://github.com/jpetazzo/container.training/tree/2026-05-enix/slides/k8s/csr-api.md)] --- ## Adjusting certificate expiration - By default, the CSR API generates certificates valid 1 year - We want to generate short-lived certificates, so we will lower that to 1 hour - Fow now, this is configured [through an experimental controller manager flag](https://github.com/kubernetes/kubernetes/issues/67324) .lab[ - Edit the static pod definition for the controller manager: ```bash sudo vim /etc/kubernetes/manifests/kube-controller-manager.yaml ``` - In the list of flags, add the following line: ```bash - --experimental-cluster-signing-duration=1h ``` ] *Kubernetes 1.22 supports a new `spec.expirationSeconds` field.* .debug[[k8s/csr-api.md](https://github.com/jpetazzo/container.training/tree/2026-05-enix/slides/k8s/csr-api.md)] --- ## Verifying and approving the CSR - Let's inspect the CSR, and if it is valid, approve it .lab[ - Switch back to `cluster-admin`: ```bash kctx - ``` - Inspect the CSR: ```bash kubectl describe csr user=jean.doe ``` - Approve it: ```bash kubectl certificate approve user=jean.doe ``` ] .debug[[k8s/csr-api.md](https://github.com/jpetazzo/container.training/tree/2026-05-enix/slides/k8s/csr-api.md)] --- ## Obtaining the certificate .lab[ - Switch back to the user's identity: ```bash kctx - ``` - Retrieve the updated CSR object and extract the certificate: ```bash kubectl get csr user=jean.doe \ -o jsonpath={.status.certificate} \ | base64 -d > cert.pem ``` - Inspect the certificate: ```bash openssl x509 -in cert.pem -text -noout ``` ] .debug[[k8s/csr-api.md](https://github.com/jpetazzo/container.training/tree/2026-05-enix/slides/k8s/csr-api.md)] --- ## Using the certificate .lab[ - Add the key and certificate to kubeconfig: ```bash kubectl config set-credentials cert:jean.doe --embed-certs \ --client-certificate=cert.pem --client-key=key.pem ``` - Update the user's context to use the key and cert to authenticate: ```bash kubectl config set-context jean.doe --user cert:jean.doe ``` - Confirm that we are seen as `jean.doe` (but don't have permissions): ```bash kubectl get pods ``` ] .debug[[k8s/csr-api.md](https://github.com/jpetazzo/container.training/tree/2026-05-enix/slides/k8s/csr-api.md)] --- ## What's missing? We have just shown, step by step, a method to issue short-lived certificates for users. To be usable in real environments, we would need to add: - a kubectl helper to automatically generate the CSR and obtain the cert (and transparently renew the cert when needed) - a Kubernetes controller to automatically validate and approve CSRs (checking that the subject and groups are valid) - a way for the users to know the groups to add to their CSR (e.g.: annotations on their ServiceAccount + read access to the ServiceAccount) .debug[[k8s/csr-api.md](https://github.com/jpetazzo/container.training/tree/2026-05-enix/slides/k8s/csr-api.md)] --- ## Is this realistic? - Larger organizations typically integrate with their own directory - The general principle, however, is the same: - users have long-term credentials (password, token, ...) - they use these credentials to obtain other, short-lived credentials - This provides enhanced security: - the long-term credentials can use long passphrases, 2FA, HSM... - the short-term credentials are more convenient to use - we get strong security *and* convenience - Systems like Vault also have certificate issuance mechanisms ??? :EN:- Generating user certificates with the CSR API :FR:- Génération de certificats utilisateur avec la CSR API .debug[[k8s/csr-api.md](https://github.com/jpetazzo/container.training/tree/2026-05-enix/slides/k8s/csr-api.md)] --- class: pic .interstitial[] --- name: toc-openid-connect class: title OpenID Connect .nav[ [Previous part](#toc-the-csr-api) | [Back to table of contents](#toc-part-2) | [Next part](#toc-restricting-pod-permissions) ] .debug[(automatically generated title slide)] --- # OpenID Connect - The Kubernetes API server can perform authentication with OpenID connect - This requires an *OpenID provider* (external authorization server using the OAuth 2.0 protocol) - We can use a third-party provider (e.g. Google) or run our own (e.g. Dex) - We are going to give an overview of the protocol - We will show it in action (in a simplified scenario) .debug[[k8s/openid-connect.md](https://github.com/jpetazzo/container.training/tree/2026-05-enix/slides/k8s/openid-connect.md)] --- ## Workflow overview - We want to access our resources (a Kubernetes cluster) - We authenticate with the OpenID provider - we can do this directly (e.g. by going to https://accounts.google.com) - or maybe a kubectl plugin can open a browser page on our behalf - After authenticating us, the OpenID provider gives us: - an *id token* (a short-lived signed JSON Web Token, see next slide) - a *refresh token* (to renew the *id token* when needed) - We can now issue requests to the Kubernetes API with the *id token* - The API server will verify that token's content to authenticate us .debug[[k8s/openid-connect.md](https://github.com/jpetazzo/container.training/tree/2026-05-enix/slides/k8s/openid-connect.md)] --- ## JSON Web Tokens - A JSON Web Token (JWT) has three parts: - a header specifying algorithms and token type - a payload (indicating who issued the token, for whom, which purposes...) - a signature generated by the issuer (the issuer = the OpenID provider) - Anyone can verify a JWT without contacting the issuer (except to obtain the issuer's public key) - Pro tip: we can inspect a JWT with https://jwt.io/ .debug[[k8s/openid-connect.md](https://github.com/jpetazzo/container.training/tree/2026-05-enix/slides/k8s/openid-connect.md)] --- ## How the Kubernetes API uses JWT - Server side - enable OIDC authentication - indicate which issuer (provider) should be allowed - indicate which audience (or "client id") should be allowed - optionally, map or prefix user and group names - Client side - obtain JWT as described earlier - pass JWT as authentication token - renew JWT when needed (using the refresh token) .debug[[k8s/openid-connect.md](https://github.com/jpetazzo/container.training/tree/2026-05-enix/slides/k8s/openid-connect.md)] --- ## Demo time! - We will use [Google Accounts](https://accounts.google.com) as our OpenID provider - We will use the [Google OAuth Playground](https://developers.google.com/oauthplayground) as the "audience" or "client id" - We will obtain a JWT through Google Accounts and the OAuth Playground - We will enable OIDC in the Kubernetes API server - We will use the JWT to authenticate .footnote[If you can't or won't use a Google account, you can try to adapt this to another provider.] .debug[[k8s/openid-connect.md](https://github.com/jpetazzo/container.training/tree/2026-05-enix/slides/k8s/openid-connect.md)] --- ## Checking the API server logs - The API server logs will be particularly useful in this section (they will indicate e.g. why a specific token is rejected) - Let's keep an eye on the API server output! .lab[ - Tail the logs of the API server: ```bash kubectl logs kube-apiserver-node1 --follow --namespace=kube-system ``` ] .debug[[k8s/openid-connect.md](https://github.com/jpetazzo/container.training/tree/2026-05-enix/slides/k8s/openid-connect.md)] --- ## Authenticate with the OpenID provider - We will use the Google OAuth Playground for convenience - In a real scenario, we would need our own OAuth client instead of the playground (even if we were still using Google as the OpenID provider) .lab[ - Open the Google OAuth Playground: ``` https://developers.google.com/oauthplayground/ ``` - Enter our own custom scope in the text field: ``` https://www.googleapis.com/auth/userinfo.email ``` - Click on "Authorize APIs" and allow the playground to access our email address ] .debug[[k8s/openid-connect.md](https://github.com/jpetazzo/container.training/tree/2026-05-enix/slides/k8s/openid-connect.md)] --- ## Obtain our JSON Web Token - The previous step gave us an "authorization code" - We will use it to obtain tokens .lab[ - Click on "Exchange authorization code for tokens" ] - The JWT is the very long `id_token` that shows up on the right hand side (it is a base64-encoded JSON object, and should therefore start with `eyJ`) .debug[[k8s/openid-connect.md](https://github.com/jpetazzo/container.training/tree/2026-05-enix/slides/k8s/openid-connect.md)] --- ## Using our JSON Web Token - We need to create a context (in kubeconfig) for our token (if we just add the token or use `kubectl --token`, our certificate will still be used) .lab[ - Create a new authentication section in kubeconfig: ```bash kubectl config set-credentials myjwt --token=eyJ... ``` - Try to use it: ```bash kubectl --user=myjwt get nodes ``` ] We should get an `Unauthorized` response, since we haven't enabled OpenID Connect in the API server yet. We should also see `invalid bearer token` in the API server log output. .debug[[k8s/openid-connect.md](https://github.com/jpetazzo/container.training/tree/2026-05-enix/slides/k8s/openid-connect.md)] --- ## Enabling OpenID Connect - We need to add a few flags to the API server configuration - These two are mandatory: `--oidc-issuer-url` → URL of the OpenID provider `--oidc-client-id` → app requesting the authentication <br/>(in our case, that's the ID for the Google OAuth Playground) - This one is optional: `--oidc-username-claim` → which field should be used as user name <br/>(we will use the user's email address instead of an opaque ID) - See the [API server documentation](https://kubernetes.io/docs/reference/access-authn-authz/authentication/#configuring-the-api-server ) for more details about all available flags .debug[[k8s/openid-connect.md](https://github.com/jpetazzo/container.training/tree/2026-05-enix/slides/k8s/openid-connect.md)] --- ## Updating the API server configuration - The instructions below will work for clusters deployed with kubeadm (or where the control plane is deployed in static pods) - If your cluster is deployed differently, you will need to adapt them .lab[ - Edit `/etc/kubernetes/manifests/kube-apiserver.yaml` - Add the following lines to the list of command-line flags: ```yaml - --oidc-issuer-url=https://accounts.google.com - --oidc-client-id=407408718192.apps.googleusercontent.com - --oidc-username-claim=email ``` ] .debug[[k8s/openid-connect.md](https://github.com/jpetazzo/container.training/tree/2026-05-enix/slides/k8s/openid-connect.md)] --- ## Restarting the API server - The kubelet monitors the files in `/etc/kubernetes/manifests` - When we save the pod manifest, kubelet will restart the corresponding pod (using the updated command line flags) .lab[ - After making the changes described on the previous slide, save the file - Issue a simple command (like `kubectl version`) until the API server is back up (it might take between a few seconds and one minute for the API server to restart) - Restart the `kubectl logs` command to view the logs of the API server ] .debug[[k8s/openid-connect.md](https://github.com/jpetazzo/container.training/tree/2026-05-enix/slides/k8s/openid-connect.md)] --- ## Using our JSON Web Token - Now that the API server is set up to recognize our token, try again! .lab[ - Try an API command with our token: ```bash kubectl --user=myjwt get nodes kubectl --user=myjwt get pods ``` ] We should see a message like: ``` Error from server (Forbidden): nodes is forbidden: User "jean.doe@gmail.com" cannot list resource "nodes" in API group "" at the cluster scope ``` → We were successfully *authenticated*, but not *authorized*. .debug[[k8s/openid-connect.md](https://github.com/jpetazzo/container.training/tree/2026-05-enix/slides/k8s/openid-connect.md)] --- ## Authorizing our user - As an extra step, let's grant read access to our user - We will use the pre-defined ClusterRole `view` .lab[ - Create a ClusterRoleBinding allowing us to view resources: ```bash kubectl create clusterrolebinding i-can-view \ --user=`jean.doe@gmail.com` --clusterrole=view ``` (make sure to put *your* Google email address there) - Confirm that we can now list pods with our token: ```bash kubectl --user=myjwt get pods ``` ] .debug[[k8s/openid-connect.md](https://github.com/jpetazzo/container.training/tree/2026-05-enix/slides/k8s/openid-connect.md)] --- ## From demo to production .warning[This was a very simplified demo! In a real deployment...] - We wouldn't use the Google OAuth Playground - We *probably* wouldn't even use Google at all (it doesn't seem to provide a way to include groups!) - Some popular alternatives: - [Dex](https://github.com/dexidp/dex), [Keycloak](https://www.keycloak.org/) (self-hosted) - [Okta](https://developer.okta.com/docs/how-to/creating-token-with-groups-claim/#step-five-decode-the-jwt-to-verify) (SaaS) - We would use a helper (like the [kubelogin](https://github.com/int128/kubelogin) plugin) to automatically obtain tokens .debug[[k8s/openid-connect.md](https://github.com/jpetazzo/container.training/tree/2026-05-enix/slides/k8s/openid-connect.md)] --- class: extra-details ## Service Account tokens - The tokens used by Service Accounts are JWT tokens as well - They are signed and verified using a special service account key pair .lab[ - Extract the token of a service account in the current namespace: ```bash kubectl get secrets -o jsonpath={..token} | base64 -d ``` - Copy-paste the token to a verification service like https://jwt.io - Notice that it says "Invalid Signature" ] .debug[[k8s/openid-connect.md](https://github.com/jpetazzo/container.training/tree/2026-05-enix/slides/k8s/openid-connect.md)] --- class: extra-details ## Verifying Service Account tokens - JSON Web Tokens embed the URL of the "issuer" (=OpenID provider) - The issuer provides its public key through a well-known discovery endpoint (similar to https://accounts.google.com/.well-known/openid-configuration) - There is no such endpoint for the Service Account key pair - But we can provide the public key ourselves for verification .debug[[k8s/openid-connect.md](https://github.com/jpetazzo/container.training/tree/2026-05-enix/slides/k8s/openid-connect.md)] --- class: extra-details ## Verifying a Service Account token - On clusters provisioned with kubeadm, the Service Account key pair is: `/etc/kubernetes/pki/sa.key` (used by the controller manager to generate tokens) `/etc/kubernetes/pki/sa.pub` (used by the API server to validate the same tokens) .lab[ - Display the public key used to sign Service Account tokens: ```bash sudo cat /etc/kubernetes/pki/sa.pub ``` - Copy-paste the key in the "verify signature" area on https://jwt.io - It should now say "Signature Verified" ] ??? :EN:- Authenticating with OIDC :FR:- S'identifier avec OIDC .debug[[k8s/openid-connect.md](https://github.com/jpetazzo/container.training/tree/2026-05-enix/slides/k8s/openid-connect.md)] --- class: pic .interstitial[] --- name: toc-restricting-pod-permissions class: title Restricting Pod Permissions .nav[ [Previous part](#toc-openid-connect) | [Back to table of contents](#toc-part-2) | [Next part](#toc-pod-security-policies) ] .debug[(automatically generated title slide)] --- # Restricting Pod Permissions - By default, our pods and containers can do *everything* (including taking over the entire cluster) - We are going to show an example of a malicious pod (which will give us root access to the whole cluster) - Then we will explain how to avoid this with admission control (PodSecurityAdmission, PodSecurityPolicy, or external policy engine) .debug[[k8s/pod-security-intro.md](https://github.com/jpetazzo/container.training/tree/2026-05-enix/slides/k8s/pod-security-intro.md)] --- ## Setting up a namespace - For simplicity, let's work in a separate namespace - Let's create a new namespace called "green" .lab[ - Create the "green" namespace: ```bash kubectl create namespace green ``` - Change to that namespace: ```bash kns green ``` ] .debug[[k8s/pod-security-intro.md](https://github.com/jpetazzo/container.training/tree/2026-05-enix/slides/k8s/pod-security-intro.md)] --- ## Creating a basic Deployment - Just to check that everything works correctly, deploy NGINX .lab[ - Create a Deployment using the official NGINX image: ```bash kubectl create deployment web --image=nginx ``` - Confirm that the Deployment, ReplicaSet, and Pod exist, and that the Pod is running: ```bash kubectl get all ``` ] .debug[[k8s/pod-security-intro.md](https://github.com/jpetazzo/container.training/tree/2026-05-enix/slides/k8s/pod-security-intro.md)] --- ## One example of malicious pods - We will now show an escalation technique in action - We will deploy a DaemonSet that adds our SSH key to the root account (on *each* node of the cluster) - The Pods of the DaemonSet will do so by mounting `/root` from the host .lab[ - Check the file `k8s/hacktheplanet.yaml` with a text editor: ```bash vim ~/container.training/k8s/hacktheplanet.yaml ``` - If you would like, change the SSH key (by changing the GitHub user name) ] .debug[[k8s/pod-security-intro.md](https://github.com/jpetazzo/container.training/tree/2026-05-enix/slides/k8s/pod-security-intro.md)] --- ## Deploying the malicious pods - Let's deploy our "exploit"! .lab[ - Create the DaemonSet: ```bash kubectl create -f ~/container.training/k8s/hacktheplanet.yaml ``` - Check that the pods are running: ```bash kubectl get pods ``` - Confirm that the SSH key was added to the node's root account: ```bash sudo cat /root/.ssh/authorized_keys ``` ] .debug[[k8s/pod-security-intro.md](https://github.com/jpetazzo/container.training/tree/2026-05-enix/slides/k8s/pod-security-intro.md)] --- ## Mitigations - This can be avoided with *admission control* - Admission control = filter for (write) API requests - Admission control can use: - plugins (compiled in API server; enabled/disabled by reconfiguration) - webhooks (registered dynamically) - Admission control has many other uses (enforcing quotas, adding ServiceAccounts automatically, etc.) .debug[[k8s/pod-security-intro.md](https://github.com/jpetazzo/container.training/tree/2026-05-enix/slides/k8s/pod-security-intro.md)] --- ## Admission plugins - [PodSecurityPolicy](https://kubernetes.io/docs/concepts/policy/pod-security-policy/) (was removed in Kubernetes 1.25) - create PodSecurityPolicy resources - create Role that can `use` a PodSecurityPolicy - create RoleBinding that grants the Role to a user or ServiceAccount - [PodSecurityAdmission](https://kubernetes.io/docs/concepts/security/pod-security-admission/) (alpha since Kubernetes 1.22, stable since 1.25) - use pre-defined policies (privileged, baseline, restricted) - label namespaces to indicate which policies they can use - optionally, define default rules (in the absence of labels) .debug[[k8s/pod-security-intro.md](https://github.com/jpetazzo/container.training/tree/2026-05-enix/slides/k8s/pod-security-intro.md)] --- ## Dynamic admission - Leverage ValidatingWebhookConfigurations (to register a validating webhook) - Examples: [Kubewarden](https://www.kubewarden.io/) [Kyverno](https://kyverno.io/policies/pod-security/) [OPA Gatekeeper](https://github.com/open-policy-agent/gatekeeper) - Pros: available today; very flexible and customizable - Cons: performance and reliability of external webhook .debug[[k8s/pod-security-intro.md](https://github.com/jpetazzo/container.training/tree/2026-05-enix/slides/k8s/pod-security-intro.md)] --- ## Validating Admission Policies - Alternative to validating admission webhooks - Evaluated in the API server (don't require an external server; don't add network latency) - Written in CEL (Common Expression Language) - alpha in K8S 1.26; beta in K8S 1.28; GA in K8S 1.30 - Can replace validating webhooks at least in simple cases - Can extend Pod Security Admission - Check [the documentation][vapdoc] for examples [vapdoc]: https://kubernetes.io/docs/reference/access-authn-authz/validating-admission-policy/ .debug[[k8s/pod-security-intro.md](https://github.com/jpetazzo/container.training/tree/2026-05-enix/slides/k8s/pod-security-intro.md)] --- ## Acronym salad - PSP = Pod Security Policy **(deprecated)** - an admission plugin called PodSecurityPolicy - a resource named PodSecurityPolicy (`apiVersion: policy/v1beta1`) - PSA = Pod Security Admission - an admission plugin called PodSecurity, enforcing PSS - PSS = Pod Security Standards - a set of 3 policies (privileged, baseline, restricted)\ ??? :EN:- Mechanisms to prevent pod privilege escalation :FR:- Les mécanismes pour limiter les privilèges des pods .debug[[k8s/pod-security-intro.md](https://github.com/jpetazzo/container.training/tree/2026-05-enix/slides/k8s/pod-security-intro.md)] --- class: pic .interstitial[] --- name: toc-pod-security-policies class: title Pod Security Policies .nav[ [Previous part](#toc-restricting-pod-permissions) | [Back to table of contents](#toc-part-2) | [Next part](#toc-pod-security-admission) ] .debug[(automatically generated title slide)] --- # Pod Security Policies - "Legacy" policies (deprecated since Kubernetes 1.21; removed in 1.25) - Superseded by Pod Security Standards + Pod Security Admission (available in alpha since Kubernetes 1.22; stable since 1.25) - **Since Kubernetes 1.24 was EOL in July 2023, nobody should use PSPs anymore!** - This section is here mostly for historical purposes, and can be skipped .debug[[k8s/pod-security-policies.md](https://github.com/jpetazzo/container.training/tree/2026-05-enix/slides/k8s/pod-security-policies.md)] --- ## Pod Security Policies in theory - To use PSPs, we need to activate their specific *admission controller* - That admission controller will intercept each pod creation attempt - It will look at: - *who/what* is creating the pod - which PodSecurityPolicies they can use - which PodSecurityPolicies can be used by the Pod's ServiceAccount - Then it will compare the Pod with each PodSecurityPolicy one by one - If a PodSecurityPolicy accepts all the parameters of the Pod, it is created - Otherwise, the Pod creation is denied and it won't even show up in `kubectl get pods` .debug[[k8s/pod-security-policies.md](https://github.com/jpetazzo/container.training/tree/2026-05-enix/slides/k8s/pod-security-policies.md)] --- ## Pod Security Policies fine print - With RBAC, using a PSP corresponds to the verb `use` on the PSP (that makes sense, right?) - If no PSP is defined, no Pod can be created (even by cluster admins) - Pods that are already running are *not* affected - If we create a Pod directly, it can use a PSP to which *we* have access - If the Pod is created by e.g. a ReplicaSet or DaemonSet, it's different: - the ReplicaSet / DaemonSet controllers don't have access to *our* policies - therefore, we need to give access to the PSP to the Pod's ServiceAccount .debug[[k8s/pod-security-policies.md](https://github.com/jpetazzo/container.training/tree/2026-05-enix/slides/k8s/pod-security-policies.md)] --- ## Pod Security Policies in practice - We are going to enable the PodSecurityPolicy admission controller - At that point, we won't be able to create any more pods (!) - Then we will create a couple of PodSecurityPolicies - ...And associated ClusterRoles (giving `use` access to the policies) - Then we will create RoleBindings to grant these roles to ServiceAccounts - We will verify that we can't run our "exploit" anymore .debug[[k8s/pod-security-policies.md](https://github.com/jpetazzo/container.training/tree/2026-05-enix/slides/k8s/pod-security-policies.md)] --- ## Enabling Pod Security Policies - To enable Pod Security Policies, we need to enable their *admission plugin* - This is done by adding a flag to the API server - On clusters deployed with `kubeadm`, the control plane runs in static pods - These pods are defined in YAML files located in `/etc/kubernetes/manifests` - Kubelet watches this directory - Each time a file is added/removed there, kubelet creates/deletes the corresponding pod - Updating a file causes the pod to be deleted and recreated .debug[[k8s/pod-security-policies.md](https://github.com/jpetazzo/container.training/tree/2026-05-enix/slides/k8s/pod-security-policies.md)] --- ## Updating the API server flags - Let's edit the manifest for the API server pod .lab[ - Have a look at the static pods: ```bash ls -l /etc/kubernetes/manifests ``` - Edit the one corresponding to the API server: ```bash sudo vim /etc/kubernetes/manifests/kube-apiserver.yaml ``` <!-- ```wait apiVersion``` --> ] .debug[[k8s/pod-security-policies.md](https://github.com/jpetazzo/container.training/tree/2026-05-enix/slides/k8s/pod-security-policies.md)] --- ## Adding the PSP admission plugin - There should already be a line with `--enable-admission-plugins=...` - Let's add `PodSecurityPolicy` on that line .lab[ - Locate the line with `--enable-admission-plugins=` - Add `PodSecurityPolicy` It should read: `--enable-admission-plugins=NodeRestriction,PodSecurityPolicy` - Save, quit <!-- ```keys /--enable-admission-plugins=``` ```key ^J``` ```key $``` ```keys a,PodSecurityPolicy``` ```key Escape``` ```keys :wq``` ```key ^J``` --> ] .debug[[k8s/pod-security-policies.md](https://github.com/jpetazzo/container.training/tree/2026-05-enix/slides/k8s/pod-security-policies.md)] --- ## Waiting for the API server to restart - The kubelet detects that the file was modified - It kills the API server pod, and starts a new one - During that time, the API server is unavailable .lab[ - Wait until the API server is available again ] .debug[[k8s/pod-security-policies.md](https://github.com/jpetazzo/container.training/tree/2026-05-enix/slides/k8s/pod-security-policies.md)] --- ## Check that the admission plugin is active - Normally, we can't create any Pod at this point .lab[ - Try to create a Pod directly: ```bash kubectl run testpsp1 --image=nginx --restart=Never ``` <!-- ```wait forbidden: no providers available``` --> - Try to create a Deployment: ```bash kubectl create deployment testpsp2 --image=nginx ``` - Look at existing resources: ```bash kubectl get all ``` ] We can get hints at what's happening by looking at the ReplicaSet and Events. .debug[[k8s/pod-security-policies.md](https://github.com/jpetazzo/container.training/tree/2026-05-enix/slides/k8s/pod-security-policies.md)] --- ## Introducing our Pod Security Policies - We will create two policies: - privileged (allows everything) - restricted (blocks some unsafe mechanisms) - For each policy, we also need an associated ClusterRole granting *use* .debug[[k8s/pod-security-policies.md](https://github.com/jpetazzo/container.training/tree/2026-05-enix/slides/k8s/pod-security-policies.md)] --- ## Creating our Pod Security Policies - We have a couple of files, each defining a PSP and associated ClusterRole: - k8s/psp-privileged.yaml: policy `privileged`, role `psp:privileged` - k8s/psp-restricted.yaml: policy `restricted`, role `psp:restricted` .lab[ - Create both policies and their associated ClusterRoles: ```bash kubectl create -f ~/container.training/k8s/psp-restricted.yaml kubectl create -f ~/container.training/k8s/psp-privileged.yaml ``` ] - The privileged policy comes from [the Kubernetes documentation](https://kubernetes.io/docs/concepts/policy/pod-security-policy/#example-policies) - The restricted policy is inspired by that same documentation page .debug[[k8s/pod-security-policies.md](https://github.com/jpetazzo/container.training/tree/2026-05-enix/slides/k8s/pod-security-policies.md)] --- ## Check that we can create Pods again - We haven't bound the policy to any user yet - But `cluster-admin` can implicitly `use` all policies .lab[ - Check that we can now create a Pod directly: ```bash kubectl run testpsp3 --image=nginx --restart=Never ``` - Create a Deployment as well: ```bash kubectl create deployment testpsp4 --image=nginx ``` - Confirm that the Deployment is *not* creating any Pods: ```bash kubectl get all ``` ] .debug[[k8s/pod-security-policies.md](https://github.com/jpetazzo/container.training/tree/2026-05-enix/slides/k8s/pod-security-policies.md)] --- ## What's going on? - We can create Pods directly (thanks to our root-like permissions) - The Pods corresponding to a Deployment are created by the ReplicaSet controller - The ReplicaSet controller does *not* have root-like permissions - We need to either: - grant permissions to the ReplicaSet controller *or* - grant permissions to our Pods' ServiceAccount - The first option would allow *anyone* to create pods - The second option will allow us to scope the permissions better .debug[[k8s/pod-security-policies.md](https://github.com/jpetazzo/container.training/tree/2026-05-enix/slides/k8s/pod-security-policies.md)] --- ## Binding the restricted policy - Let's bind the role `psp:restricted` to ServiceAccount `green:default` (aka the default ServiceAccount in the green Namespace) - This will allow Pod creation in the green Namespace (because these Pods will be using that ServiceAccount automatically) .lab[ - Create the following RoleBinding: ```bash kubectl create rolebinding psp:restricted \ --clusterrole=psp:restricted \ --serviceaccount=green:default ``` ] .debug[[k8s/pod-security-policies.md](https://github.com/jpetazzo/container.training/tree/2026-05-enix/slides/k8s/pod-security-policies.md)] --- ## Trying it out - The Deployments that we created earlier will *eventually* recover (the ReplicaSet controller will retry to create Pods once in a while) - If we create a new Deployment now, it should work immediately .lab[ - Create a simple Deployment: ```bash kubectl create deployment testpsp5 --image=nginx ``` - Look at the Pods that have been created: ```bash kubectl get all ``` ] .debug[[k8s/pod-security-policies.md](https://github.com/jpetazzo/container.training/tree/2026-05-enix/slides/k8s/pod-security-policies.md)] --- ## Trying to hack the cluster - Let's create the same DaemonSet we used earlier .lab[ - Create a hostile DaemonSet: ```bash kubectl create -f ~/container.training/k8s/hacktheplanet.yaml ``` - Look at the state of the namespace: ```bash kubectl get all ``` ] .debug[[k8s/pod-security-policies.md](https://github.com/jpetazzo/container.training/tree/2026-05-enix/slides/k8s/pod-security-policies.md)] --- class: extra-details ## What's in our restricted policy? - The restricted PSP is similar to the one provided in the docs, but: - it allows containers to run as root - it doesn't drop capabilities - Many containers run as root by default, and would require additional tweaks - Many containers use e.g. `chown`, which requires a specific capability (that's the case for the NGINX official image, for instance) - We still block: hostPath, privileged containers, and much more! .debug[[k8s/pod-security-policies.md](https://github.com/jpetazzo/container.training/tree/2026-05-enix/slides/k8s/pod-security-policies.md)] --- class: extra-details ## The case of static pods - If we list the pods in the `kube-system` namespace, `kube-apiserver` is missing - However, the API server is obviously running (otherwise, `kubectl get pods --namespace=kube-system` wouldn't work) - The API server Pod is created directly by kubelet (without going through the PSP admission plugin) - Then, kubelet creates a "mirror pod" representing that Pod in etcd - That "mirror pod" creation goes through the PSP admission plugin - And it gets blocked! - This can be fixed by binding `psp:privileged` to group `system:nodes` .debug[[k8s/pod-security-policies.md](https://github.com/jpetazzo/container.training/tree/2026-05-enix/slides/k8s/pod-security-policies.md)] --- ## .warning[Before moving on...] - Our cluster is currently broken (we can't create pods in namespaces kube-system, default, ...) - We need to either: - disable the PSP admission plugin - allow use of PSP to relevant users and groups - For instance, we could: - bind `psp:restricted` to the group `system:authenticated` - bind `psp:privileged` to the ServiceAccount `kube-system:default` .debug[[k8s/pod-security-policies.md](https://github.com/jpetazzo/container.training/tree/2026-05-enix/slides/k8s/pod-security-policies.md)] --- ## Fixing the cluster - Let's disable the PSP admission plugin .lab[ - Edit the Kubernetes API server static pod manifest - Remove the PSP admission plugin - This can be done with this one-liner: ```bash sudo sed -i s/,PodSecurityPolicy// /etc/kubernetes/manifests/kube-apiserver.yaml ``` ] ??? :EN:- Preventing privilege escalation with Pod Security Policies :FR:- Limiter les droits des conteneurs avec les *Pod Security Policies* .debug[[k8s/pod-security-policies.md](https://github.com/jpetazzo/container.training/tree/2026-05-enix/slides/k8s/pod-security-policies.md)] --- class: pic .interstitial[] --- name: toc-pod-security-admission class: title Pod Security Admission .nav[ [Previous part](#toc-pod-security-policies) | [Back to table of contents](#toc-part-2) | [Next part](#toc-upgrading-clusters) ] .debug[(automatically generated title slide)] --- # Pod Security Admission - "New" policies (available in alpha since Kubernetes 1.22, and GA since Kubernetes 1.25) - Easier to use (doesn't require complex interaction between policies and RBAC) .debug[[k8s/pod-security-admission.md](https://github.com/jpetazzo/container.training/tree/2026-05-enix/slides/k8s/pod-security-admission.md)] --- ## PSA in theory - Leans on PSS (Pod Security Standards) - Defines three policies: - `privileged` (can do everything; for system components) - `restricted` (no root user; almost no capabilities) - `baseline` (in-between with reasonable defaults) - Label namespaces to indicate which policies are allowed there - Also supports setting global defaults - Supports `enforce`, `audit`, and `warn` modes .debug[[k8s/pod-security-admission.md](https://github.com/jpetazzo/container.training/tree/2026-05-enix/slides/k8s/pod-security-admission.md)] --- ## Pod Security Standards - `privileged` - can do everything - `baseline` - disables hostNetwork, hostPID, hostIPC, hostPorts, hostPath volumes - limits which SELinux/AppArmor profiles can be used - containers can still run as root and use most capabilities - `restricted` - limits volumes to configMap, emptyDir, ephemeral, secret, PVC - containers can't run as root, only capability is NET_BIND_SERVICE - `baseline` (can't do privileged pods, hostPath, hostNetwork...) .debug[[k8s/pod-security-admission.md](https://github.com/jpetazzo/container.training/tree/2026-05-enix/slides/k8s/pod-security-admission.md)] --- class: extra-details ## Why `baseline` ≠ `restricted` ? - `baseline` = should work for that vast majority of images - `restricted` = better, but might break / require adaptation - Many images run as root by default - Some images use CAP_CHOWN (to `chown` files) - Some programs use CAP_NET_RAW (e.g. `ping`) .debug[[k8s/pod-security-admission.md](https://github.com/jpetazzo/container.training/tree/2026-05-enix/slides/k8s/pod-security-admission.md)] --- ## Namespace labels - Three optional labels can be added to namespaces: `pod-security.kubernetes.io/enforce` `pod-security.kubernetes.io/audit` `pod-security.kubernetes.io/warn` - The values can be: `baseline`, `restricted`, `privileged` (setting it to `privileged` doesn't really do anything) .debug[[k8s/pod-security-admission.md](https://github.com/jpetazzo/container.training/tree/2026-05-enix/slides/k8s/pod-security-admission.md)] --- ## `enforce`, `audit`, `warn` - `enforce` = prevents creation of pods - `warn` = allow creation but include a warning in the API response (will be visible e.g. in `kubectl` output) - `audit` = allow creation but generate an API audit event (will be visible if API auditing has been enabled and configured) .debug[[k8s/pod-security-admission.md](https://github.com/jpetazzo/container.training/tree/2026-05-enix/slides/k8s/pod-security-admission.md)] --- ## Blocking privileged pods - Let's block `privileged` pods everywhere - And issue warnings and audit for anything above the `restricted` level .lab[ - Set up the default policy for all namespaces: ```bash kubectl label namespaces \ pod-security.kubernetes.io/enforce=baseline \ pod-security.kubernetes.io/audit=restricted \ pod-security.kubernetes.io/warn=restricted \ --all ``` ] Note: warnings will be issued for infringing pods, but they won't be affected yet. .debug[[k8s/pod-security-admission.md](https://github.com/jpetazzo/container.training/tree/2026-05-enix/slides/k8s/pod-security-admission.md)] --- class: extra-details ## Check before you apply - When adding an `enforce` policy, we see warnings (for the pods that would infringe that policy) - It's possible to do a `--dry-run=server` to see these warnings (without applying the label) - It will only show warnings for `enforce` policies (not `warn` or `audit`) .debug[[k8s/pod-security-admission.md](https://github.com/jpetazzo/container.training/tree/2026-05-enix/slides/k8s/pod-security-admission.md)] --- ## Relaxing `kube-system` - We have many system components in `kube-system` - These pods aren't affected yet, but if there is a rolling update or something like that, the new pods won't be able to come up .lab[ - Let's allow `privileged` pods in `kube-system`: ```bash kubectl label namespace kube-system \ pod-security.kubernetes.io/enforce=privileged \ pod-security.kubernetes.io/audit=privileged \ pod-security.kubernetes.io/warn=privileged \ --overwrite ``` ] .debug[[k8s/pod-security-admission.md](https://github.com/jpetazzo/container.training/tree/2026-05-enix/slides/k8s/pod-security-admission.md)] --- ## What about new namespaces? - If new namespaces are created, they will get default permissions - What can we do about this? - make sure that whoever/whatever creates namespaces sets labels correctly? - use mutating policies to automatically add labels when namespaces are created? - change default permissions with an *admission configuration* file? - something else? - Question: is one of these options better/safer? .debug[[k8s/pod-security-admission.md](https://github.com/jpetazzo/container.training/tree/2026-05-enix/slides/k8s/pod-security-admission.md)] --- ## Access control - Kubernetes RBAC has a separate `create` permission - It is possible to let someone create a Namespace, but not change its labels (the latter would require `patch` or `update` permissions) - However, if someone can create a Namespace, they can set any labels at creation time - We can't control specific labels with RBAC, but we can do it with admission control (CEL policies, Kyverno...) - Conclusion: it's possible to let users create namespaces, but it requires tight controls .debug[[k8s/pod-security-admission.md](https://github.com/jpetazzo/container.training/tree/2026-05-enix/slides/k8s/pod-security-admission.md)] --- ## Alternative solution - Don't let users create namespaces directly - Delegate that to our CI/CD, gitops, ... and make sure *that* sets labels correctly - Or use a controller to create namespaces on our behalf (Example: https://github.com/jpetazzo/nsplease) .debug[[k8s/pod-security-admission.md](https://github.com/jpetazzo/container.training/tree/2026-05-enix/slides/k8s/pod-security-admission.md)] --- ## Admission configuration - Step 1: write an "admission configuration file" - Step 2: make sure that file is available to the API server - Step 3: add a flag to the API server to use that file *Note: this is done out of the box on some high-end, hardened distribution like Talos.* *If you are attending a live class, it might also have been done on your clusters.* *The next slides assume that you're using a vanilla kubeadm cluster.* .debug[[k8s/pod-security-admission.md](https://github.com/jpetazzo/container.training/tree/2026-05-enix/slides/k8s/pod-security-admission.md)] --- ## Admission Configuration Let's use [k8s/admission-configuration.yaml](https://github.com/jpetazzo/container.training/tree/main/k8s/admission-configuration.yaml): ```yaml apiVersion: apiserver.config.k8s.io/v1 kind: AdmissionConfiguration plugins: - name: PodSecurity configuration: apiVersion: pod-security.admission.config.k8s.io/v1alpha1 kind: PodSecurityConfiguration defaults: enforce: baseline audit: baseline warn: baseline exemptions: usernames: - cluster-admin namespaces: - kube-system ``` .debug[[k8s/pod-security-admission.md](https://github.com/jpetazzo/container.training/tree/2026-05-enix/slides/k8s/pod-security-admission.md)] --- ## Copy the file to the API server - We need the file to be available from the API server pod - For convenience, let's copy it do `/etc/kubernetes/pki` (it's definitely not where it *should* be, but that'll do!) .lab[ - Copy the file: ```bash sudo cp ~/container.training/k8s/admission-configuration.yaml \ /etc/kubernetes/pki ``` ] .debug[[k8s/pod-security-admission.md](https://github.com/jpetazzo/container.training/tree/2026-05-enix/slides/k8s/pod-security-admission.md)] --- ## Reconfigure the API server - We need to add a flag to the API server to use that file .lab[ - Make a backup copy of `/etc/kubernetes/manifests/kube-apiserver.yaml` (safety first!) - Edit the file; in the list of `command` parameters, add: `--admission-control-config-file=/etc/kubernetes/pki/admission-configuration.yaml` - Save the new file and wait until the API server comes back online ] .debug[[k8s/pod-security-admission.md](https://github.com/jpetazzo/container.training/tree/2026-05-enix/slides/k8s/pod-security-admission.md)] --- ## Test the new default policy - Create a new Namespace - Try to create the "hacktheplanet" DaemonSet in the new namespace - We get a warning when creating the DaemonSet - The DaemonSet is created - But the Pods don't get created .debug[[k8s/pod-security-admission.md](https://github.com/jpetazzo/container.training/tree/2026-05-enix/slides/k8s/pod-security-admission.md)] --- ## So, which solution is the best? - It depends! - If namespaces are exclusively created by admins and deployment pipelines: *make sure the pipelines set the labels properly* - If users need to be able to create arbitrary namespaces: *enable admission configuration and a validation rule to block security labels* - If you can't enable admission configuration (e.g. some managed clusters): *you can work around it with more complex mutation/validation rules* ??? :EN:- Preventing privilege escalation with Pod Security Admission :FR:- Limiter les droits des conteneurs avec *Pod Security Admission* .debug[[k8s/pod-security-admission.md](https://github.com/jpetazzo/container.training/tree/2026-05-enix/slides/k8s/pod-security-admission.md)] --- class: pic .interstitial[] --- name: toc-upgrading-clusters class: title Upgrading clusters .nav[ [Previous part](#toc-pod-security-admission) | [Back to table of contents](#toc-part-2) | [Next part](#toc-backing-up-clusters) ] .debug[(automatically generated title slide)] --- # Upgrading clusters **(Note: we won't do the labs for that section!)** - It's *recommended* to run consistent versions across a cluster (mostly to have feature parity and latest security updates) - It's not *mandatory* (otherwise, cluster upgrades would be a nightmare!) - Components can be upgraded one at a time without problems <!-- ##VERSION## --> .debug[[k8s/cluster-upgrade.md](https://github.com/jpetazzo/container.training/tree/2026-05-enix/slides/k8s/cluster-upgrade.md)] --- ## Checking what we're running - It's easy to check the version for the API server .lab[ - Log into node `oldversion1` - Check the version of kubectl and of the API server: ```bash kubectl version ``` ] - In a HA setup with multiple API servers, they can have different versions - Running the command above multiple times can return different values .debug[[k8s/cluster-upgrade.md](https://github.com/jpetazzo/container.training/tree/2026-05-enix/slides/k8s/cluster-upgrade.md)] --- ## Node versions - It's also easy to check the version of kubelet .lab[ - Check node versions (includes kubelet, kernel, container engine): ```bash kubectl get nodes -o wide ``` ] - Different nodes can run different kubelet versions - Different nodes can run different kernel versions - Different nodes can run different container engines .debug[[k8s/cluster-upgrade.md](https://github.com/jpetazzo/container.training/tree/2026-05-enix/slides/k8s/cluster-upgrade.md)] --- ## Control plane versions - If the control plane is self-hosted (running in pods), we can check it .lab[ - Show image versions for all pods in `kube-system` namespace: ```bash kubectl --namespace=kube-system get pods -o json \ | jq -r ' .items[] | [.spec.nodeName, .metadata.name] + (.spec.containers[].image | split(":")) | @tsv ' \ | column -t ``` ] .debug[[k8s/cluster-upgrade.md](https://github.com/jpetazzo/container.training/tree/2026-05-enix/slides/k8s/cluster-upgrade.md)] --- ## What version are we running anyway? - When I say, "I'm running Kubernetes 1.31", is that the version of: - kubectl - API server - kubelet - controller manager - something else? .debug[[k8s/cluster-upgrade.md](https://github.com/jpetazzo/container.training/tree/2026-05-enix/slides/k8s/cluster-upgrade.md)] --- ## Other versions that are important - etcd - kube-dns or CoreDNS - CNI plugin(s) - Network controller, network policy controller - Container engine - Linux kernel .debug[[k8s/cluster-upgrade.md](https://github.com/jpetazzo/container.training/tree/2026-05-enix/slides/k8s/cluster-upgrade.md)] --- ## Important questions - Should we upgrade the control plane before or after the kubelets? - Within the control plane, should we upgrade the API server first or last? - How often should we upgrade? - How long are versions maintained? - All the answers are in [the documentation about version skew policy](https://kubernetes.io/docs/setup/release/version-skew-policy/)! - Let's review the key elements together ... .debug[[k8s/cluster-upgrade.md](https://github.com/jpetazzo/container.training/tree/2026-05-enix/slides/k8s/cluster-upgrade.md)] --- ## Kubernetes uses semantic versioning - Kubernetes versions look like MAJOR.MINOR.PATCH; e.g. in 1.31.11: - MAJOR = 1 - MINOR = 31 - PATCH = 11 - It's always possible to mix and match different PATCH releases (e.g. 1.31.11 and 1.31.14 are compatible) - It is recommended to run the latest PATCH release (but it's mandatory only when there is a security advisory) .debug[[k8s/cluster-upgrade.md](https://github.com/jpetazzo/container.training/tree/2026-05-enix/slides/k8s/cluster-upgrade.md)] --- ## Version skew - API server must be more recent than its clients (kubelet and control plane) - ... Which means it must always be upgraded first - All components support a difference of one¹ MINOR version - This allows live upgrades (since we can mix e.g. 1.31 and 1.32) - It also means that going from 1.31 to 1.33 requires going through 1.32 .footnote[¹Except kubelet, which can be up to two MINOR behind API server, and kubectl, which can be one MINOR ahead or behind API server.] .debug[[k8s/cluster-upgrade.md](https://github.com/jpetazzo/container.training/tree/2026-05-enix/slides/k8s/cluster-upgrade.md)] --- ## Release cycle - There is a new PATCH relese whenever necessary (every few weeks, or "ASAP" when there is a security vulnerability) - There is a new MINOR release every 3 months (approximately) - At any given time, three MINOR releases are maintained - ... Which means that MINOR releases are maintained approximately 9 months - We should expect to upgrade at least every 3 months (on average) .debug[[k8s/cluster-upgrade.md](https://github.com/jpetazzo/container.training/tree/2026-05-enix/slides/k8s/cluster-upgrade.md)] --- ## General guidelines - To update a component, use whatever was used to install it - If it's a distro package, update that distro package - If it's a container or pod, update that container or pod - If you used configuration management, update with that .debug[[k8s/cluster-upgrade.md](https://github.com/jpetazzo/container.training/tree/2026-05-enix/slides/k8s/cluster-upgrade.md)] --- ## Know where your binaries come from - Sometimes, we need to upgrade *quickly* (when a vulnerability is announced and patched) - If we are using an installer, we should: - make sure it's using upstream packages - or make sure that whatever packages it uses are current - make sure we can tell it to pin specific component versions .debug[[k8s/cluster-upgrade.md](https://github.com/jpetazzo/container.training/tree/2026-05-enix/slides/k8s/cluster-upgrade.md)] --- ## In practice - We are going to update a few cluster components - We will change the kubelet version on one node - We will change the version of the API server - We will work with cluster `oldversion` (nodes `oldversion1`, `oldversion2`, `oldversion3`) .debug[[k8s/cluster-upgrade.md](https://github.com/jpetazzo/container.training/tree/2026-05-enix/slides/k8s/cluster-upgrade.md)] --- ## Updating the API server - This cluster has been deployed with kubeadm - The control plane runs in *static pods* - These pods are started automatically by kubelet (even when kubelet can't contact the API server) - They are defined in YAML files in `/etc/kubernetes/manifests` (this path is set by a kubelet command-line flag) - kubelet automatically updates the pods when the files are changed .debug[[k8s/cluster-upgrade.md](https://github.com/jpetazzo/container.training/tree/2026-05-enix/slides/k8s/cluster-upgrade.md)] --- ## Changing the API server version - We will edit the YAML file to use a different image version .lab[ - Log into node `oldversion1` - Check API server version: ```bash kubectl version ``` - Edit the API server pod manifest: ```bash sudo vim /etc/kubernetes/manifests/kube-apiserver.yaml ``` - Look for the `image:` line, and update it to e.g. `v1.35.0` ] .debug[[k8s/cluster-upgrade.md](https://github.com/jpetazzo/container.training/tree/2026-05-enix/slides/k8s/cluster-upgrade.md)] --- ## Checking what we've done - The API server will be briefly unavailable while kubelet restarts it .lab[ - Check the API server version: ```bash kubectl version ``` ] .debug[[k8s/cluster-upgrade.md](https://github.com/jpetazzo/container.training/tree/2026-05-enix/slides/k8s/cluster-upgrade.md)] --- ## Was that a good idea? -- **No!** -- - Remember the guideline we gave earlier: *To update a component, use whatever was used to install it.* - This control plane was deployed with kubeadm - We should use kubeadm to upgrade it! .debug[[k8s/cluster-upgrade.md](https://github.com/jpetazzo/container.training/tree/2026-05-enix/slides/k8s/cluster-upgrade.md)] --- ## Updating the whole control plane - Let's make it right, and use kubeadm to upgrade the entire control plane (note: this is possible only because the cluster was installed with kubeadm) .lab[ - Check what will be upgraded: ```bash sudo kubeadm upgrade plan ``` ] Note 1: kubeadm thinks that our cluster is running 1.35.0. <br/>It is confused by our manual upgrade of the API server! Note 2: kubeadm itself is still version 1.31.11.. <br/>It doesn't know how to upgrade to higher versions. .debug[[k8s/cluster-upgrade.md](https://github.com/jpetazzo/container.training/tree/2026-05-enix/slides/k8s/cluster-upgrade.md)] --- ## Upgrading kubeadm - First things first: we need to upgrade kubeadm - The Kubernetes package repositories are now split by minor versions (i.e. there is one repository for 1.31, another for 1.32, etc.) - This avoids accidentally upgrading from one minor version to another (e.g. with unattended upgrades or if packages haven't been held/pinned) - We'll need to add the new package repository and unpin packages! .debug[[k8s/cluster-upgrade.md](https://github.com/jpetazzo/container.training/tree/2026-05-enix/slides/k8s/cluster-upgrade.md)] --- ## Installing the new packages - Edit `/etc/apt/sources.list.d/kubernetes.list` (or copy it to e.g. `kubernetes-new.list` and edit that) - `apt-get update` - Now edit (or remove) `/etc/apt/preferences.d/kubernetes` - `apt-get install kubeadm` should now upgrade `kubeadm` correctly! 🎉 .debug[[k8s/cluster-upgrade.md](https://github.com/jpetazzo/container.training/tree/2026-05-enix/slides/k8s/cluster-upgrade.md)] --- ## Reverting our manual API server upgrade - First, we should revert our `image:` change (so that kubeadm executes the right migration steps) .lab[ - Edit the API server pod manifest: ```bash sudo vim /etc/kubernetes/manifests/kube-apiserver.yaml ``` - Look for the `image:` line, and restore it to the original value (e.g. `v1.31.11`) - Wait for the control plane to come back up ] .debug[[k8s/cluster-upgrade.md](https://github.com/jpetazzo/container.training/tree/2026-05-enix/slides/k8s/cluster-upgrade.md)] --- ## Upgrading the cluster with kubeadm - Now we can let kubeadm do its job! .lab[ - Check the upgrade plan: ```bash sudo kubeadm upgrade plan ``` - Perform the upgrade: ```bash sudo kubeadm upgrade apply v1.32.0 ``` ] .debug[[k8s/cluster-upgrade.md](https://github.com/jpetazzo/container.training/tree/2026-05-enix/slides/k8s/cluster-upgrade.md)] --- ## Updating kubelet - These nodes have been installed using the official Kubernetes packages - We can therefore use `apt` or `apt-get` .lab[ - Log into node `oldversion2` - Update package lists and APT pins like we did before - Then upgrade kubelet ] .debug[[k8s/cluster-upgrade.md](https://github.com/jpetazzo/container.training/tree/2026-05-enix/slides/k8s/cluster-upgrade.md)] --- ## Checking what we've done .lab[ - Log into node `oldversion1` - Check node versions: ```bash kubectl get nodes -o wide ``` - Create a deployment and scale it to make sure that the node still works ] .debug[[k8s/cluster-upgrade.md](https://github.com/jpetazzo/container.training/tree/2026-05-enix/slides/k8s/cluster-upgrade.md)] --- ## Was that a good idea? -- **Almost!** -- - Yes, kubelet was installed with distribution packages - However, kubeadm took care of configuring kubelet (when doing `kubeadm join ...`) - We were supposed to run a special command *before* upgrading kubelet! - That command should be executed on each node - It will download the kubelet configuration generated by kubeadm .debug[[k8s/cluster-upgrade.md](https://github.com/jpetazzo/container.training/tree/2026-05-enix/slides/k8s/cluster-upgrade.md)] --- ## Upgrading kubelet the right way - We need to upgrade kubeadm, upgrade kubelet config, then upgrade kubelet (after upgrading the control plane) .lab[ - Execute the whole upgrade procedure on each node: ```bash for N in 1 2 3; do ssh oldversion$N " sudo sed -i s/1.31/1.32/ /etc/apt/sources.list.d/kubernetes.list && sudo rm /etc/apt/preferences.d/kubernetes && sudo apt update && sudo apt install kubeadm -y && sudo kubeadm upgrade node && sudo apt install kubelet -y" done ``` ] .debug[[k8s/cluster-upgrade.md](https://github.com/jpetazzo/container.training/tree/2026-05-enix/slides/k8s/cluster-upgrade.md)] --- ## Checking what we've done - All our nodes should now be updated to version 1.32 .lab[ - Check nodes versions: ```bash kubectl get nodes -o wide ``` ] .debug[[k8s/cluster-upgrade.md](https://github.com/jpetazzo/container.training/tree/2026-05-enix/slides/k8s/cluster-upgrade.md)] --- ## And now, was that a good idea? -- **Almost!** -- - The official recommendation is to *drain* a node before performing node maintenance (migrate all workloads off the node before upgrading it) - How do we do that? - Is it really necessary? - Let's see! .debug[[k8s/cluster-upgrade.md](https://github.com/jpetazzo/container.training/tree/2026-05-enix/slides/k8s/cluster-upgrade.md)] --- ## Draining a node - This can be achieved with the `kubectl drain` command, which will: - *cordon* the node (prevent new pods from being scheduled there) - *evict* all the pods running on the node (delete them gracefully) - the evicted pods will automatically be recreated somewhere else - evictions might be blocked in some cases (Pod Disruption Budgets, `emptyDir` volumes) - Once the node is drained, it can safely be upgraded, restarted... - Once it's ready, it can be put back in commission with `kubectl uncordon` .debug[[k8s/cluster-upgrade.md](https://github.com/jpetazzo/container.training/tree/2026-05-enix/slides/k8s/cluster-upgrade.md)] --- ## Is it necessary? - When upgrading kubelet from one patch-level version to another: - it's *probably fine* - When upgrading system packages: - it's *probably fine* - except [when it's not][datadog-systemd-outage] - When upgrading the kernel: - it's *probably fine* - ...as long as we can tolerate a restart of the containers on the node - ...and that they will be unavailable for a few minutes (during the reboot) [datadog-systemd-outage]: https://www.datadoghq.com/blog/engineering/2023-03-08-deep-dive-into-platform-level-impact/ .debug[[k8s/cluster-upgrade.md](https://github.com/jpetazzo/container.training/tree/2026-05-enix/slides/k8s/cluster-upgrade.md)] --- ## Is it necessary? - When upgrading kubelet from one minor version to another: - it *may or may not be fine* - in some cases (e.g. migrating from Docker to containerd) it *will not* - Here's what [the documentation][node-upgrade-docs] says: *Draining nodes before upgrading kubelet ensures that pods are re-admitted and containers are re-created, which may be necessary to resolve some security issues or other important bugs.* - Do it at your own risk, and if you do, test extensively in staging environments! [node-upgrade-docs]: https://kubernetes.io/docs/tasks/administer-cluster/cluster-upgrade/#manual-deployments .debug[[k8s/cluster-upgrade.md](https://github.com/jpetazzo/container.training/tree/2026-05-enix/slides/k8s/cluster-upgrade.md)] --- ## Database operators to the rescue - Moving stateful pods (e.g.: database server) can cause downtime - Database replication can help: - if a node contains database servers, we make sure these servers aren't primaries - if they are primaries, we execute a *switch over* - Some database operators (e.g. [CNPG]) will do that switch over automatically (when they detect that a node has been *cordoned*) [CNPG]: https://cloudnative-pg.io/ .debug[[k8s/cluster-upgrade.md](https://github.com/jpetazzo/container.training/tree/2026-05-enix/slides/k8s/cluster-upgrade.md)] --- class: extra-details ## Skipping versions - This example worked because we went from 1.31 to 1.32 - If you are upgrading from e.g. 1.26, you will have to go through 1.27 first - This means upgrading kubeadm to 1.27.X, then using it to upgrade the cluster - Then upgrading kubeadm to 1.28.X, etc. - **Make sure to read the release notes before upgrading!** ??? :EN:- Best practices for cluster upgrades :EN:- Example: upgrading a kubeadm cluster :FR:- Bonnes pratiques pour la mise à jour des clusters :FR:- Exemple : mettre à jour un cluster kubeadm .debug[[k8s/cluster-upgrade.md](https://github.com/jpetazzo/container.training/tree/2026-05-enix/slides/k8s/cluster-upgrade.md)] --- class: pic .interstitial[] --- name: toc-backing-up-clusters class: title Backing up clusters .nav[ [Previous part](#toc-upgrading-clusters) | [Back to table of contents](#toc-part-2) | [Next part](#toc-) ] .debug[(automatically generated title slide)] --- # Backing up clusters **(Note: we won't do the labs for that section!)** - Backups can have multiple purposes: - disaster recovery (servers or storage are destroyed or unreachable) - error recovery (human or process has altered or corrupted data) - cloning environments (for testing, validation...) - Let's see the strategies and tools available with Kubernetes! .debug[[k8s/cluster-backup.md](https://github.com/jpetazzo/container.training/tree/2026-05-enix/slides/k8s/cluster-backup.md)] --- ## Important - Kubernetes helps us with disaster recovery (it gives us replication primitives) - Kubernetes helps us clone / replicate environments (all resources can be described with manifests) - Kubernetes *does not* help us with error recovery - We still need to back up/snapshot our data: - with database backups (mysqldump, pgdump, etc.) - and/or snapshots at the storage layer - and/or traditional full disk backups .debug[[k8s/cluster-backup.md](https://github.com/jpetazzo/container.training/tree/2026-05-enix/slides/k8s/cluster-backup.md)] --- ## In a perfect world ... - The deployment of our Kubernetes clusters is automated (recreating a cluster takes less than a minute of human time) - All the resources (Deployments, Services...) on our clusters are under version control (never use `kubectl run`; always apply YAML files coming from a repository) - Stateful components are either: - stored on systems with regular snapshots - backed up regularly to an external, durable storage - outside of Kubernetes .debug[[k8s/cluster-backup.md](https://github.com/jpetazzo/container.training/tree/2026-05-enix/slides/k8s/cluster-backup.md)] --- ## Kubernetes cluster deployment - If our deployment system isn't fully automated, it should at least be documented - Litmus test: how long does it take to deploy a cluster... - for a senior engineer? - for a new hire? - Does it require external intervention? (e.g. provisioning servers, signing TLS certs...) .debug[[k8s/cluster-backup.md](https://github.com/jpetazzo/container.training/tree/2026-05-enix/slides/k8s/cluster-backup.md)] --- ## Plan B - Full machine backups of the control plane can help - If the control plane is in pods (or containers), pay attention to storage drivers (if the backup mechanism is not container-aware, the backups can take way more resources than they should, or even be unusable!) - If the previous sentence worries you: **automate the deployment of your clusters!** .debug[[k8s/cluster-backup.md](https://github.com/jpetazzo/container.training/tree/2026-05-enix/slides/k8s/cluster-backup.md)] --- ## Managing our Kubernetes resources - Ideal scenario: - never create a resource directly on a cluster - push to a code repository - a special branch (`production` or even `master`) gets automatically deployed - Some folks call this "GitOps" (it's the logical evolution of configuration management and infrastructure as code) .debug[[k8s/cluster-backup.md](https://github.com/jpetazzo/container.training/tree/2026-05-enix/slides/k8s/cluster-backup.md)] --- ## GitOps in theory - What do we keep in version control? - For very simple scenarios: source code, Dockerfiles, scripts - For real applications: add resources (as YAML files) - For applications deployed multiple times: Helm, Kustomize... (staging and production count as "multiple times") .debug[[k8s/cluster-backup.md](https://github.com/jpetazzo/container.training/tree/2026-05-enix/slides/k8s/cluster-backup.md)] --- ## GitOps tooling - Various tools exist (Weave Flux, GitKube...) - These tools are still very young - You still need to write YAML for all your resources - There is no tool to: - list *all* resources in a namespace - get resource YAML in a canonical form - diff YAML descriptions with current state .debug[[k8s/cluster-backup.md](https://github.com/jpetazzo/container.training/tree/2026-05-enix/slides/k8s/cluster-backup.md)] --- ## GitOps in practice - Start describing your resources with YAML - Leverage a tool like Kustomize or Helm - Make sure that you can easily deploy to a new namespace (or even better: to a new cluster) - When tooling matures, you will be ready .debug[[k8s/cluster-backup.md](https://github.com/jpetazzo/container.training/tree/2026-05-enix/slides/k8s/cluster-backup.md)] --- ## Plan B - What if we can't describe everything with YAML? - What if we manually create resources and forget to commit them to source control? - What about global resources, that don't live in a namespace? - How can we be sure that we saved *everything*? .debug[[k8s/cluster-backup.md](https://github.com/jpetazzo/container.training/tree/2026-05-enix/slides/k8s/cluster-backup.md)] --- ## Backing up etcd - All objects are saved in etcd - etcd data should be relatively small (and therefore, quick and easy to back up) - Two options to back up etcd: - snapshot the data directory - use `etcdctl snapshot` .debug[[k8s/cluster-backup.md](https://github.com/jpetazzo/container.training/tree/2026-05-enix/slides/k8s/cluster-backup.md)] --- ## Making an etcd snapshot - The basic command is simple: ```bash etcdctl snapshot save <filename> ``` - But we also need to specify: - the address of the server to back up - the path to the key, certificate, and CA certificate <br/>(if our etcd uses TLS certificates) - an environment variable to specify that we want etcdctl v3 <br/>(not necessary anymore with recent versions of etcd) .debug[[k8s/cluster-backup.md](https://github.com/jpetazzo/container.training/tree/2026-05-enix/slides/k8s/cluster-backup.md)] --- ## Snapshotting etcd on kubeadm - Here is a strategy that works on clusters deployed with kubeadm (and maybe others) - We're going to: - identify a node running the control plane - identify the etcd image - execute `etcdctl snapshot` in a *debug container* - transfer the resulting snapshot with another *debug container* .debug[[k8s/cluster-backup.md](https://github.com/jpetazzo/container.training/tree/2026-05-enix/slides/k8s/cluster-backup.md)] --- ## Finding an etcd node and image These commands let us retrieve the node and image automatically. .lab[ - Get the name of a control plane node: ```bash NODE=$(kubectl get nodes \ --selector=node-role.kubernetes.io/control-plane \ -o jsonpath={.items[0].metadata.name}) ``` - Get the etcd image: ```bash IMAGE=$(kubectl get pods --namespace kube-system etcd-$NODE \ -o jsonpath={..containers[].image}) ``` ] .debug[[k8s/cluster-backup.md](https://github.com/jpetazzo/container.training/tree/2026-05-enix/slides/k8s/cluster-backup.md)] --- ## Making a snapshot This relies on the fact that in a `node` debug pod: - the host filesystem is mounted in `/host`, - the debug pod is using the host's network. .lab[ - Execute `etcdctl` in a debug pod: ```bash kubectl debug --attach --profile=general \ node/$NODE --image $IMAGE -- \ etcdctl --endpoints=https://[127.0.0.1]:2379 \ --cacert=/host/etc/kubernetes/pki/etcd/ca.crt \ --cert=/host/etc/kubernetes/pki/etcd/healthcheck-client.crt \ --key=/host/etc/kubernetes/pki/etcd/healthcheck-client.key \ snapshot save /host/tmp/snapshot ``` ] .debug[[k8s/cluster-backup.md](https://github.com/jpetazzo/container.training/tree/2026-05-enix/slides/k8s/cluster-backup.md)] --- ## Transfer the snapshot We're going to use base64 encoding to ensure that the snapshot doesn't get corrupted in transit. .lab[ - Retrieve the snapshot: ```bash kubectl debug --attach --profile=general --quiet \ node/$NODE --image $IMAGE -- \ base64 /host/tmp/snapshot | base64 -d > snapshot ``` ] We can now work with the `snapshot` file in the current directory! .debug[[k8s/cluster-backup.md](https://github.com/jpetazzo/container.training/tree/2026-05-enix/slides/k8s/cluster-backup.md)] --- ## Restoring an etcd snapshot - ~~Execute exactly the same command, but replacing `save` with `restore`~~ (Believe it or not, doing that will *not* do anything useful!) - The `restore` command does *not* load a snapshot into a running etcd server - The `restore` command creates a new data directory from the snapshot (it's an offline operation; it doesn't interact with an etcd server) - It will create a new data directory in a temporary container (leaving the running etcd node untouched) .debug[[k8s/cluster-backup.md](https://github.com/jpetazzo/container.training/tree/2026-05-enix/slides/k8s/cluster-backup.md)] --- ## When using kubeadm 1. Create a new data directory from the snapshot: ```bash sudo rm -rf /var/lib/etcd docker run --rm -v /var/lib:/var/lib -v $PWD:/vol $IMAGE \ etcdctl snapshot restore /vol/snapshot --data-dir=/var/lib/etcd ``` 2. Provision the control plane, using that data directory: ```bash sudo kubeadm init \ --ignore-preflight-errors=DirAvailable--var-lib-etcd ``` 3. Rejoin the other nodes .debug[[k8s/cluster-backup.md](https://github.com/jpetazzo/container.training/tree/2026-05-enix/slides/k8s/cluster-backup.md)] --- ## The fine print - This only saves etcd state - It **does not** save persistent volumes and local node data - Some critical components (like the pod network) might need to be reset - As a result, our pods might have to be recreated, too - If we have proper liveness checks, this should happen automatically .debug[[k8s/cluster-backup.md](https://github.com/jpetazzo/container.training/tree/2026-05-enix/slides/k8s/cluster-backup.md)] --- ## Accessing etcd directly - Data in etcd is encoded in a binary format - We can retrieve the data with etcdctl, but it's hard to read - There is a tool to decode that data: `auger` - Check the [use cases][auger-use-cases] for an example of how to retrieve and modify etcd data! [auger-use-cases]: https://github.com/etcd-io/auger?tab=readme-ov-file#use-cases .debug[[k8s/cluster-backup.md](https://github.com/jpetazzo/container.training/tree/2026-05-enix/slides/k8s/cluster-backup.md)] --- ## More information about etcd backups - [Kubernetes documentation](https://kubernetes.io/docs/tasks/administer-cluster/configure-upgrade-etcd/#built-in-snapshot) about etcd backups - [etcd documentation](https://coreos.com/etcd/docs/latest/op-guide/recovery.html#snapshotting-the-keyspace) about snapshots and restore - [A good blog post by elastisys](https://elastisys.com/2018/12/10/backup-kubernetes-how-and-why/) explaining how to restore a snapshot - [Another good blog post by consol labs](https://labs.consol.de/kubernetes/2018/05/25/kubeadm-backup.html) on the same topic - [auger](https://github.com/etcd-io/auger), a tool to directly access Kubernetes objects stored in etcd .debug[[k8s/cluster-backup.md](https://github.com/jpetazzo/container.training/tree/2026-05-enix/slides/k8s/cluster-backup.md)] --- ## Don't forget ... - Also back up the TLS information (at the very least: CA key and cert; API server key and cert) - With clusters provisioned by kubeadm, this is in `/etc/kubernetes/pki` - If you don't: - you will still be able to restore etcd state and bring everything back up - you will need to redistribute user certificates .warning[**TLS information is highly sensitive! <br/>Anyone who has it has full access to your cluster!**] .debug[[k8s/cluster-backup.md](https://github.com/jpetazzo/container.training/tree/2026-05-enix/slides/k8s/cluster-backup.md)] --- ## Stateful services - It's totally fine to keep your production databases outside of Kubernetes *Especially if you have only one database server!* - Feel free to put development and staging databases on Kubernetes (as long as they don't hold important data) - Using Kubernetes for stateful services makes sense if you have *many* (because then you can leverage Kubernetes automation) .debug[[k8s/cluster-backup.md](https://github.com/jpetazzo/container.training/tree/2026-05-enix/slides/k8s/cluster-backup.md)] --- ## Snapshotting persistent volumes - Option 1: snapshot volumes out of band (with the API/CLI/GUI of our SAN/cloud/...) - Option 2: storage system integration (e.g. [Portworx](https://docs.portworx.com/portworx-install-with-kubernetes/storage-operations/create-snapshots/) can [create snapshots through annotations](https://docs.portworx.com/portworx-install-with-kubernetes/storage-operations/create-snapshots/snaps-annotations/#taking-periodic-snapshots-on-a-running-pod)) - Option 3: [snapshots through Kubernetes API](https://kubernetes.io/docs/concepts/storage/volume-snapshots/) (Generally available since Kuberentes 1.20 for a number of [CSI](https://kubernetes.io/blog/2019/01/15/container-storage-interface-ga/) volume plugins : GCE, OpenSDS, Ceph, Portworx, etc) .debug[[k8s/cluster-backup.md](https://github.com/jpetazzo/container.training/tree/2026-05-enix/slides/k8s/cluster-backup.md)] --- ## More backup tools - [Stash](https://stash.run/) back up Kubernetes persistent volumes - ~~Heptio Ark~~ [Velero](https://velero.io/) full cluster backup - [kube-backup](https://github.com/pieterlange/kube-backup) (unmaintained) simple scripts to save resource YAML to a git repository - [bivac](https://github.com/camptocamp/bivac) Backup Interface for Volumes Attached to Containers - [Veeam Kasten](https://www.veeam.com/products/cloud/kubernetes-data-protection.html) commercial product; compares to Velero ??? :EN:- Backing up clusters :FR:- Politiques de sauvegarde .debug[[k8s/cluster-backup.md](https://github.com/jpetazzo/container.training/tree/2026-05-enix/slides/k8s/cluster-backup.md)]